For partners · 22 min read
Connect Mediery to an AI client with MCP
Connect Mediery to ChatGPT, Claude, Codex, Cursor, or OpenCode with OAuth or an API key.
Mediery’s MCP server lets a supported AI client work with your business data and tools. Access is limited to your partner account, and every call uses your MCP allowance or prepaid token wallet.
Enable Mediery MCP
- 1Open AI Add-ons in the Partner Console at /client-dashboard/addons.
- 2Find “Mediery MCP Server” and choose Enable. If the card is locked, your current plan does not include MCP access.
- 3Open MCP in the sidebar. You can also go directly to /client-dashboard/mcp.
- 4Keep Mediery MCP Server enabled while you use any connected client. The web and Claude Desktop guides below authorize through OAuth; the other clients use an API key.
Enabling and disabling MCP
MCP must remain enabled in AI Add-ons while you use connected clients. Disabling Mediery MCP Server immediately suspends API-key management and every MCP connection, but it does not delete or revoke your existing keys. Re-enable the add-on to restore those keys and reconnect your clients.
Mediery MCP server URL
Use this Streamable HTTP endpoint in your client configuration:
https://api.mediery.com/mcpChatGPT (web)
Open https://chatgpt.com and sign in. ChatGPT connects to Mediery through OAuth, so you do not need to create or paste an API key.
- 1
Click your profile in the lower-left corner, then choose Settings.
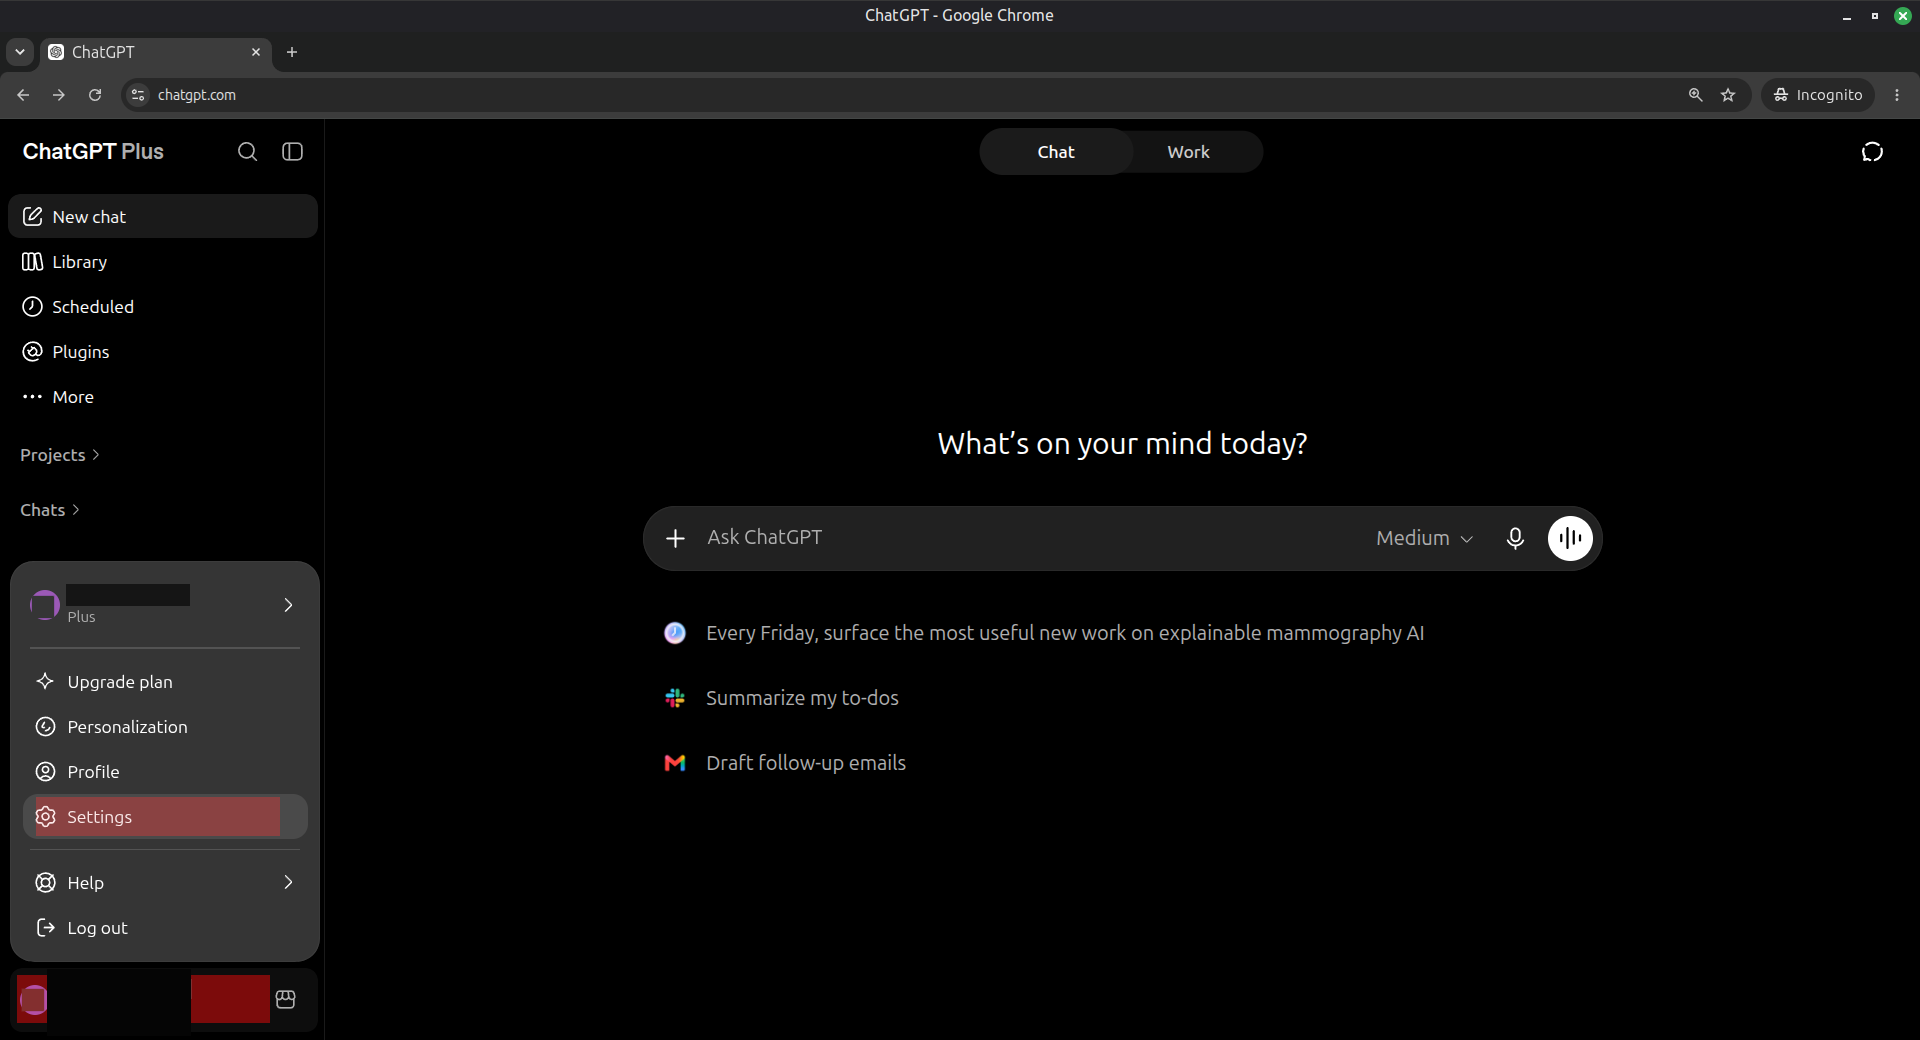
Open ChatGPT settings. - 2
Select Security and login.
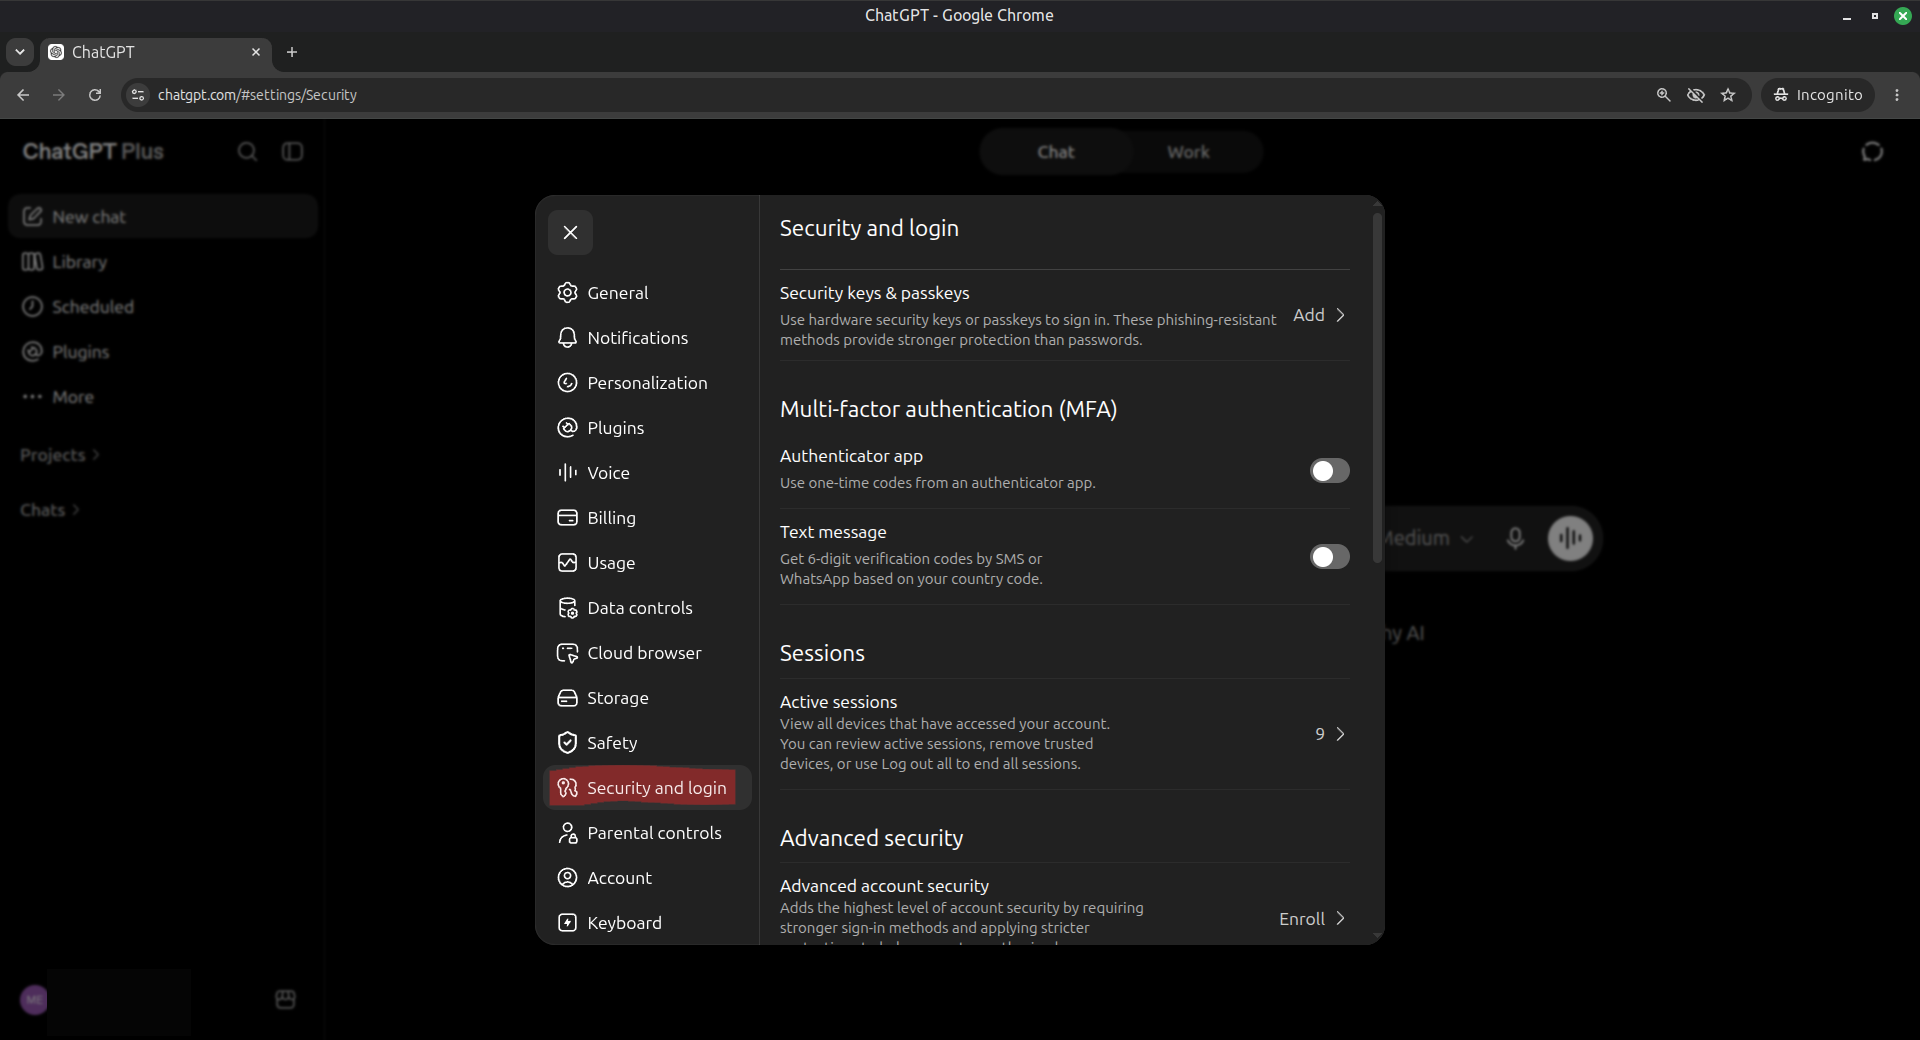
Open Security and login. - 3
Scroll to Developer mode and enable it.
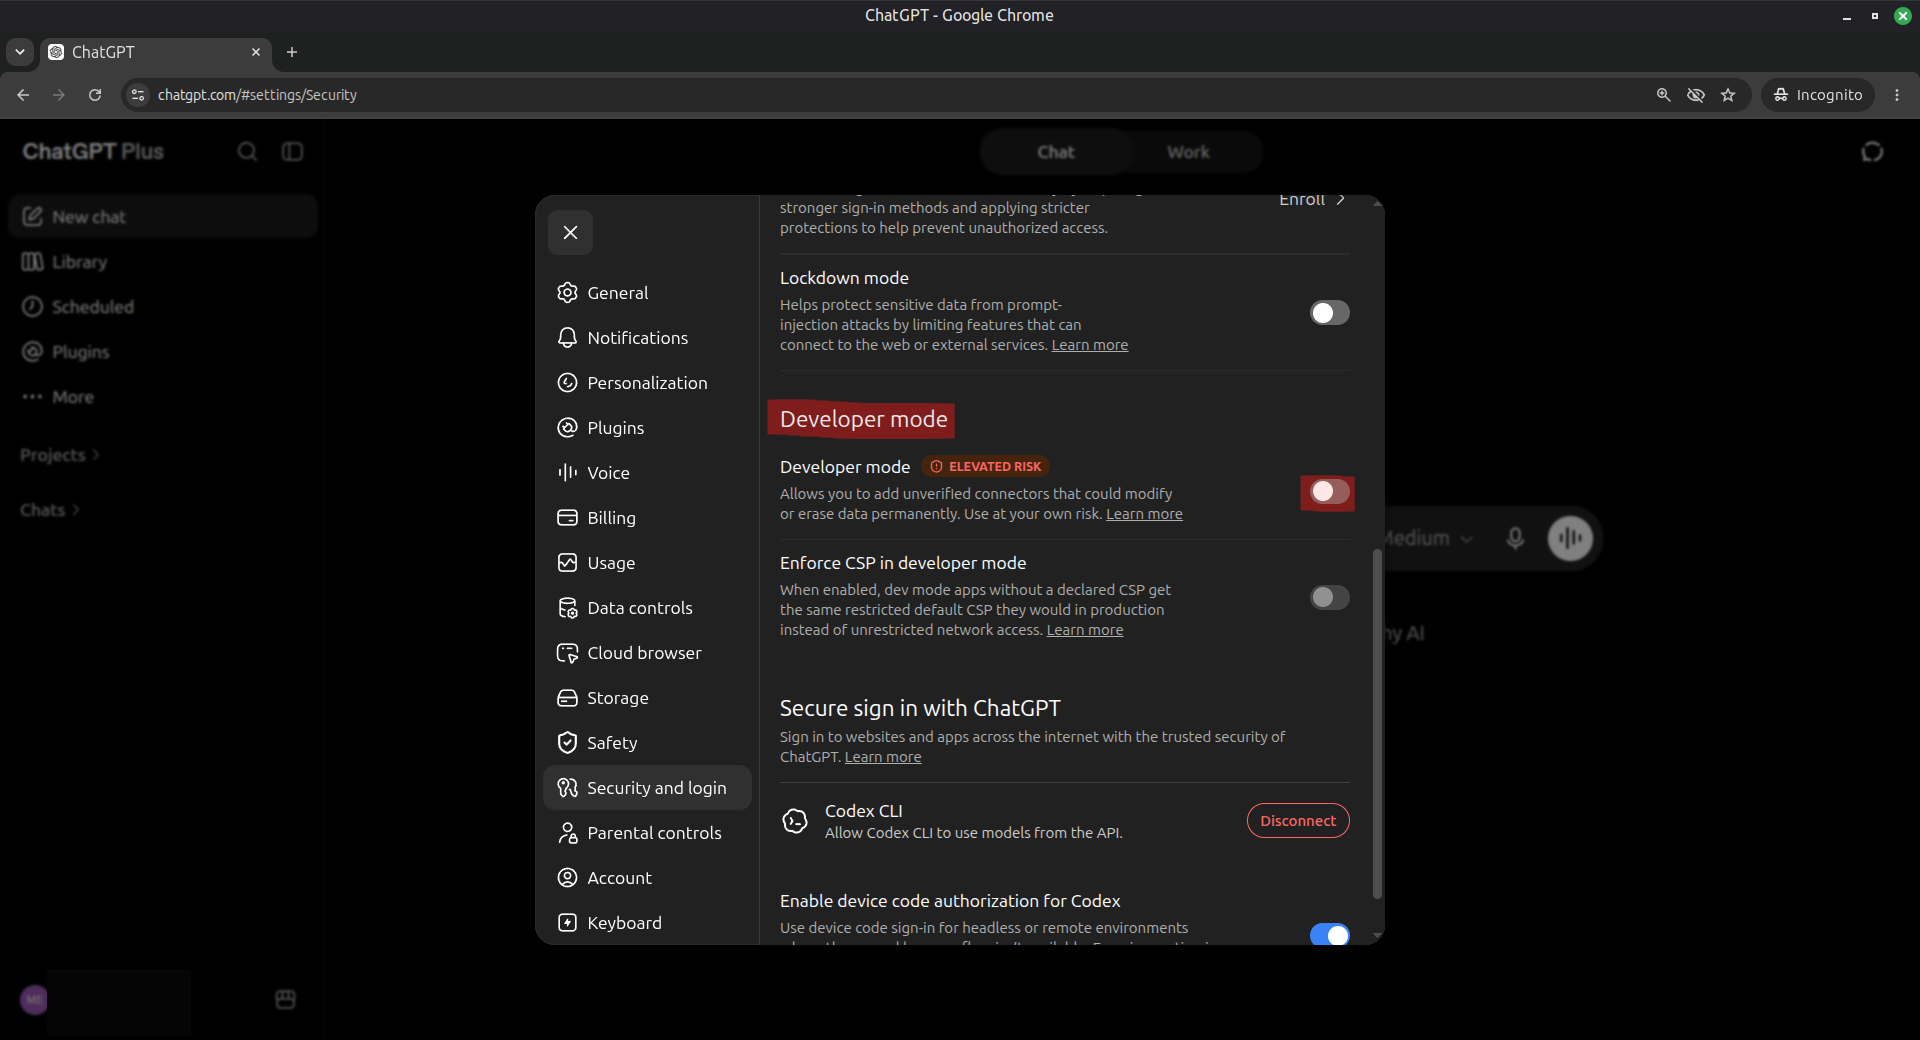
Enable Developer mode. - 4
Confirm that the Developer mode switch is on, then close Settings.
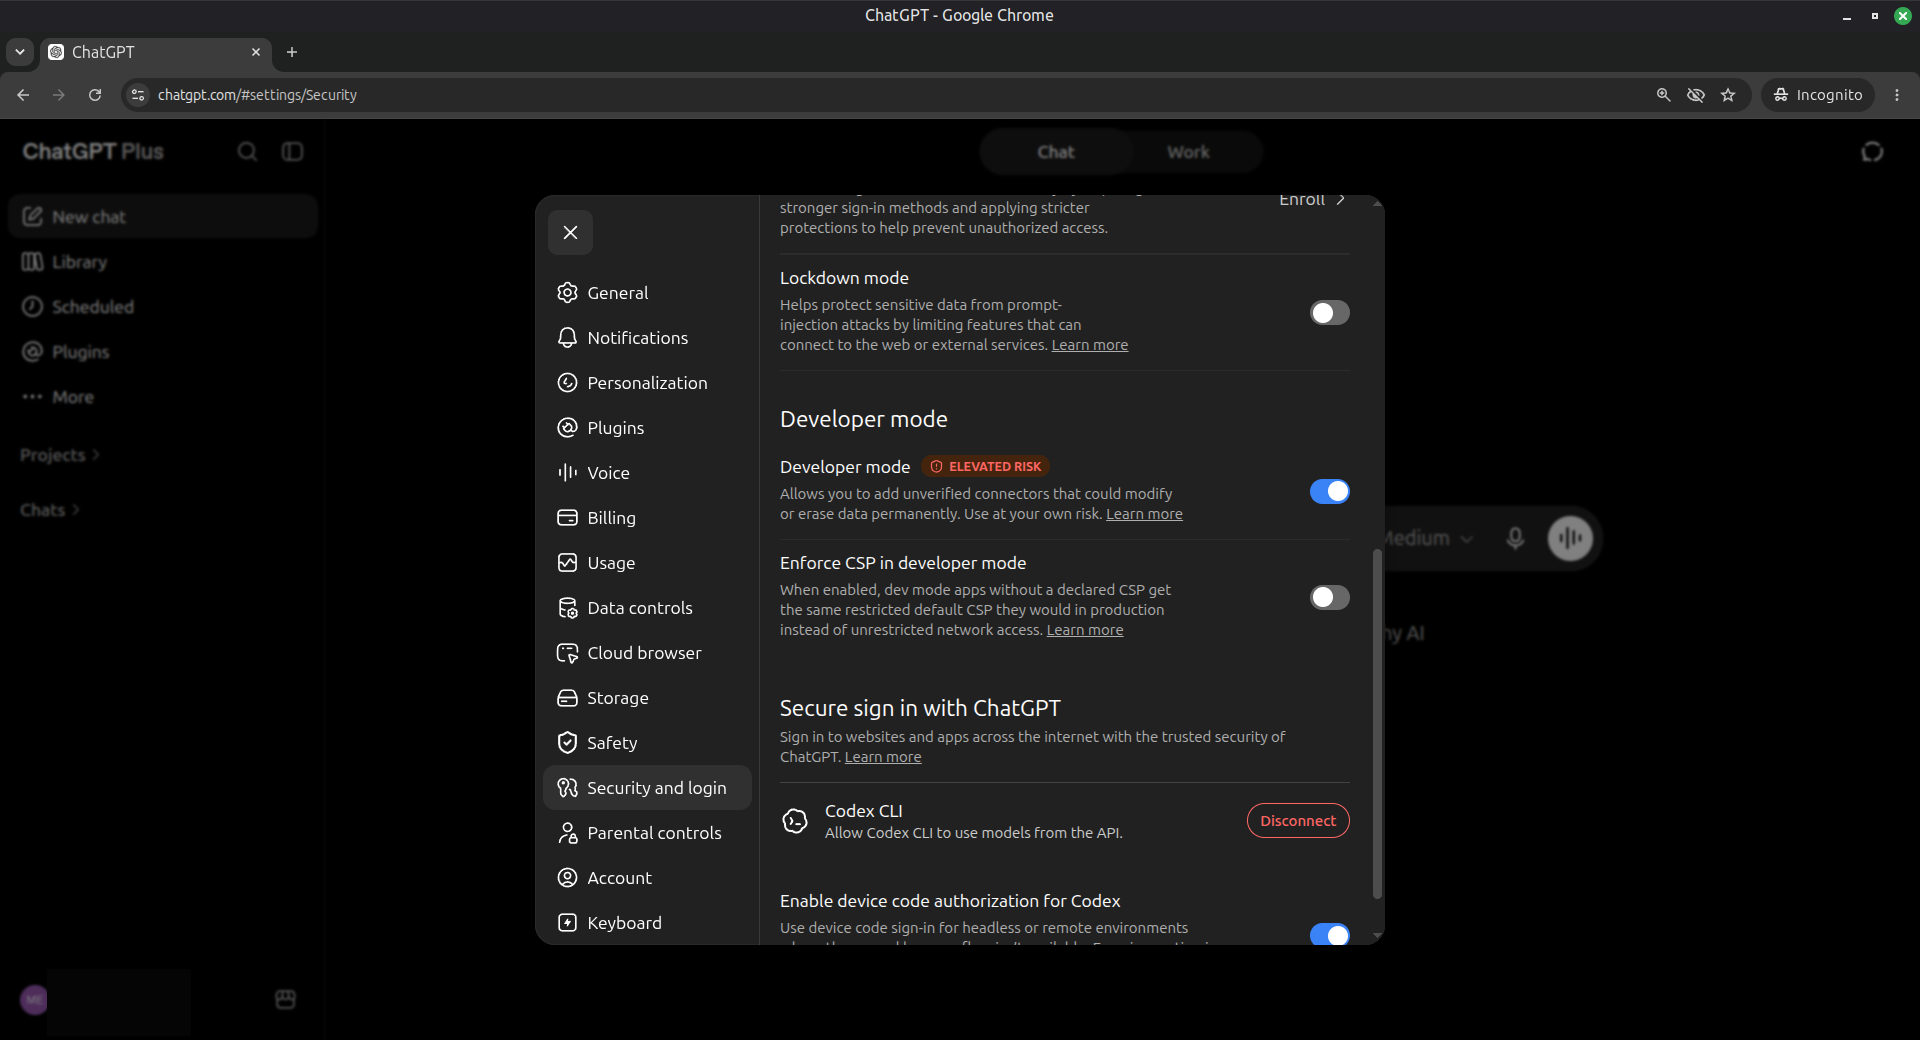
Developer mode is enabled. - 5
Open Plugins in the sidebar and click the plus button.
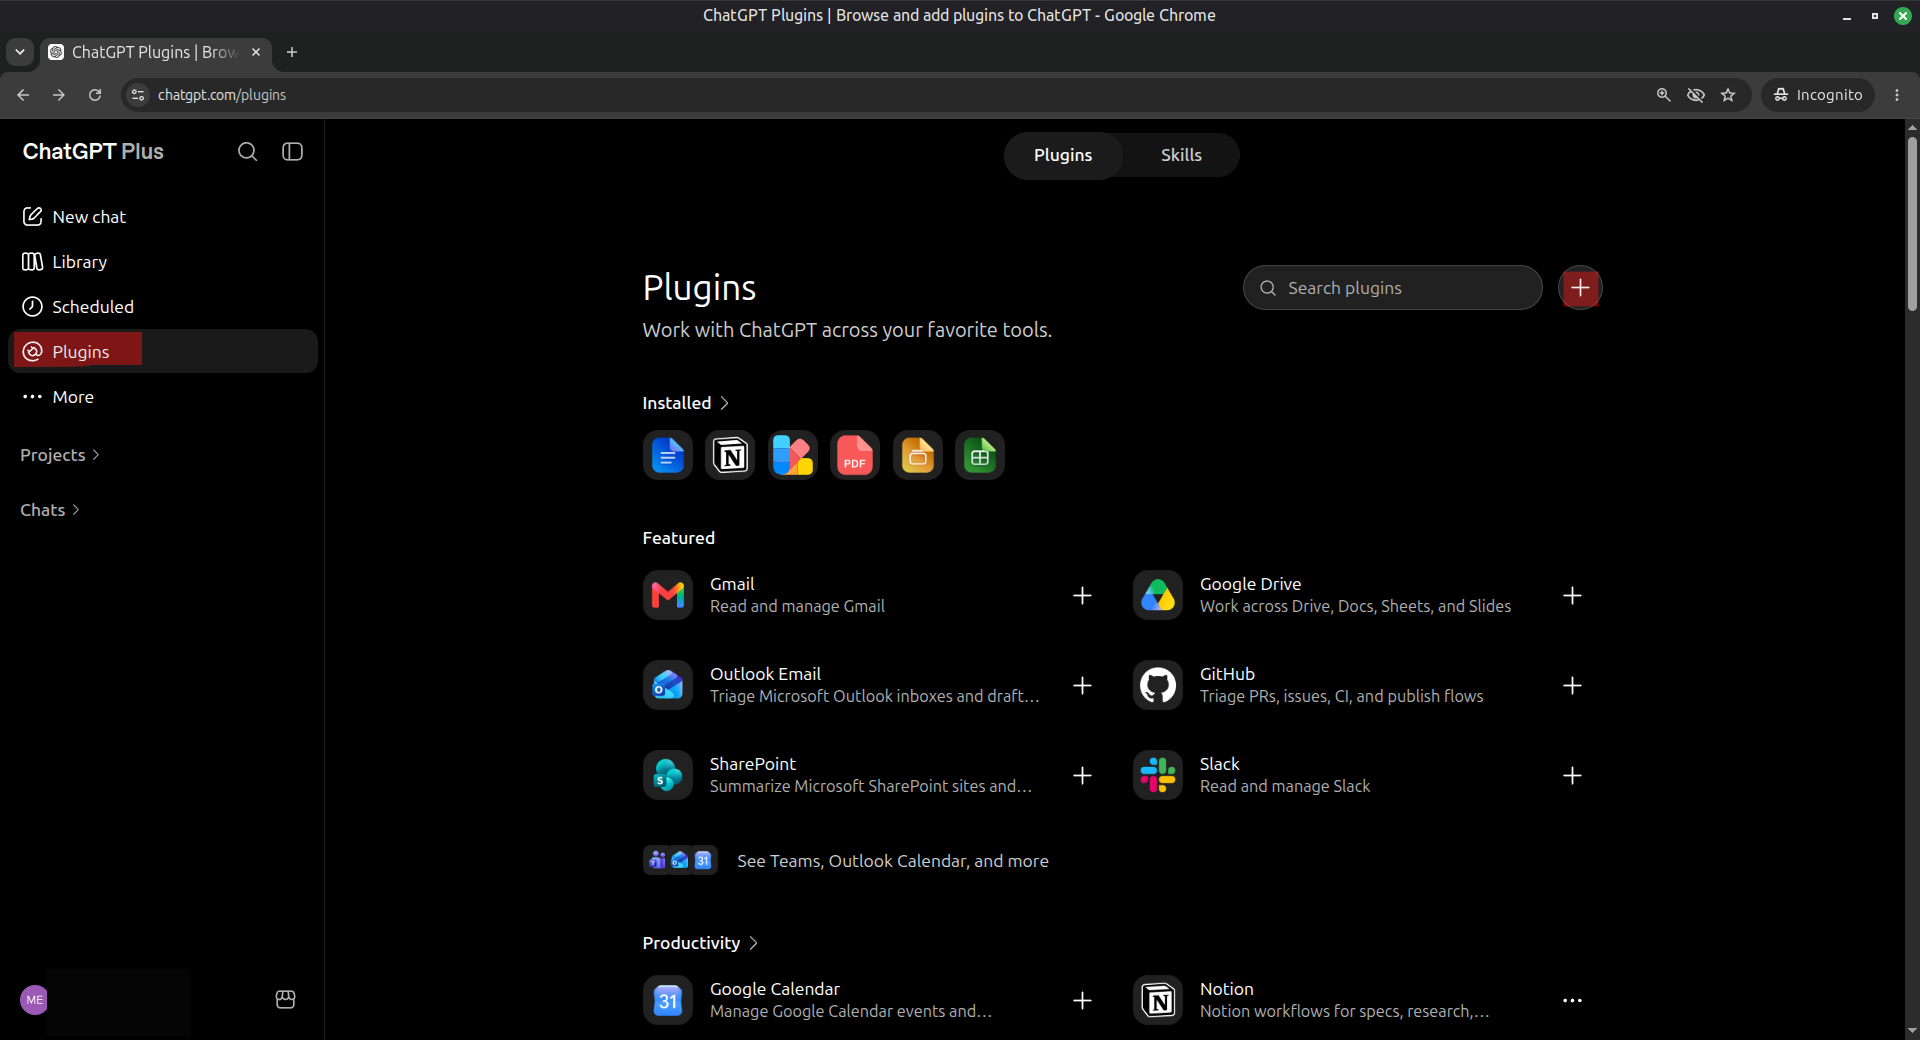
Open Plugins and add a plugin. - 6
Enter Mediery as the name, choose Server URL, enter https://api.mediery.com/mcp, and set Authentication to OAuth.
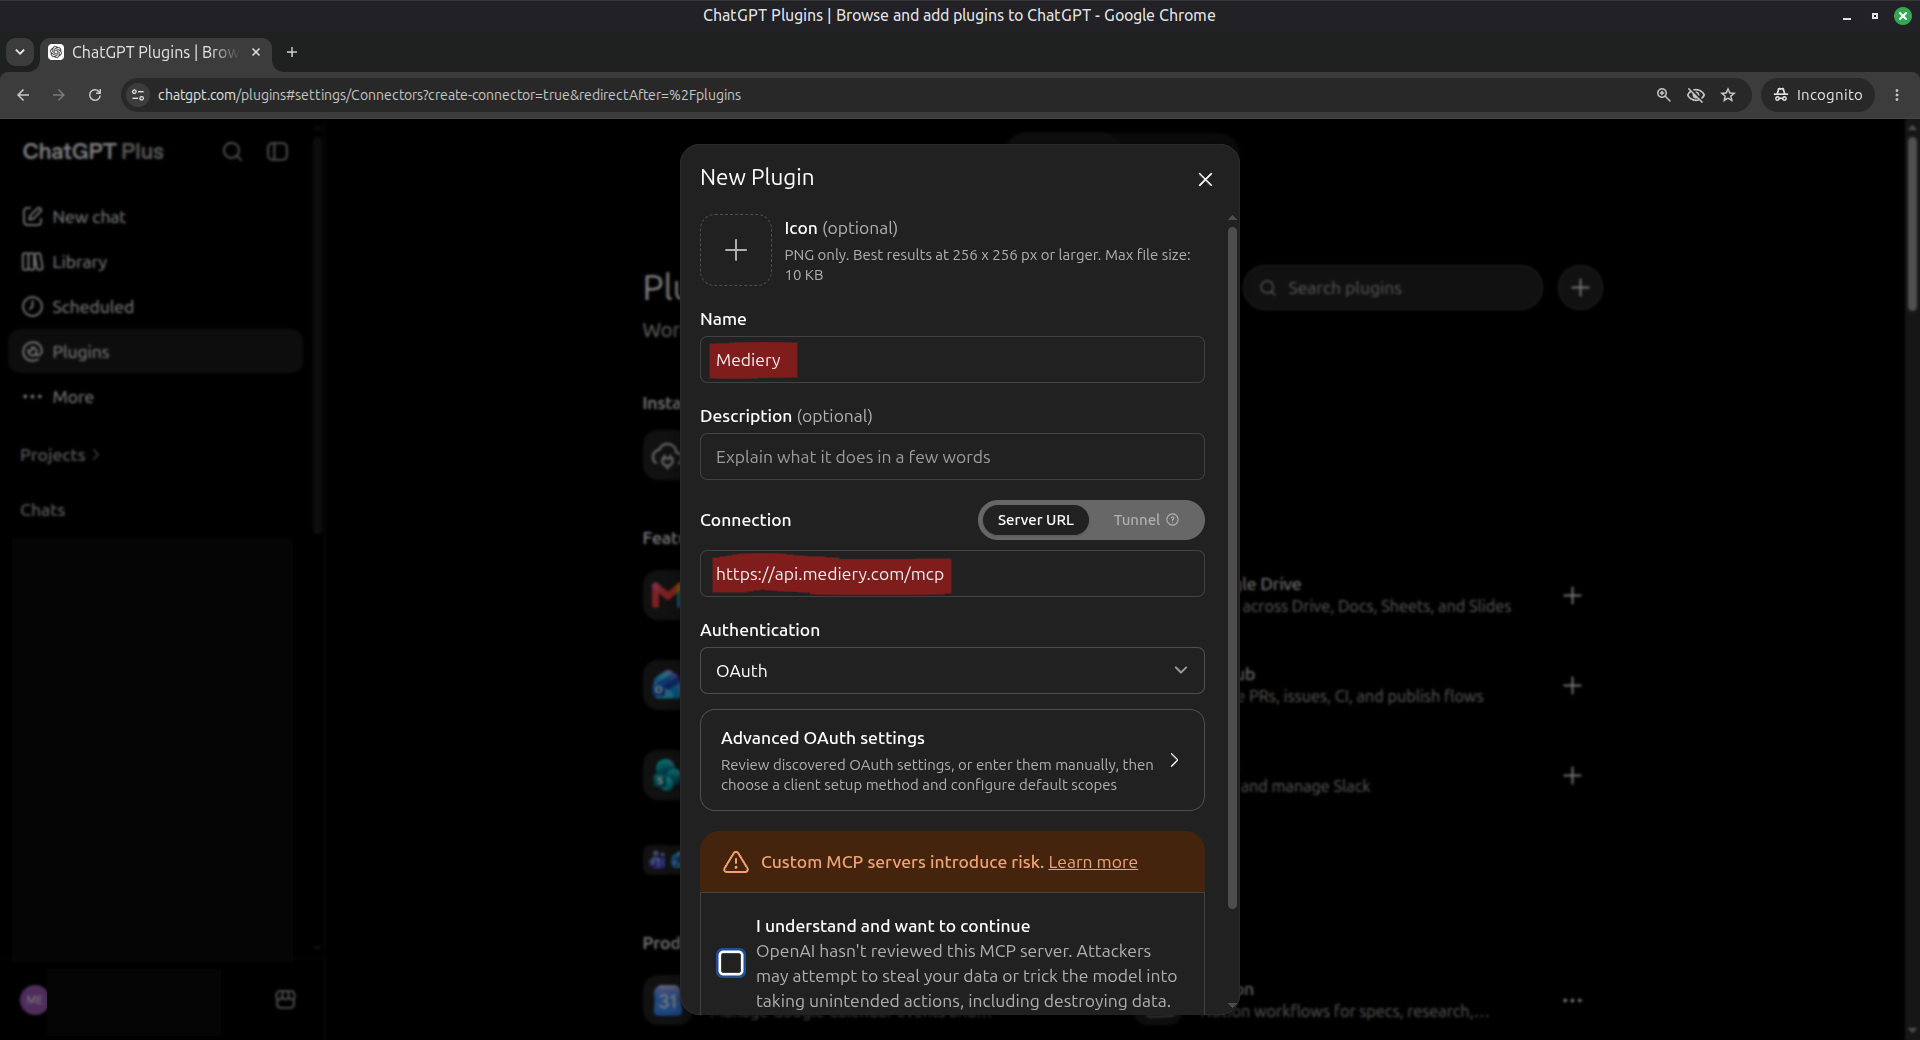
Configure Mediery as an OAuth plugin. - 7
Select “I understand and want to continue”, then choose Create.
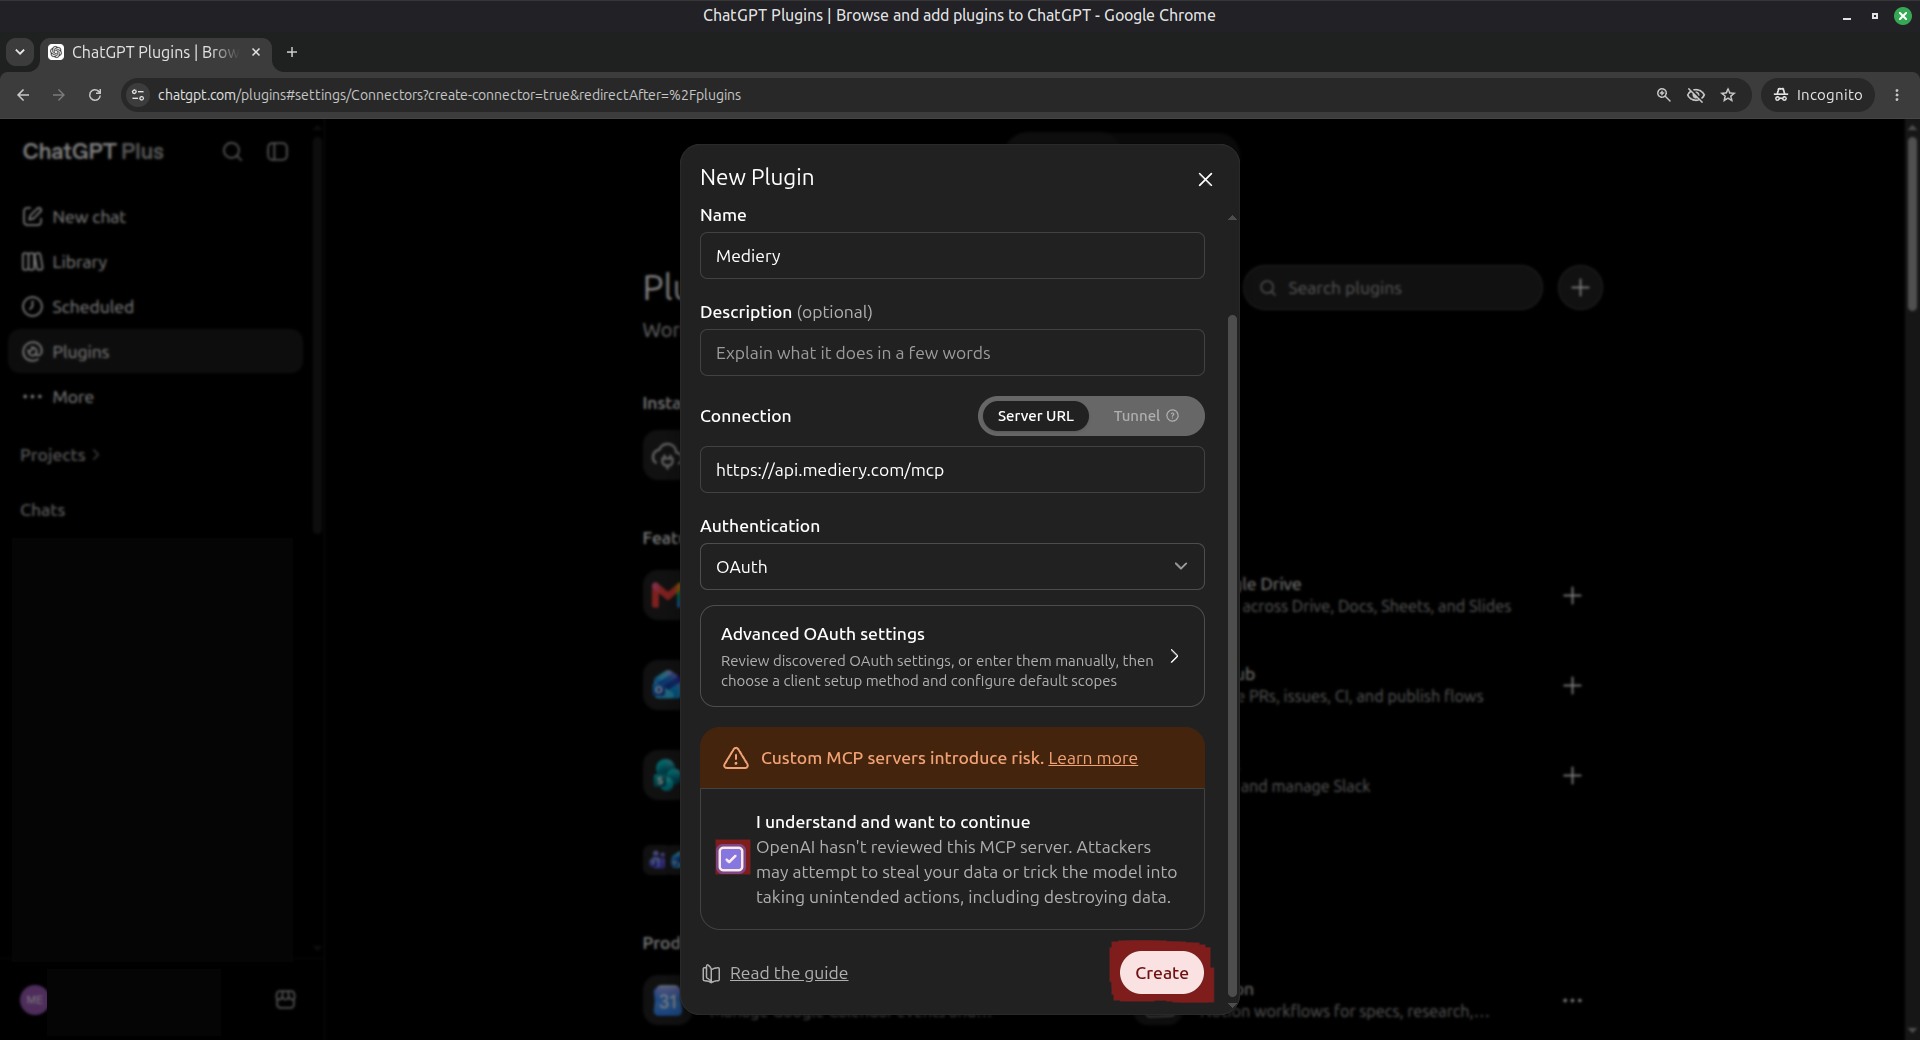
Confirm and create the plugin. - 8
Choose Sign in with Mediery.
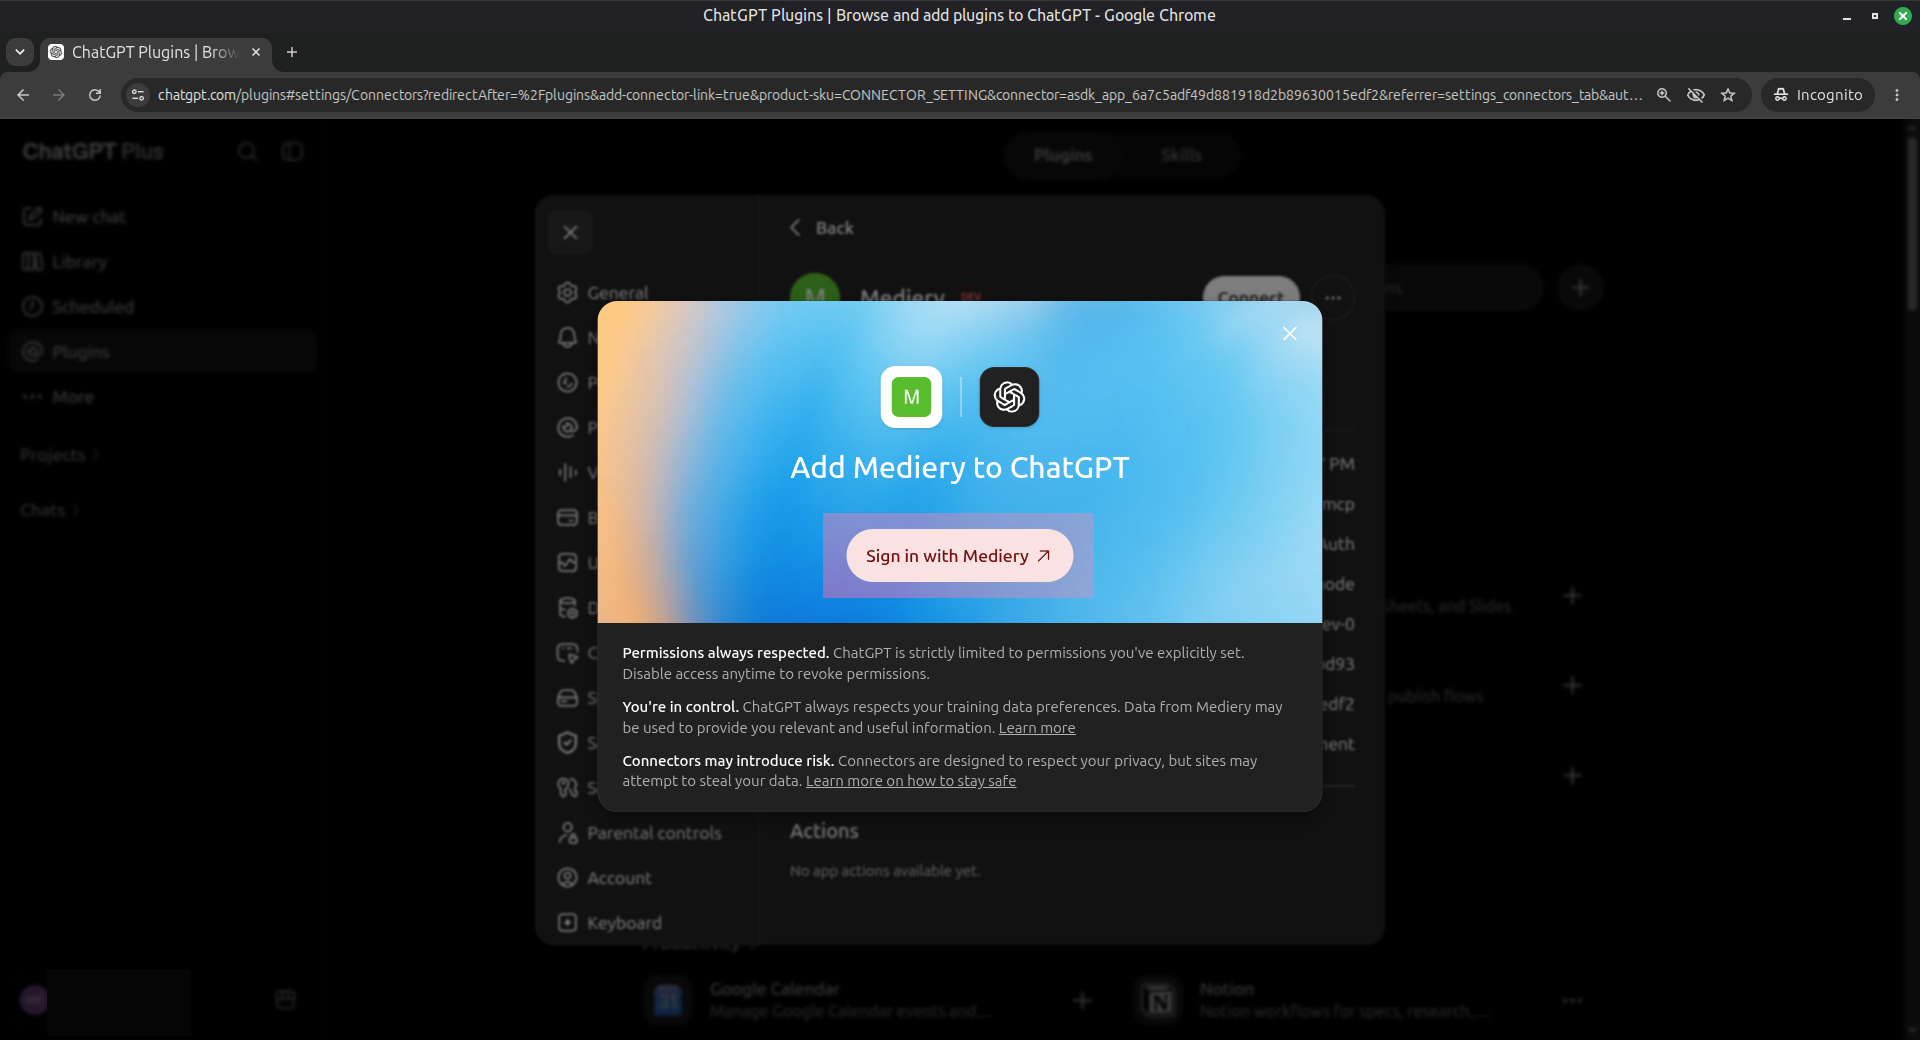
Start Mediery authorization. - 9
Your browser opens Mediery. If you are not already signed in, sign in with your Mediery partner account. Do not navigate to another Mediery page. After sign-in, Mediery returns you to the authorization request where you can choose the permission level.
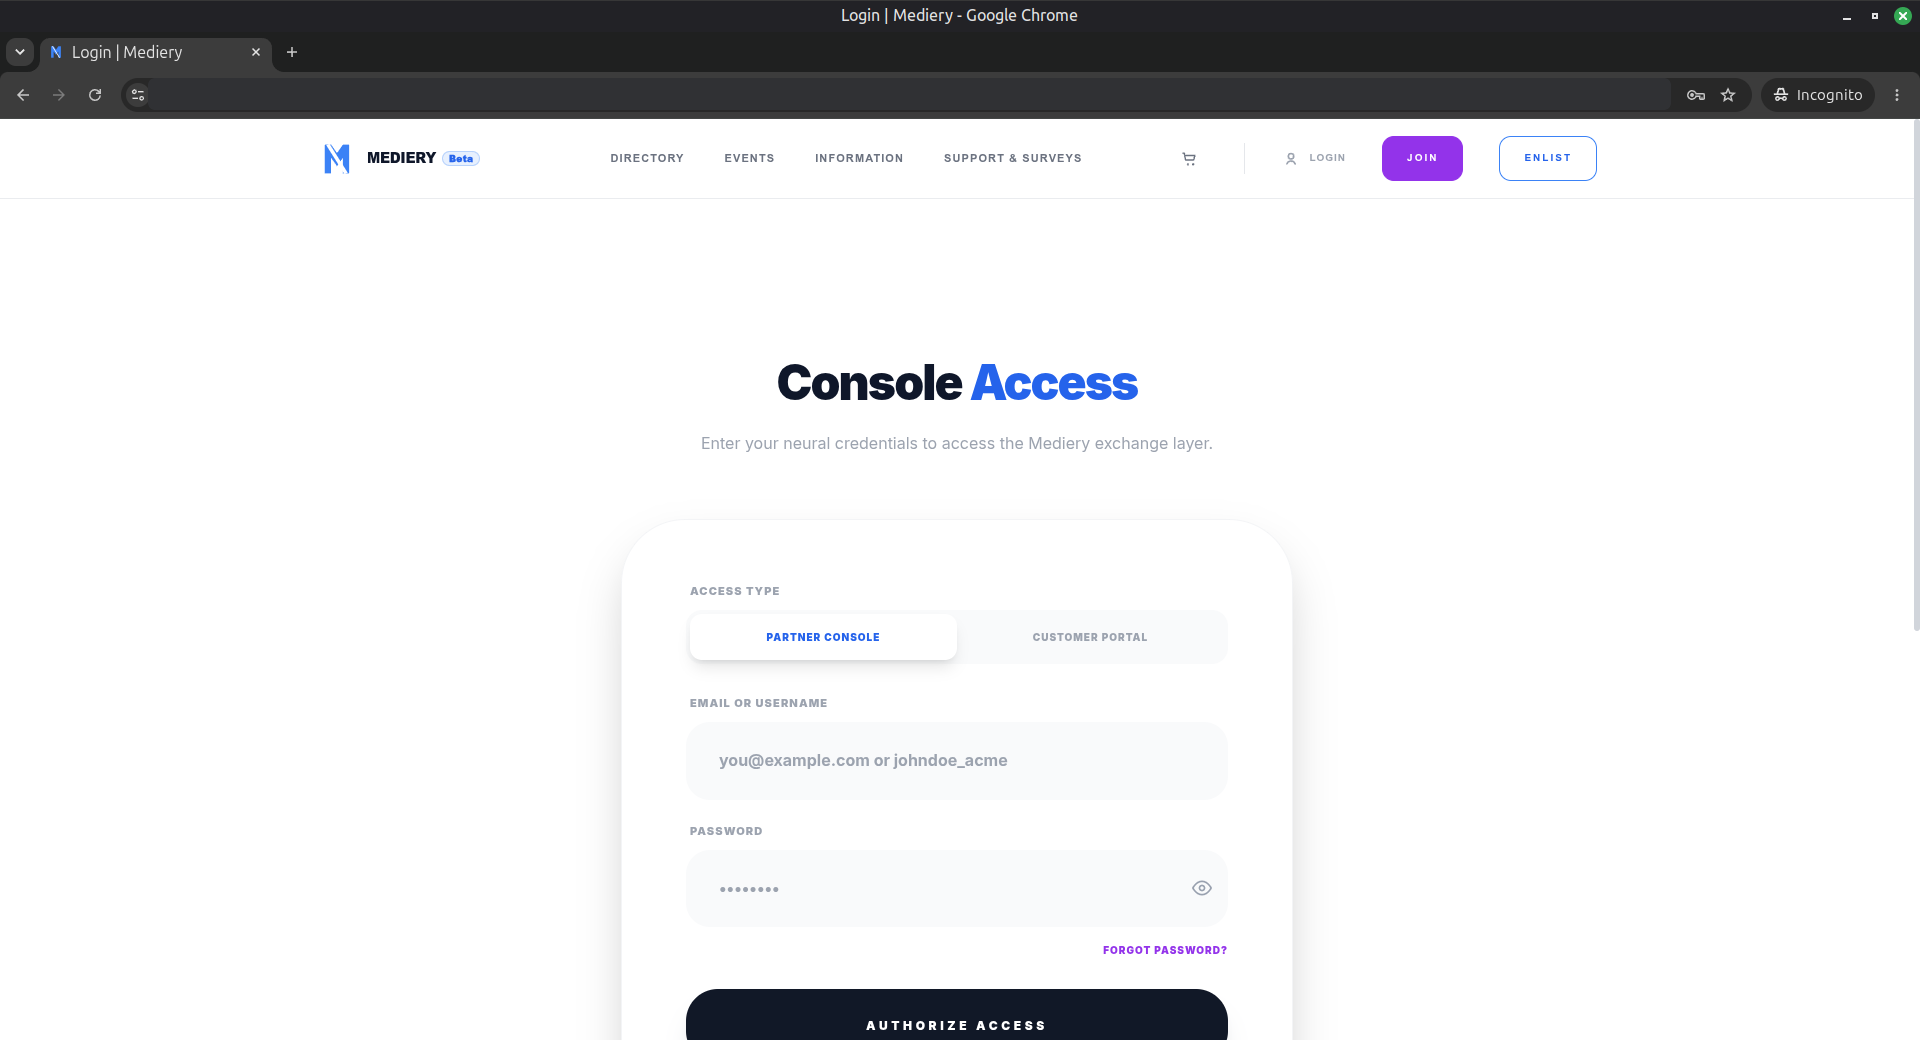
Sign in on the page opened by OAuth before choosing permissions. - 10
Once you are signed in as a partner, read access is included. To let ChatGPT make changes, select “Allow this client to create, update, and delete data”; otherwise leave it unselected. Choose Allow access.
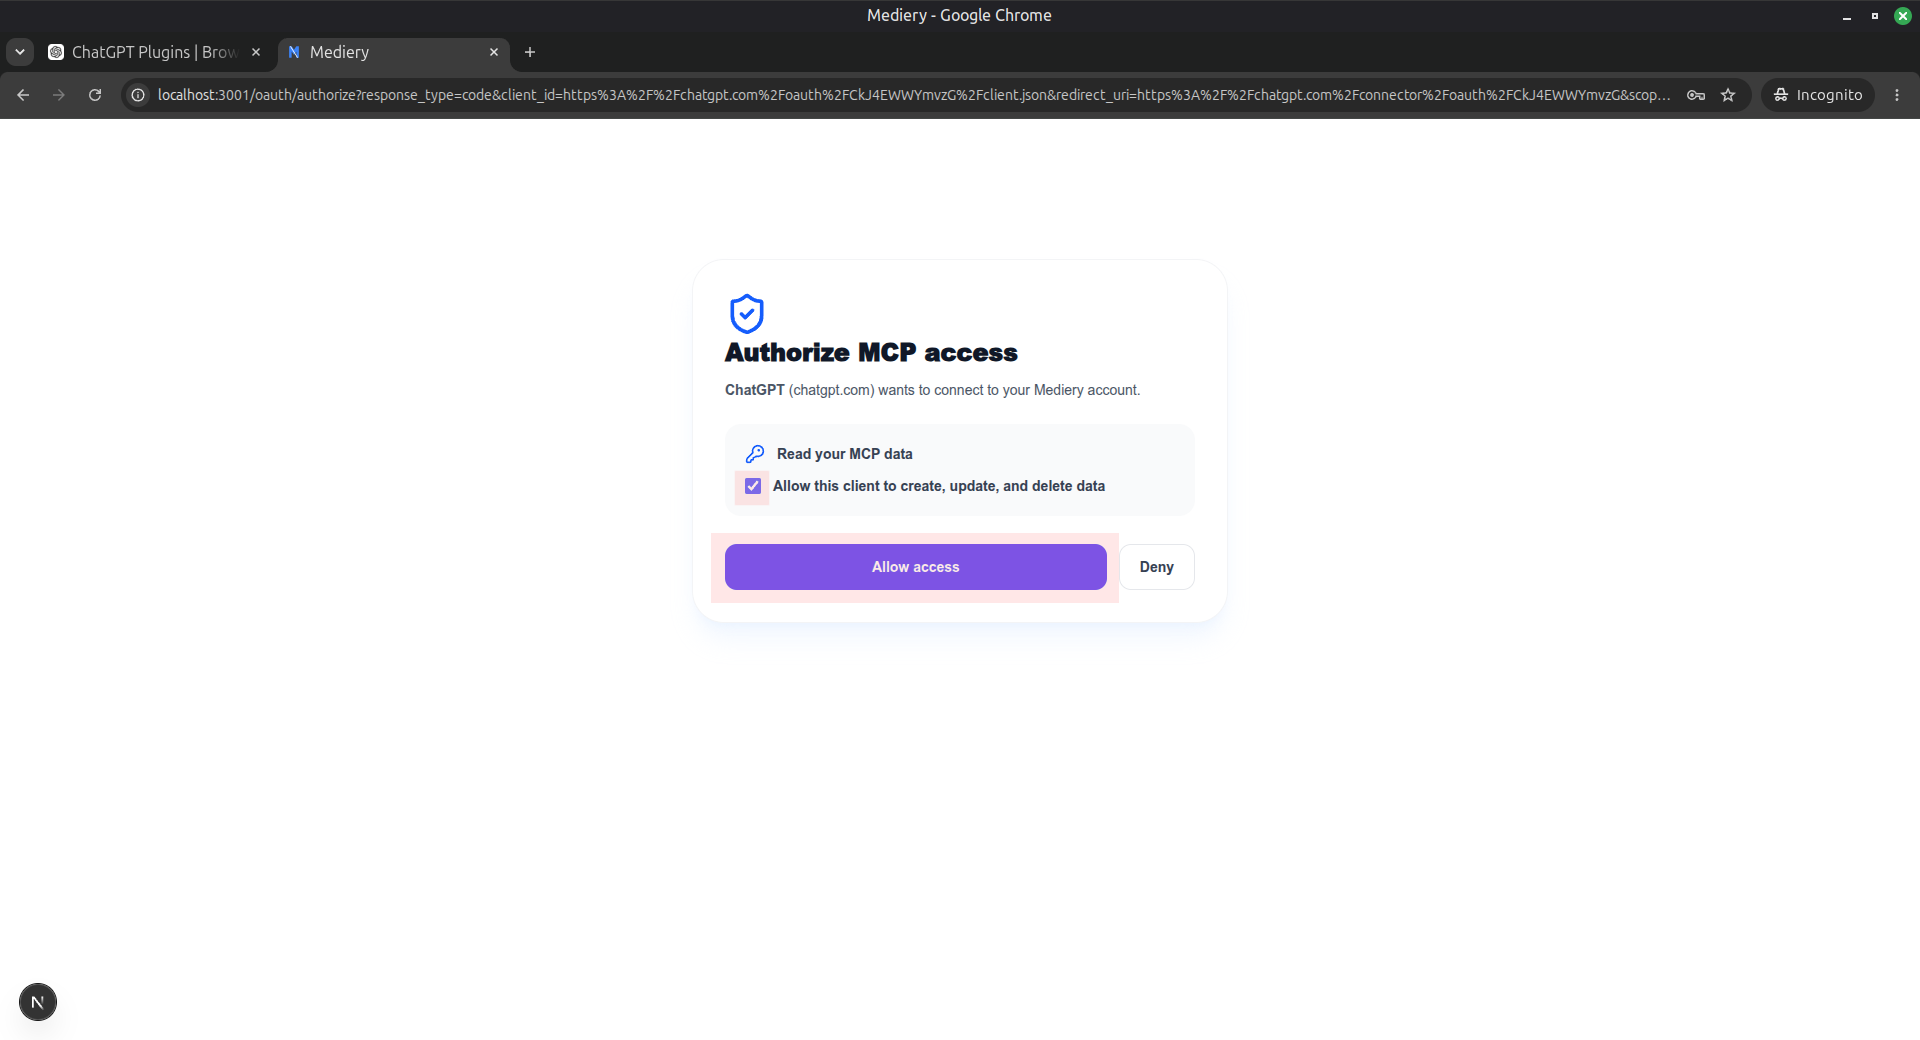
Choose the access level and authorize ChatGPT. - 11
Return to ChatGPT. Mediery is now available from the Plugins page.
Claude.ai (Web)
Open https://claude.ai and sign in. Claude connects to Mediery through OAuth, so you do not need to create or paste an API key.
- 1
Click your profile in the lower-left corner and choose Settings.
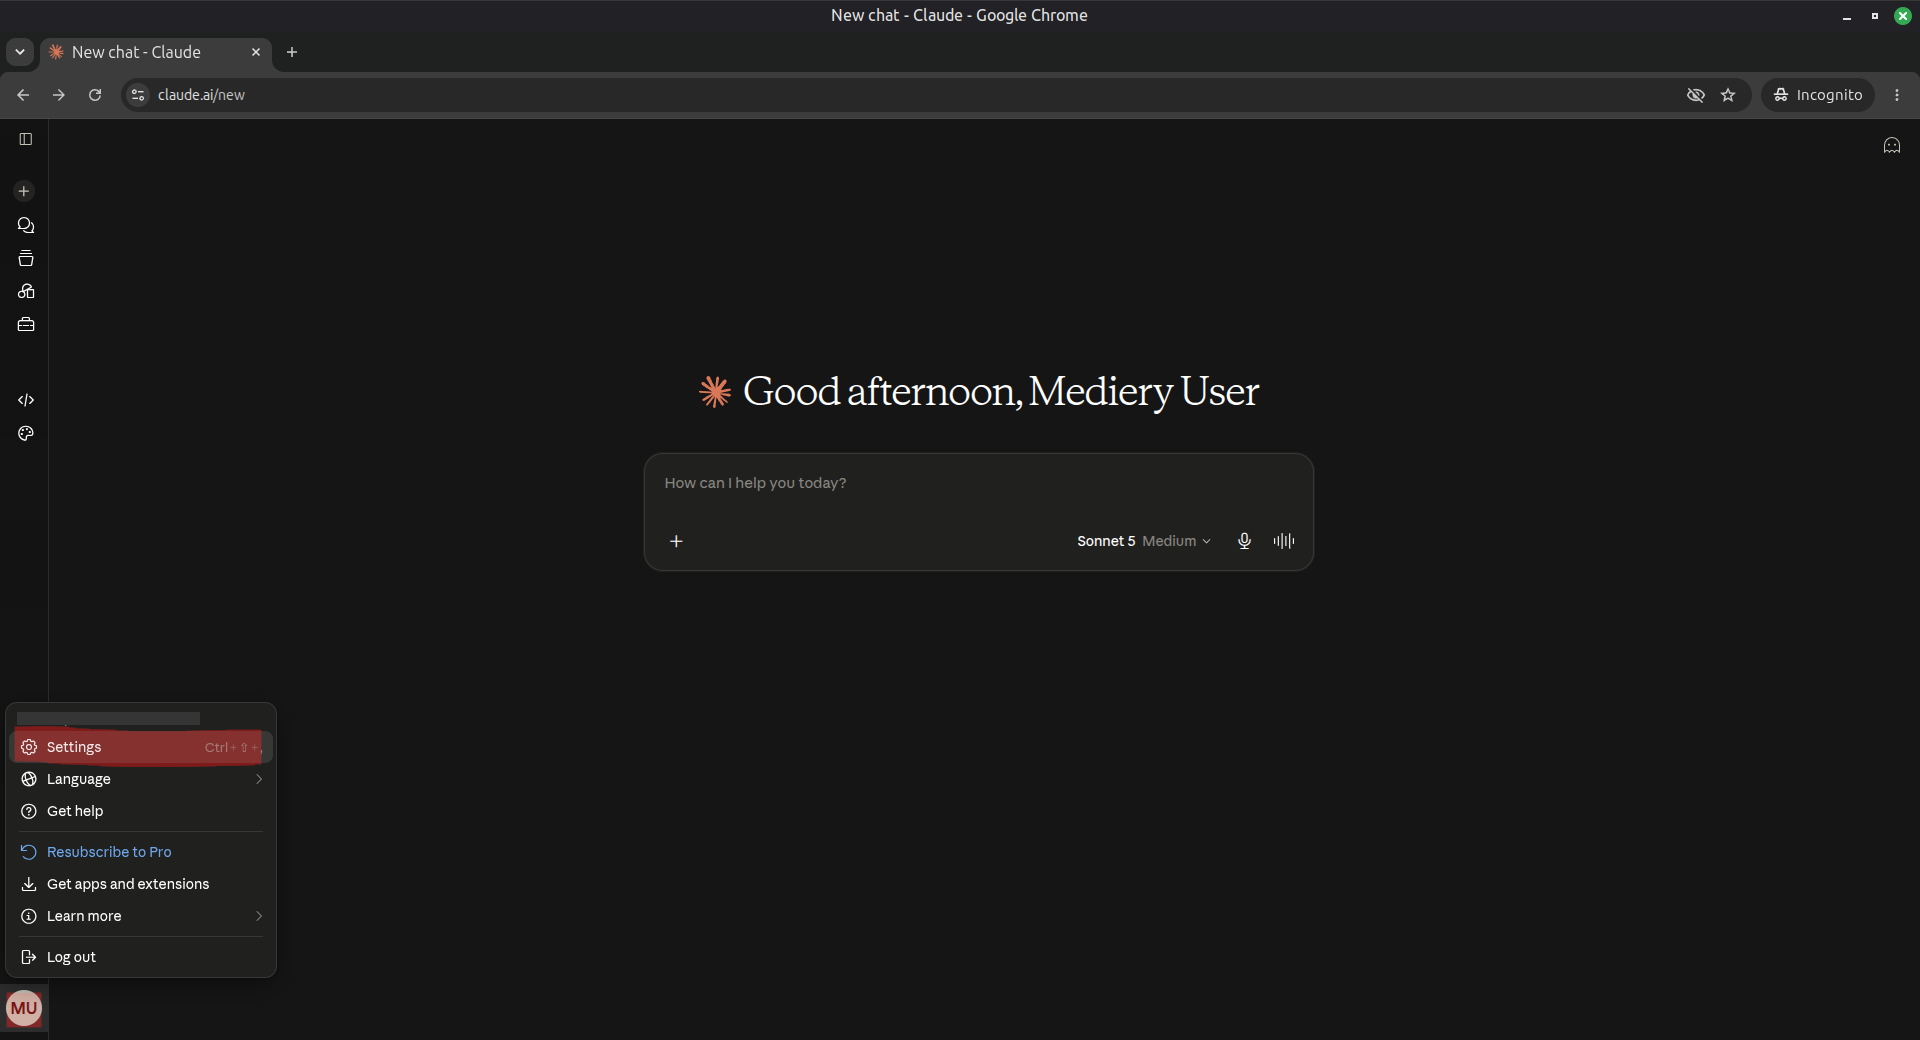
Open Claude.ai settings. - 2
Under Customize, select Connectors.
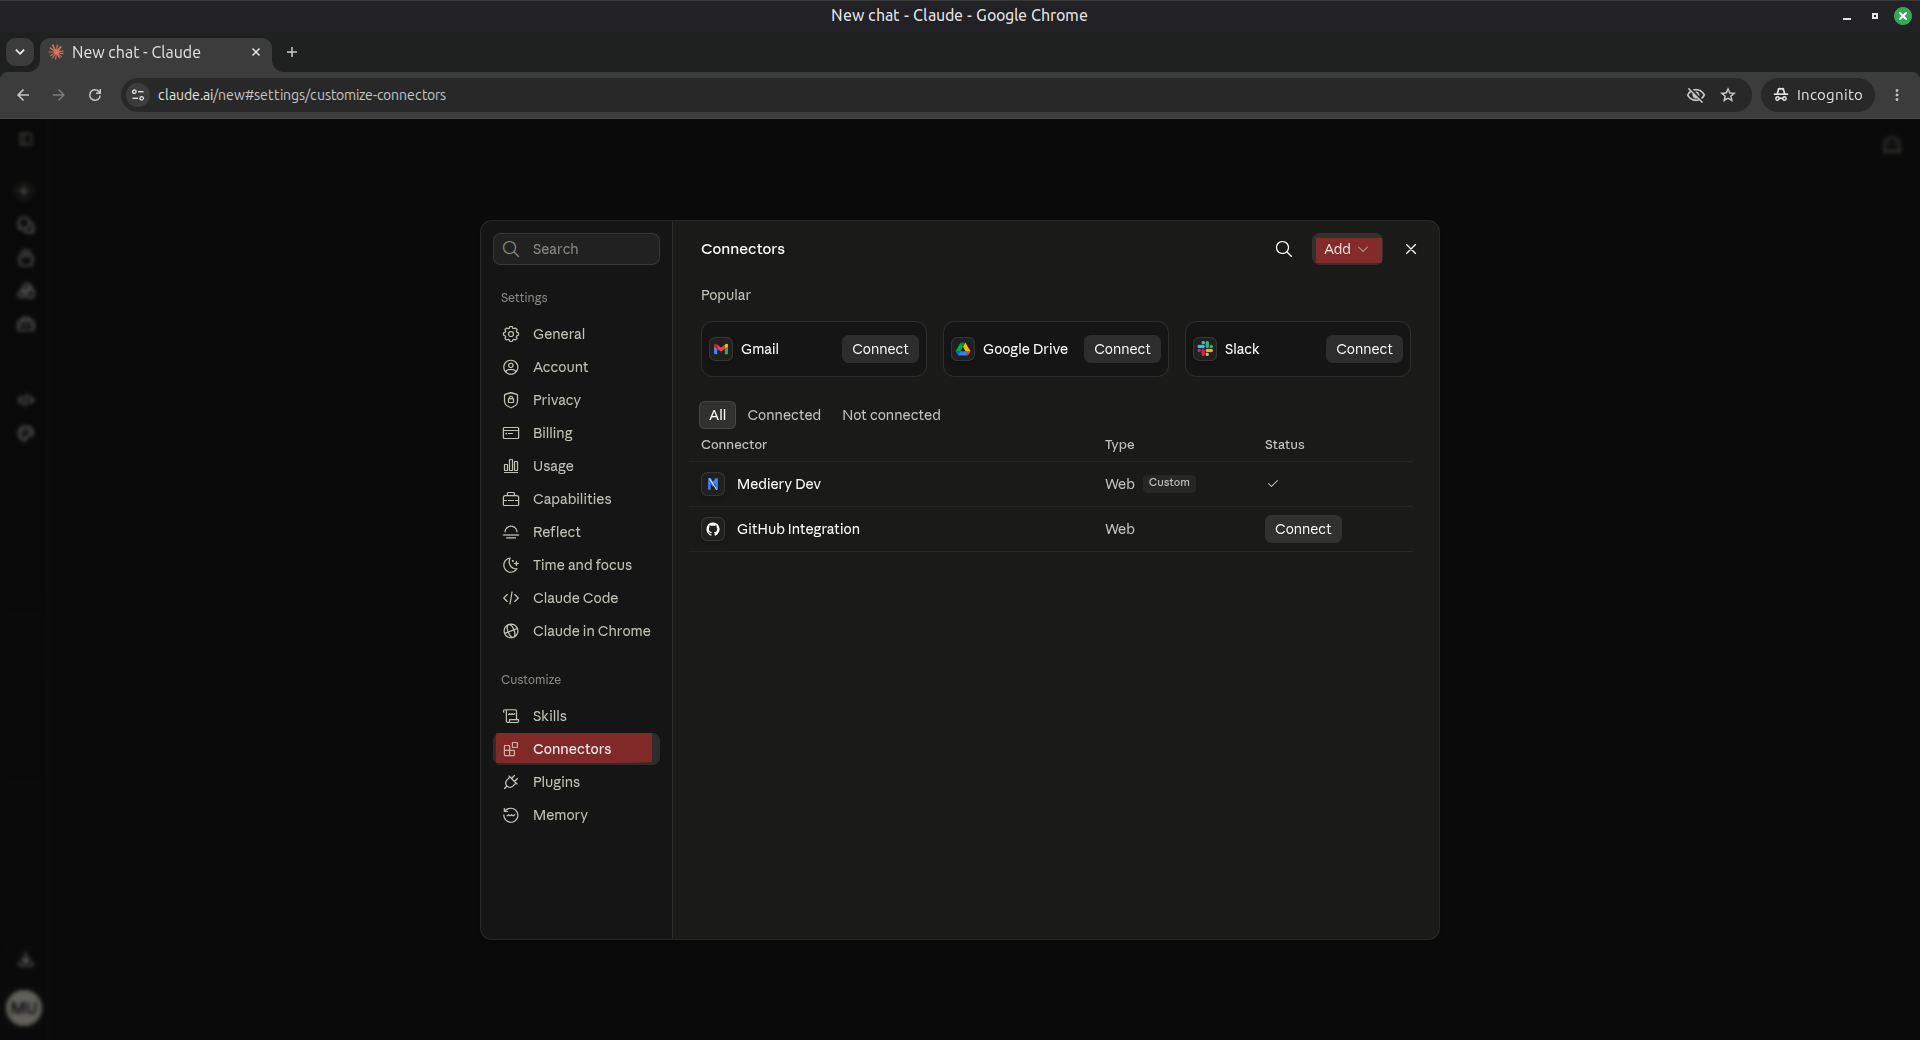
Open the Connectors settings. - 3
Open the Add menu and choose Add custom connector.
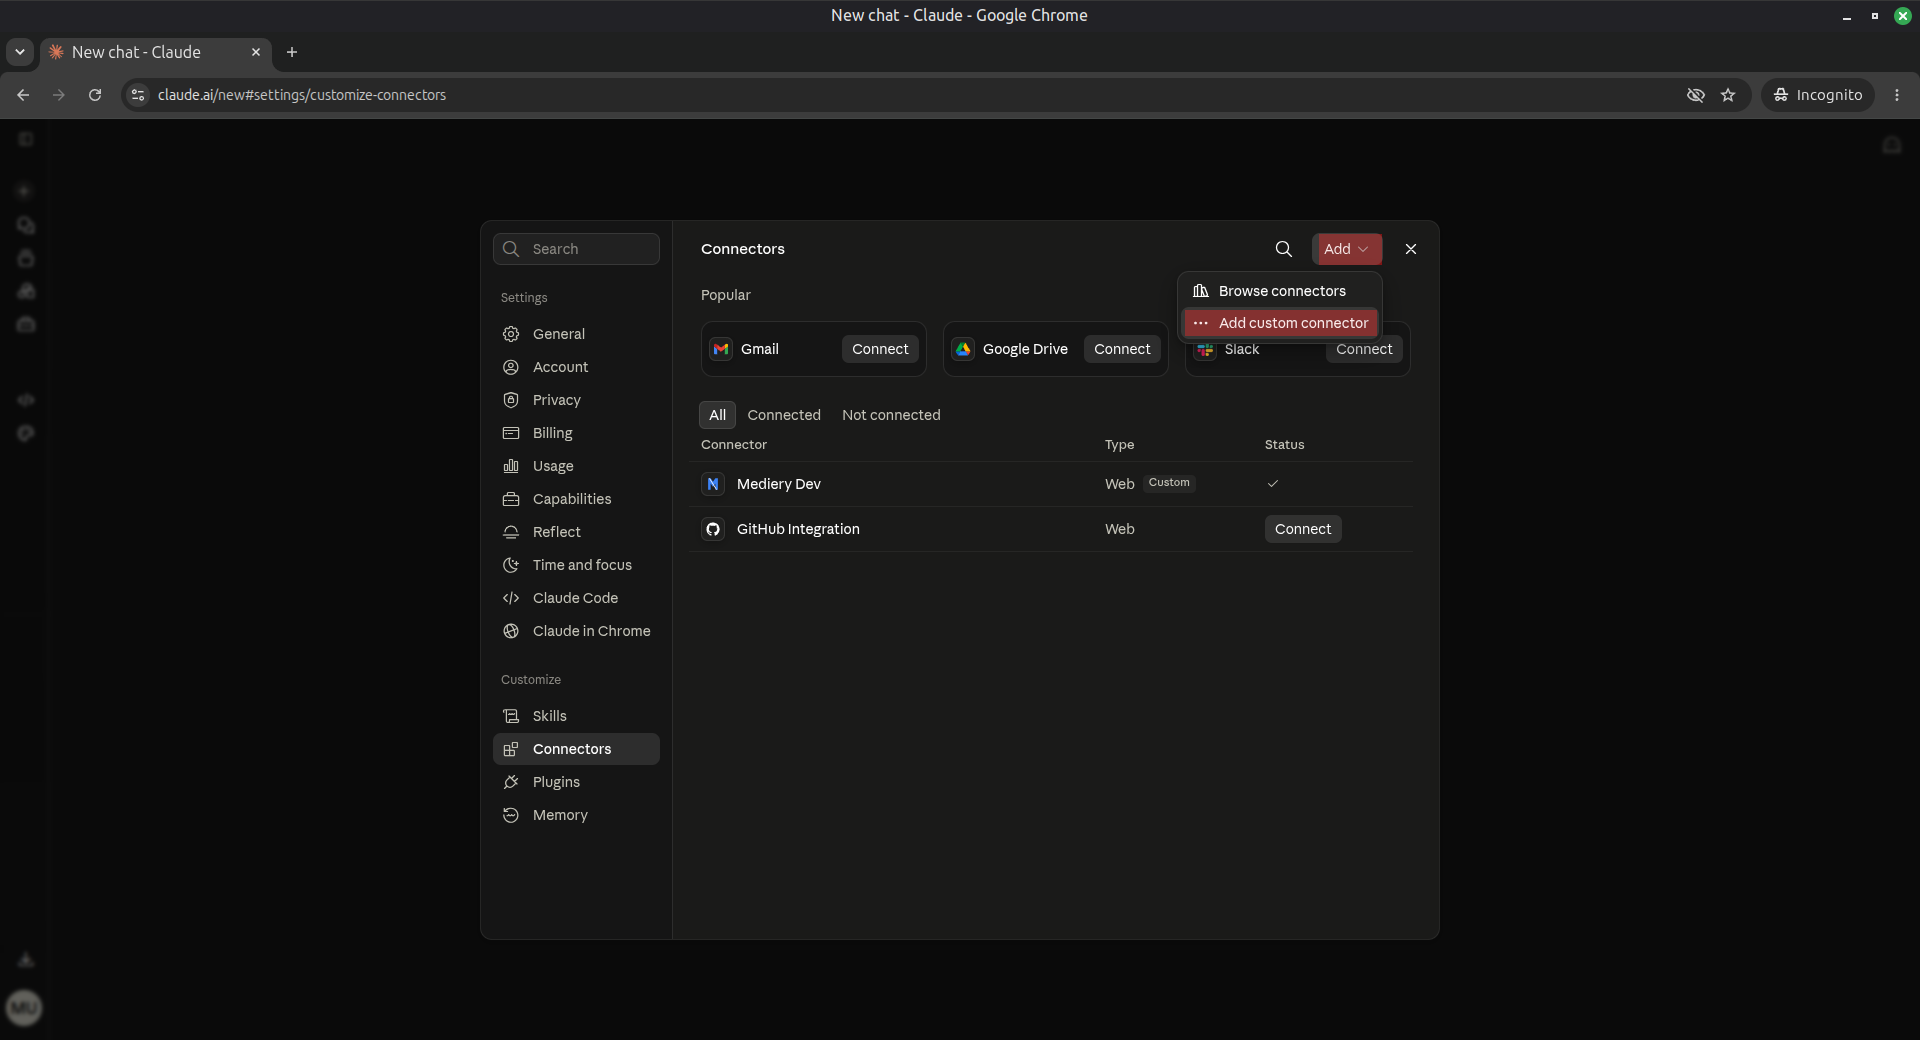
Choose Add custom connector. - 4
Enter Mediery as the name and https://api.mediery.com/mcp as the MCP server URL. Leave OAuth Client ID and OAuth Client Secret blank, then choose Add.
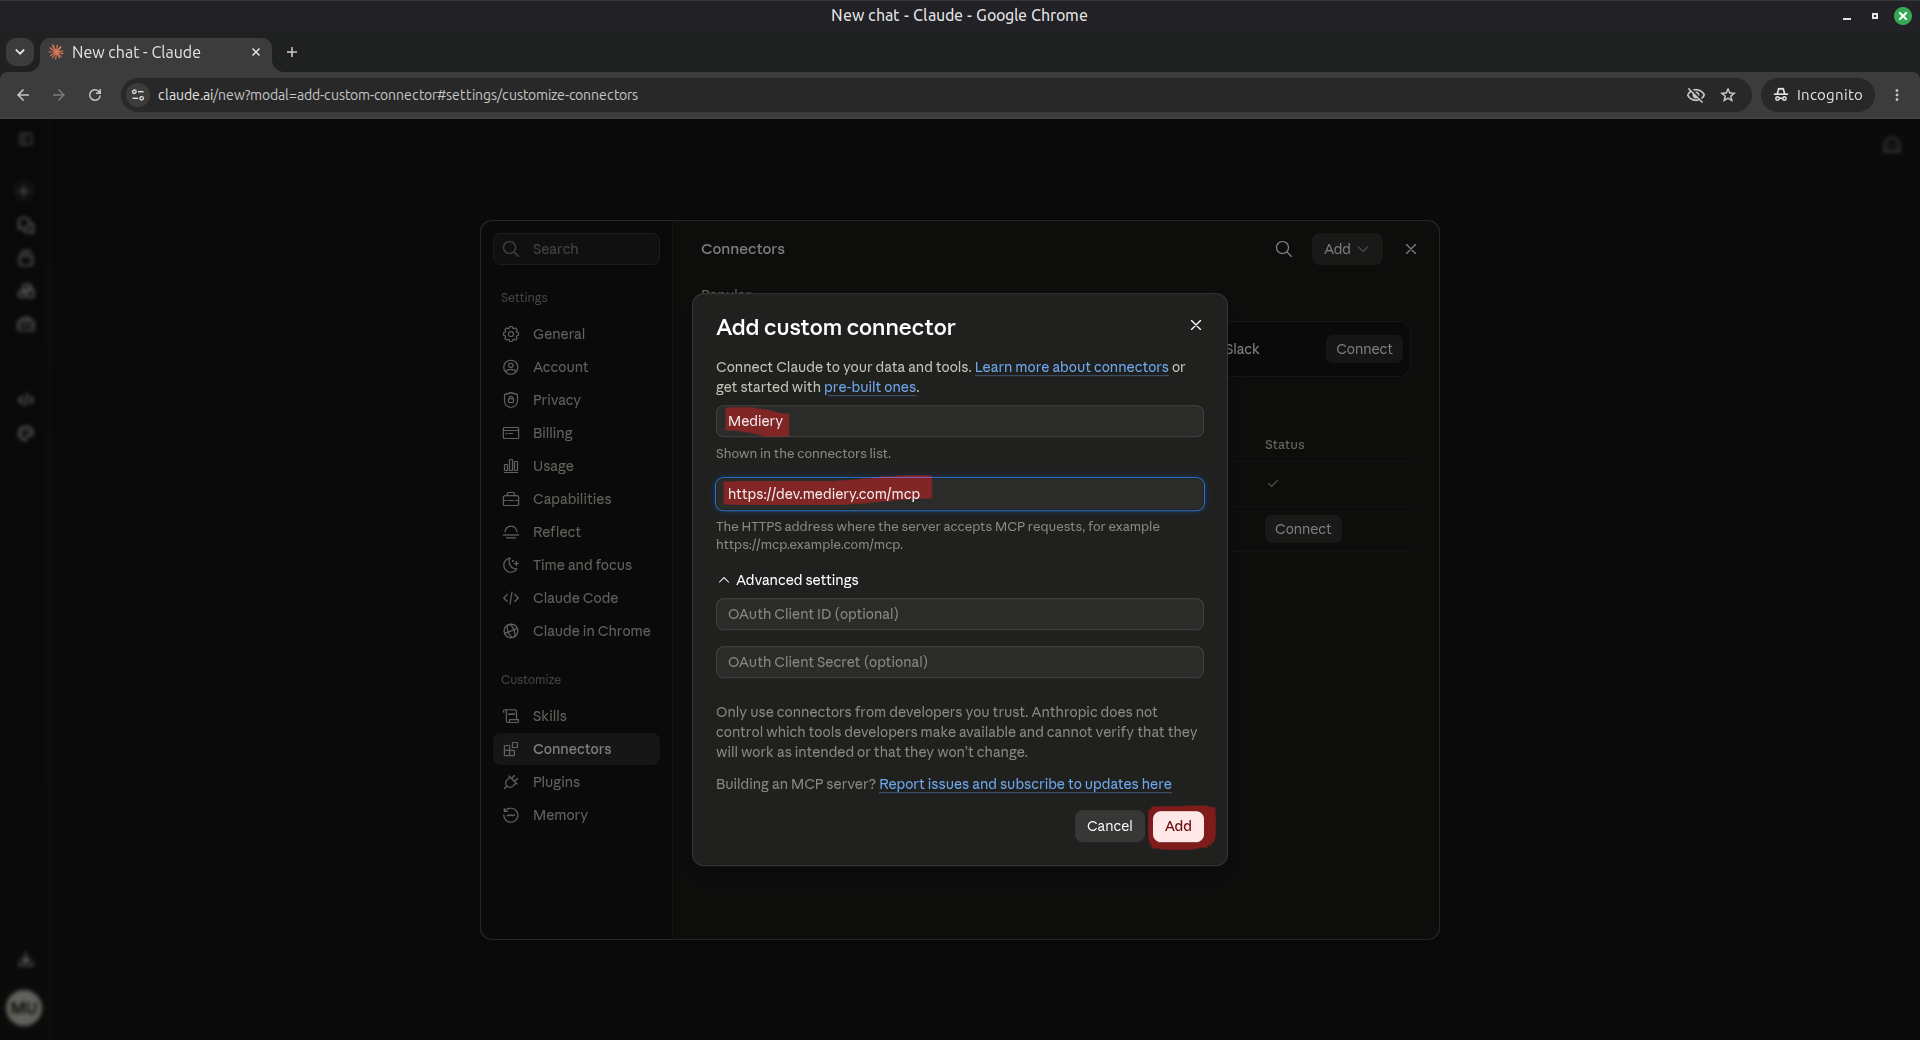
Enter the Mediery name and MCP endpoint; no OAuth client credentials are required. - 5
Open the Mediery connector and choose Connect.
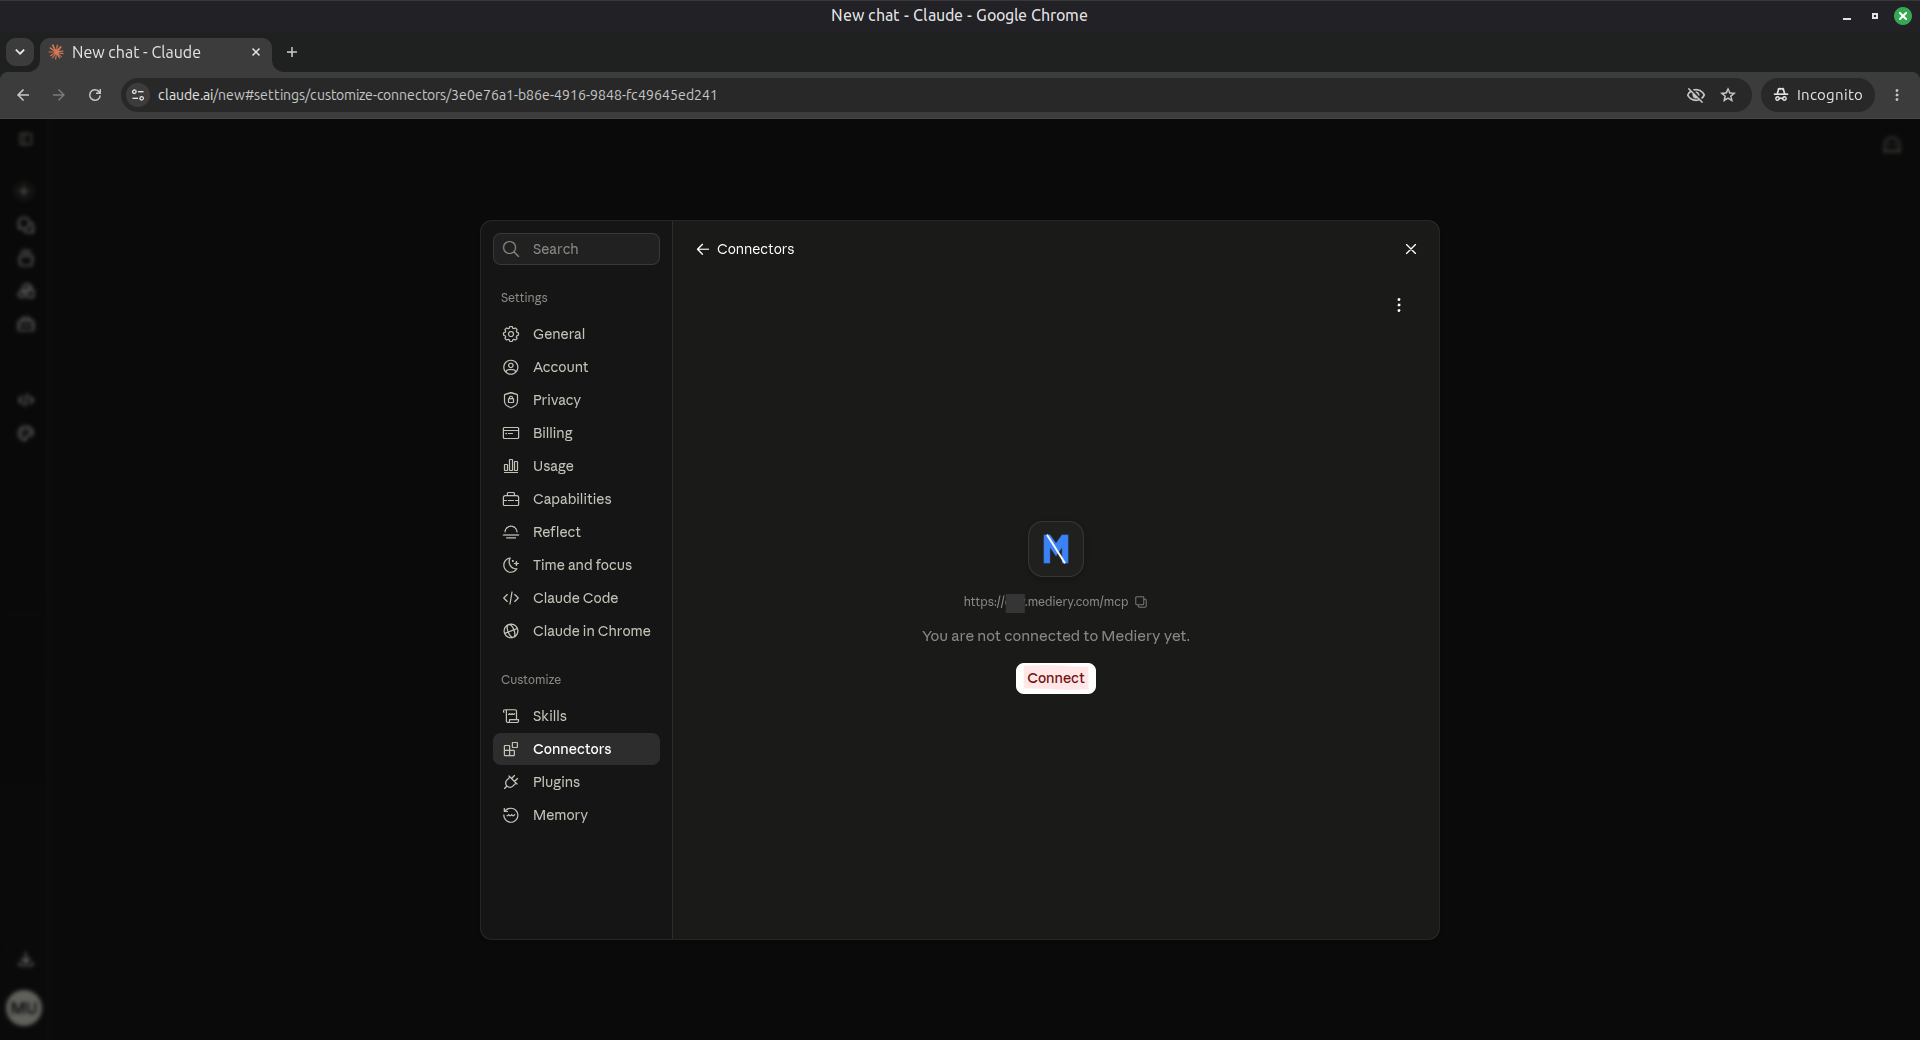
Start the OAuth connection. - 6
Claude opens Mediery in your browser. If you are not already signed in, sign in with your Mediery partner account. Do not navigate to another Mediery page. After sign-in, Mediery returns you to the authorization request where you can choose the permission level.
Sign in on the page opened by OAuth before choosing permissions. - 7
After signing in as a partner, review the Mediery access request.
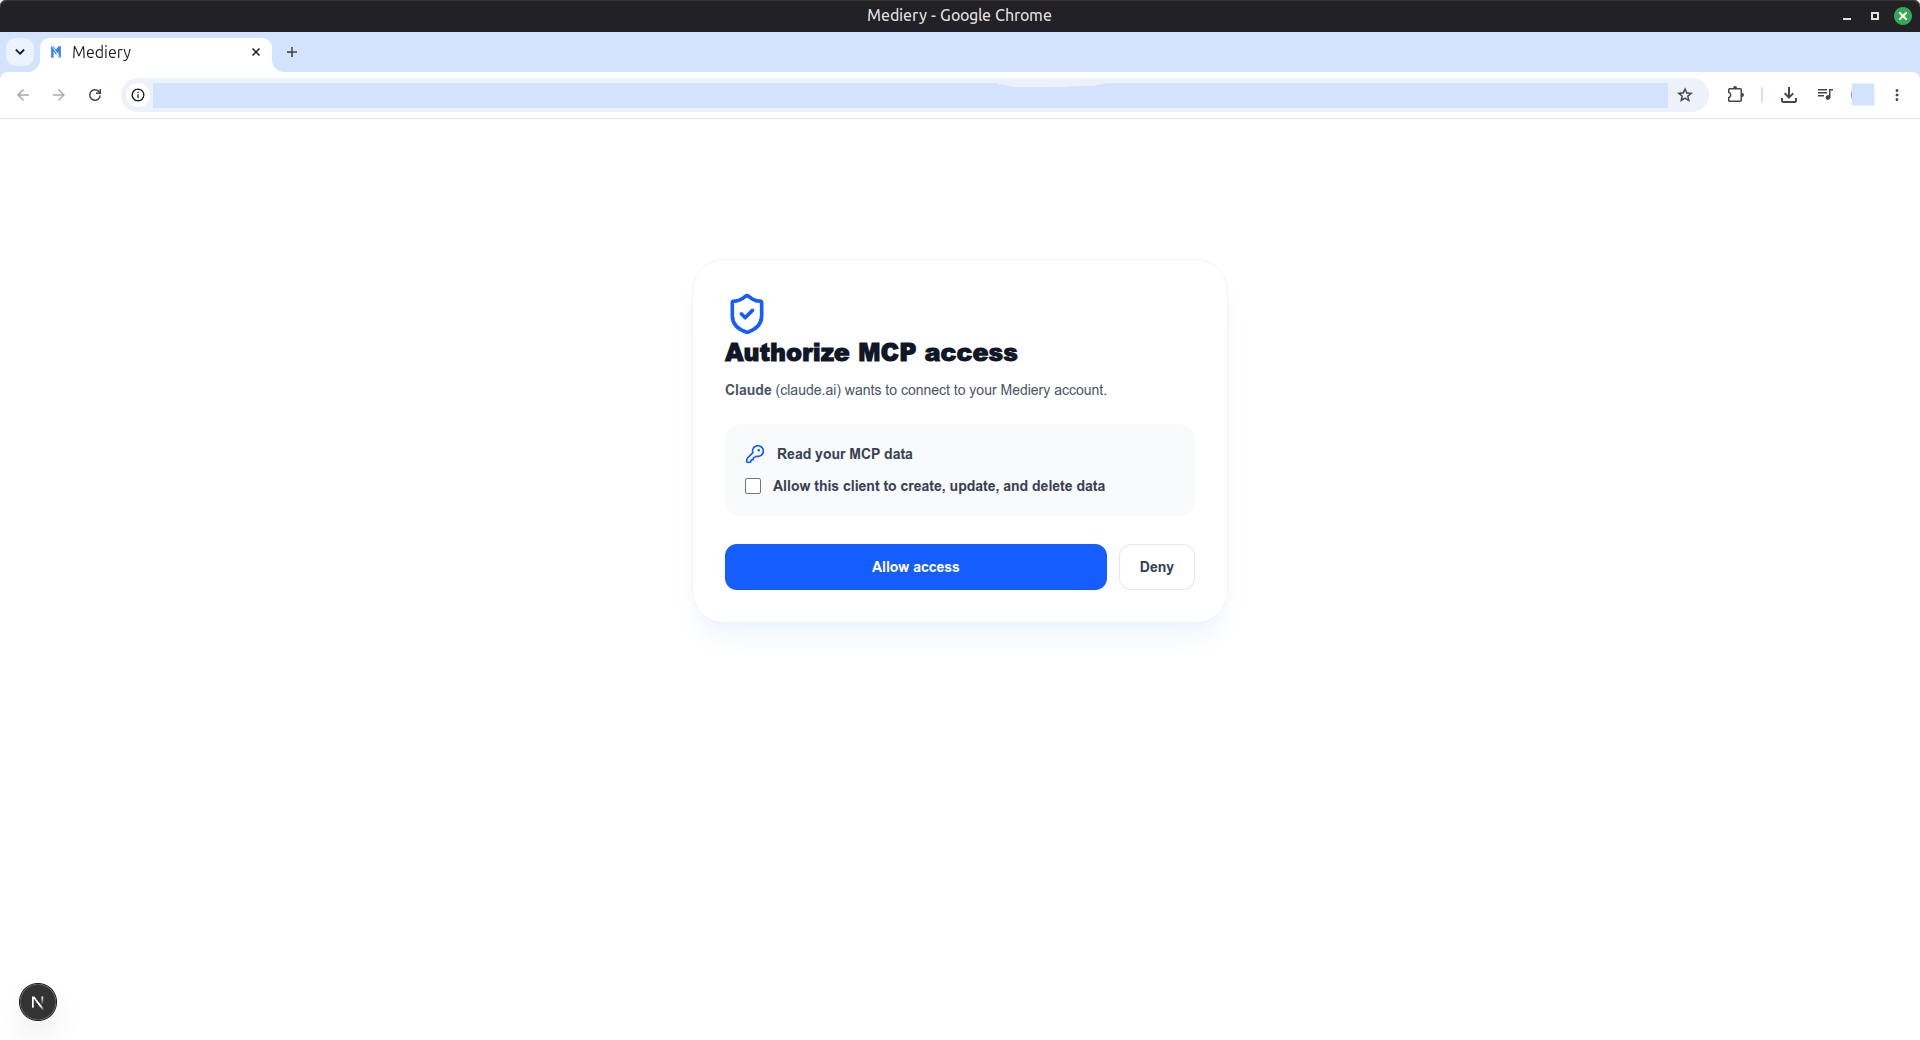
Review the Mediery access request. - 8
Once you are signed in as a partner, read access is included. If you also want Claude to make changes, select “Allow this client to create, update, and delete data”. Leave it unselected for read-only access.
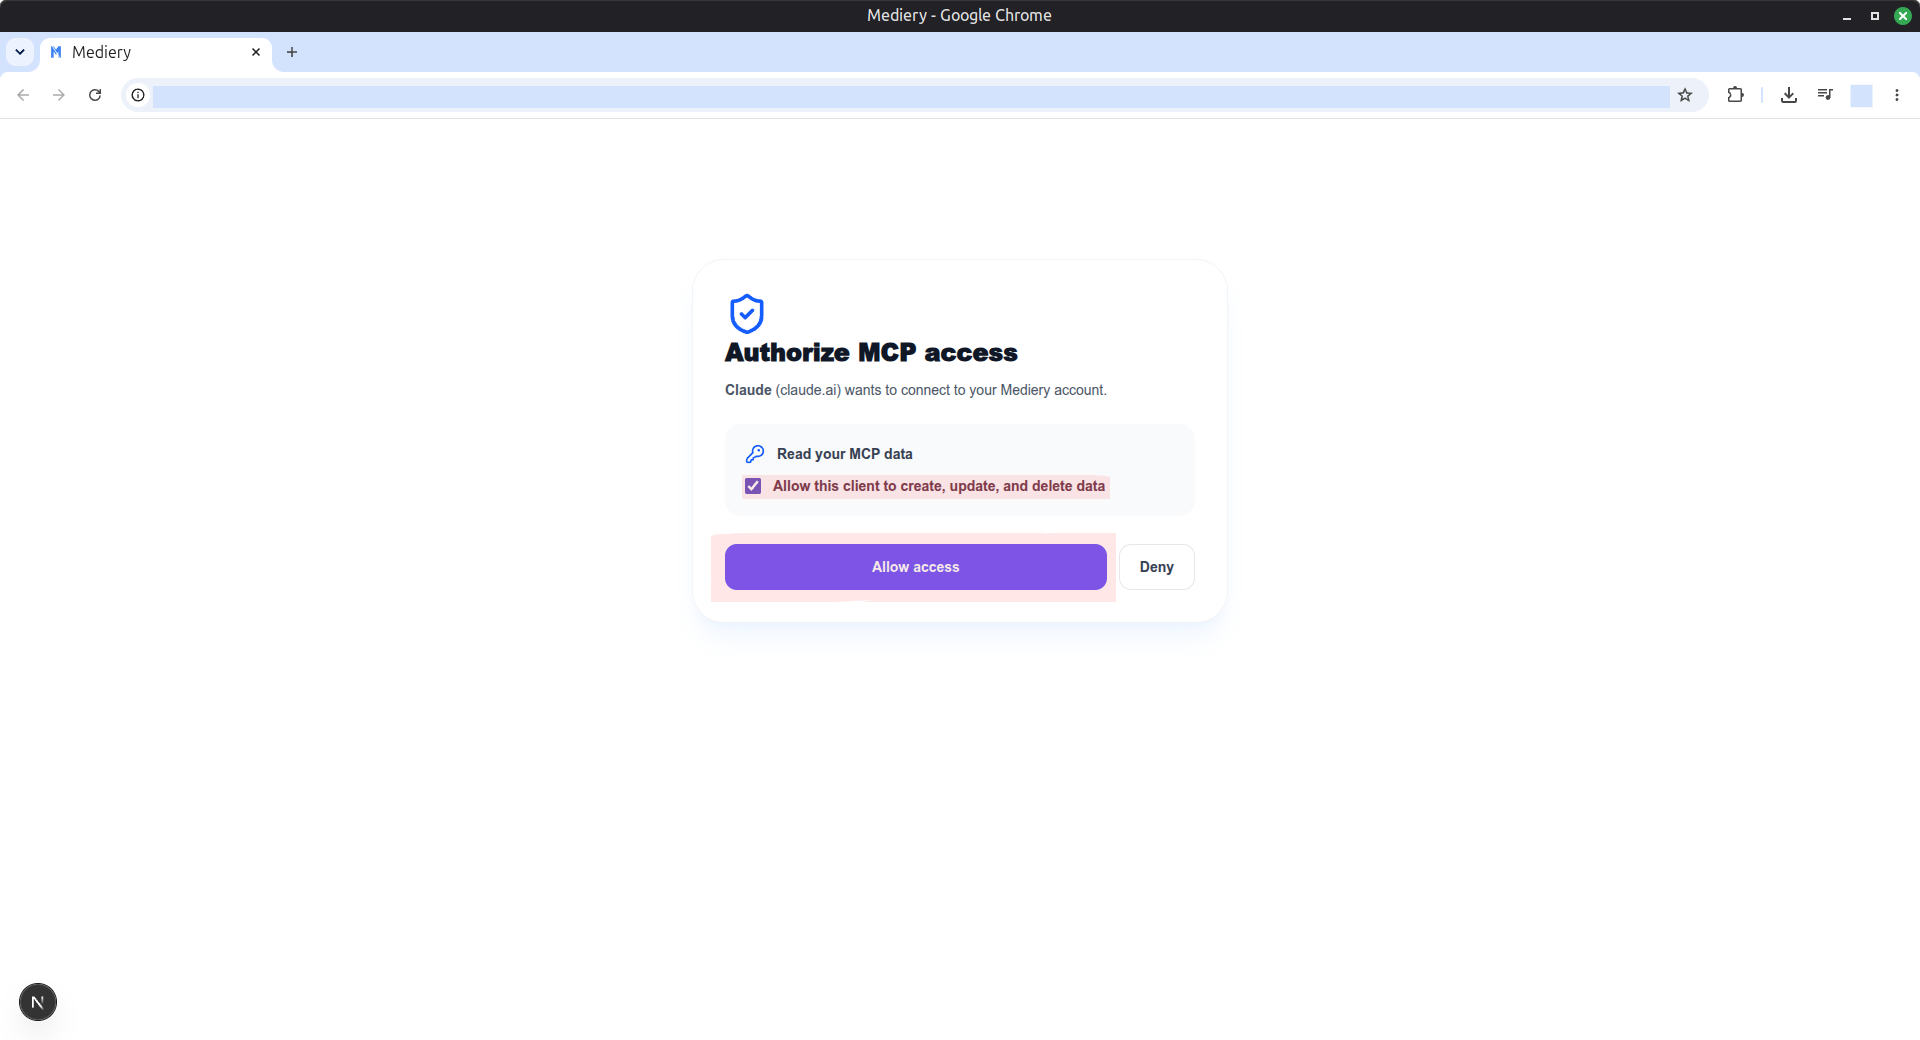
Select write access only when Claude needs to change Mediery data. - 9
Choose Allow access and wait for authorization to finish.
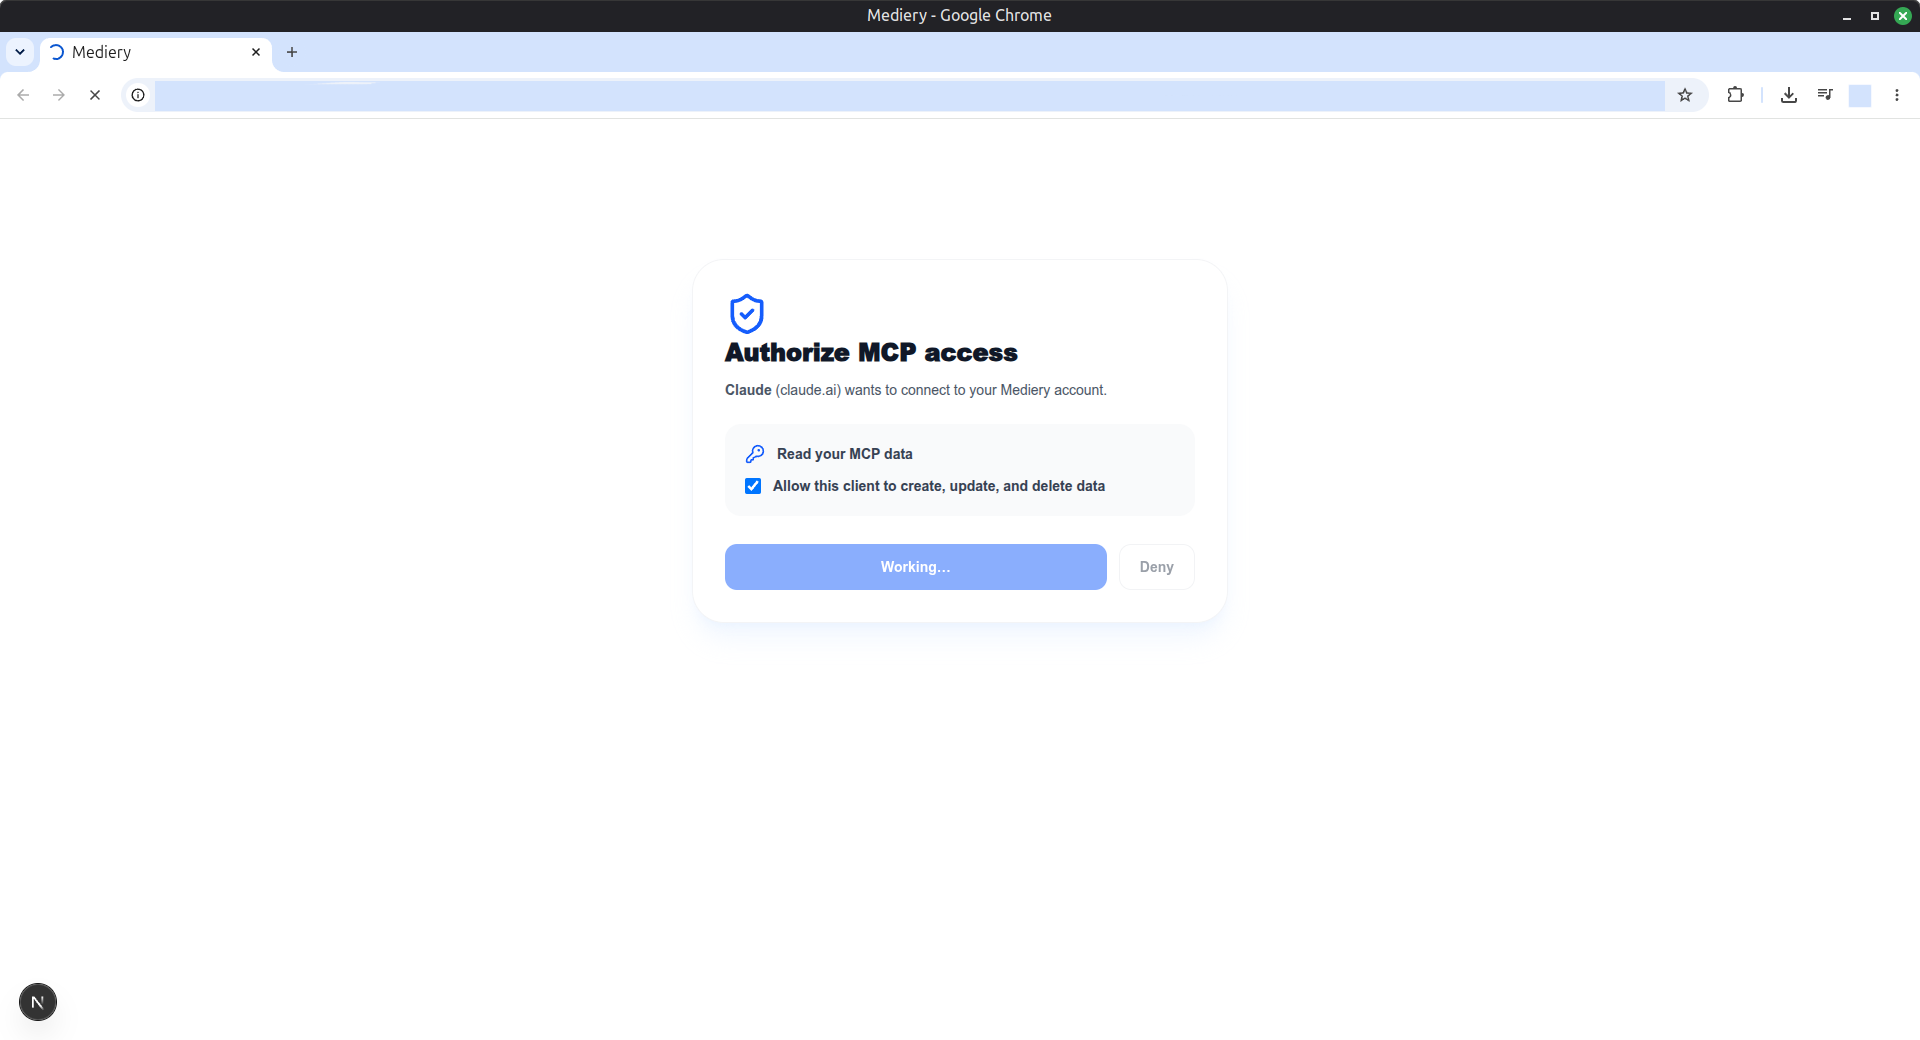
Authorize the connection. - 10
Return to Claude.ai and confirm that Mediery is connected and its tools are listed. You can also choose when Claude must ask for approval before using read-only or write/delete tools.
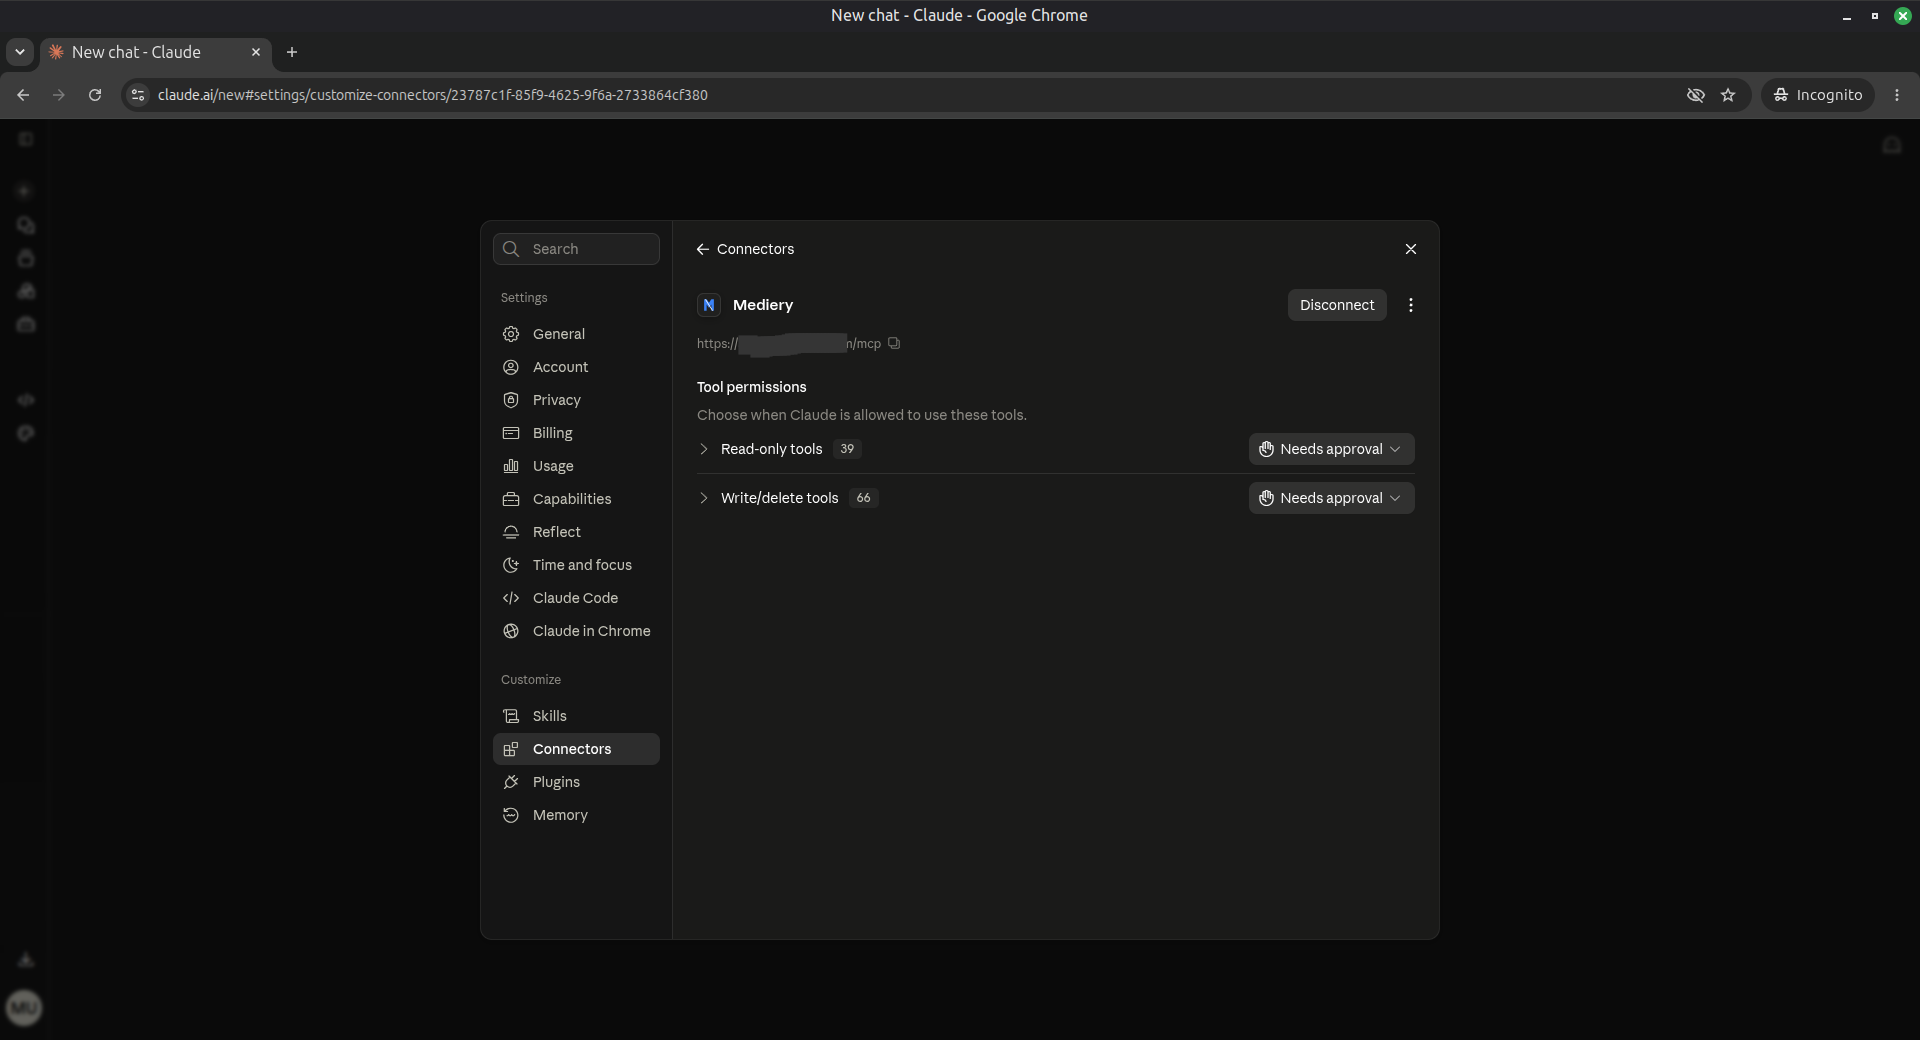
Review the available tools and their approval policies. - 11
To let Mediery tools receive files attached to your chat, open Claude.ai Settings and select Capabilities.
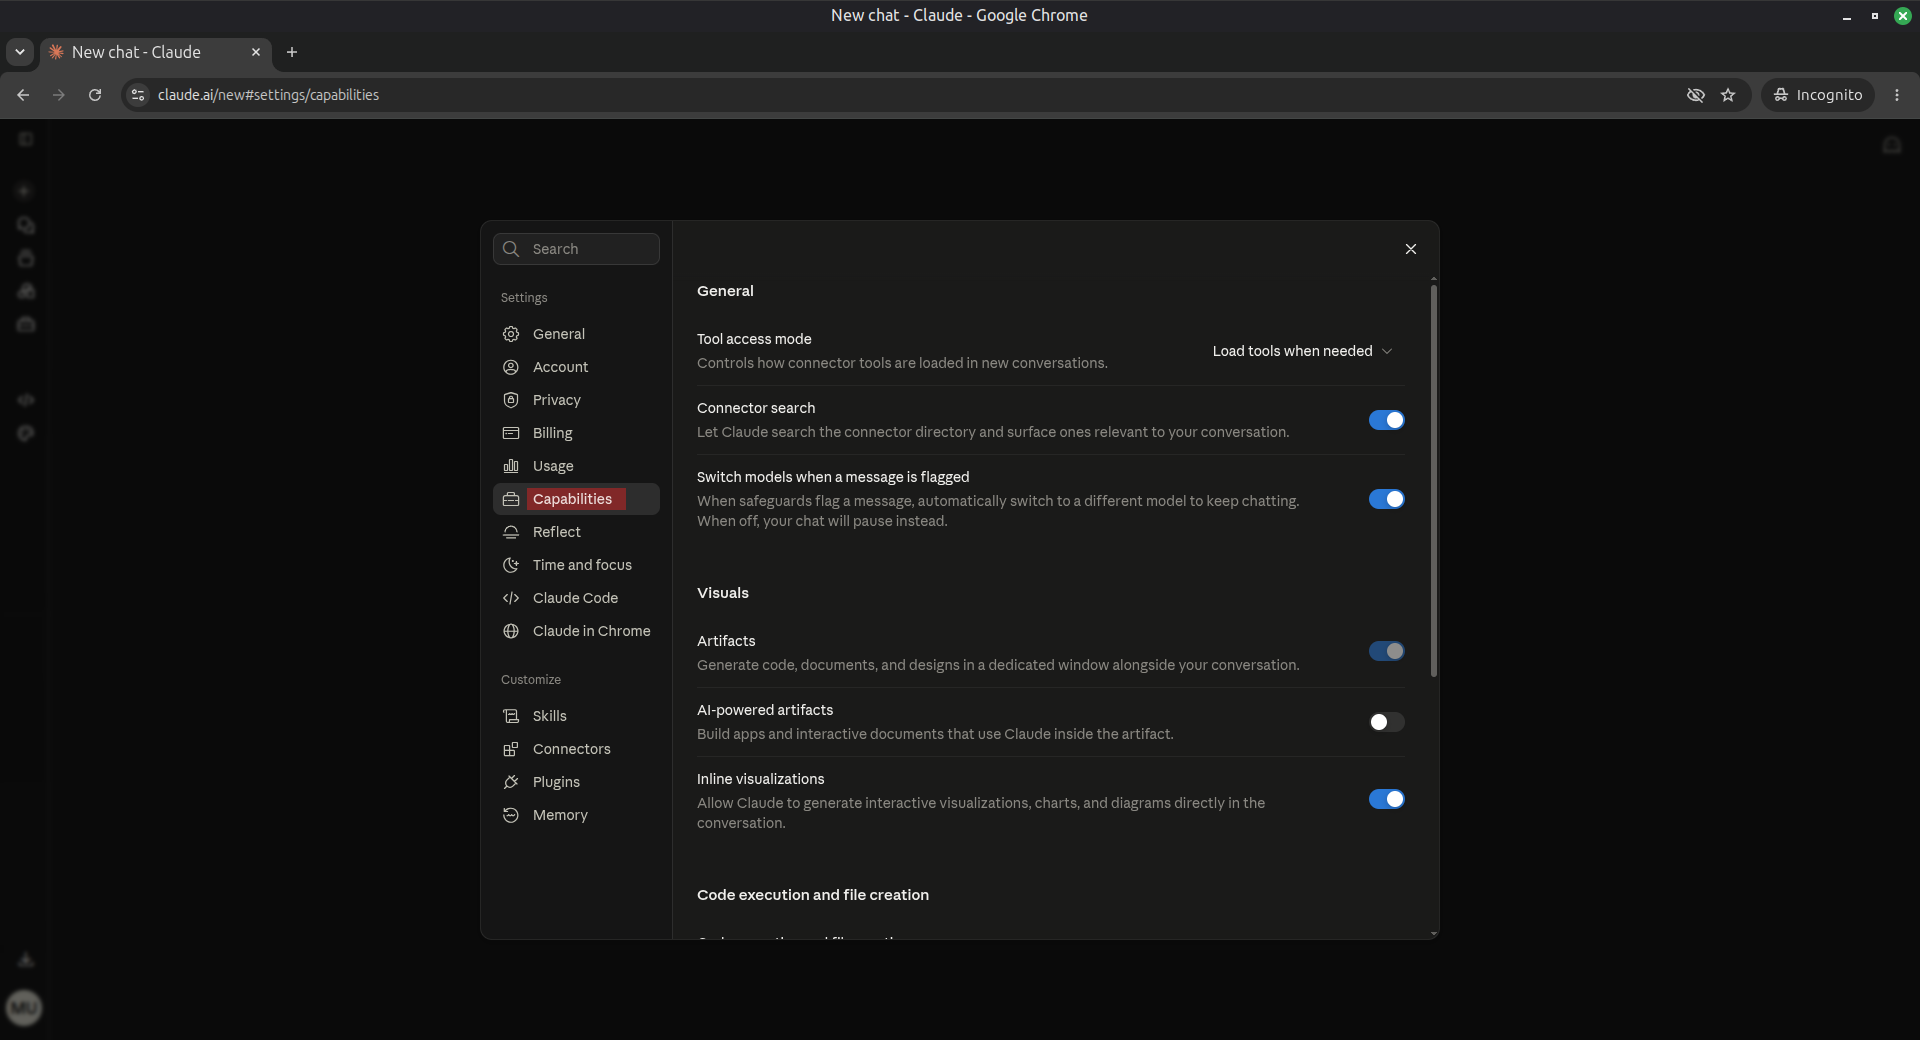
Open the Capabilities settings for file uploads. - 12
Scroll to Code execution and file creation. Make sure Code execution and file creation is enabled, then enable Allow network egress.
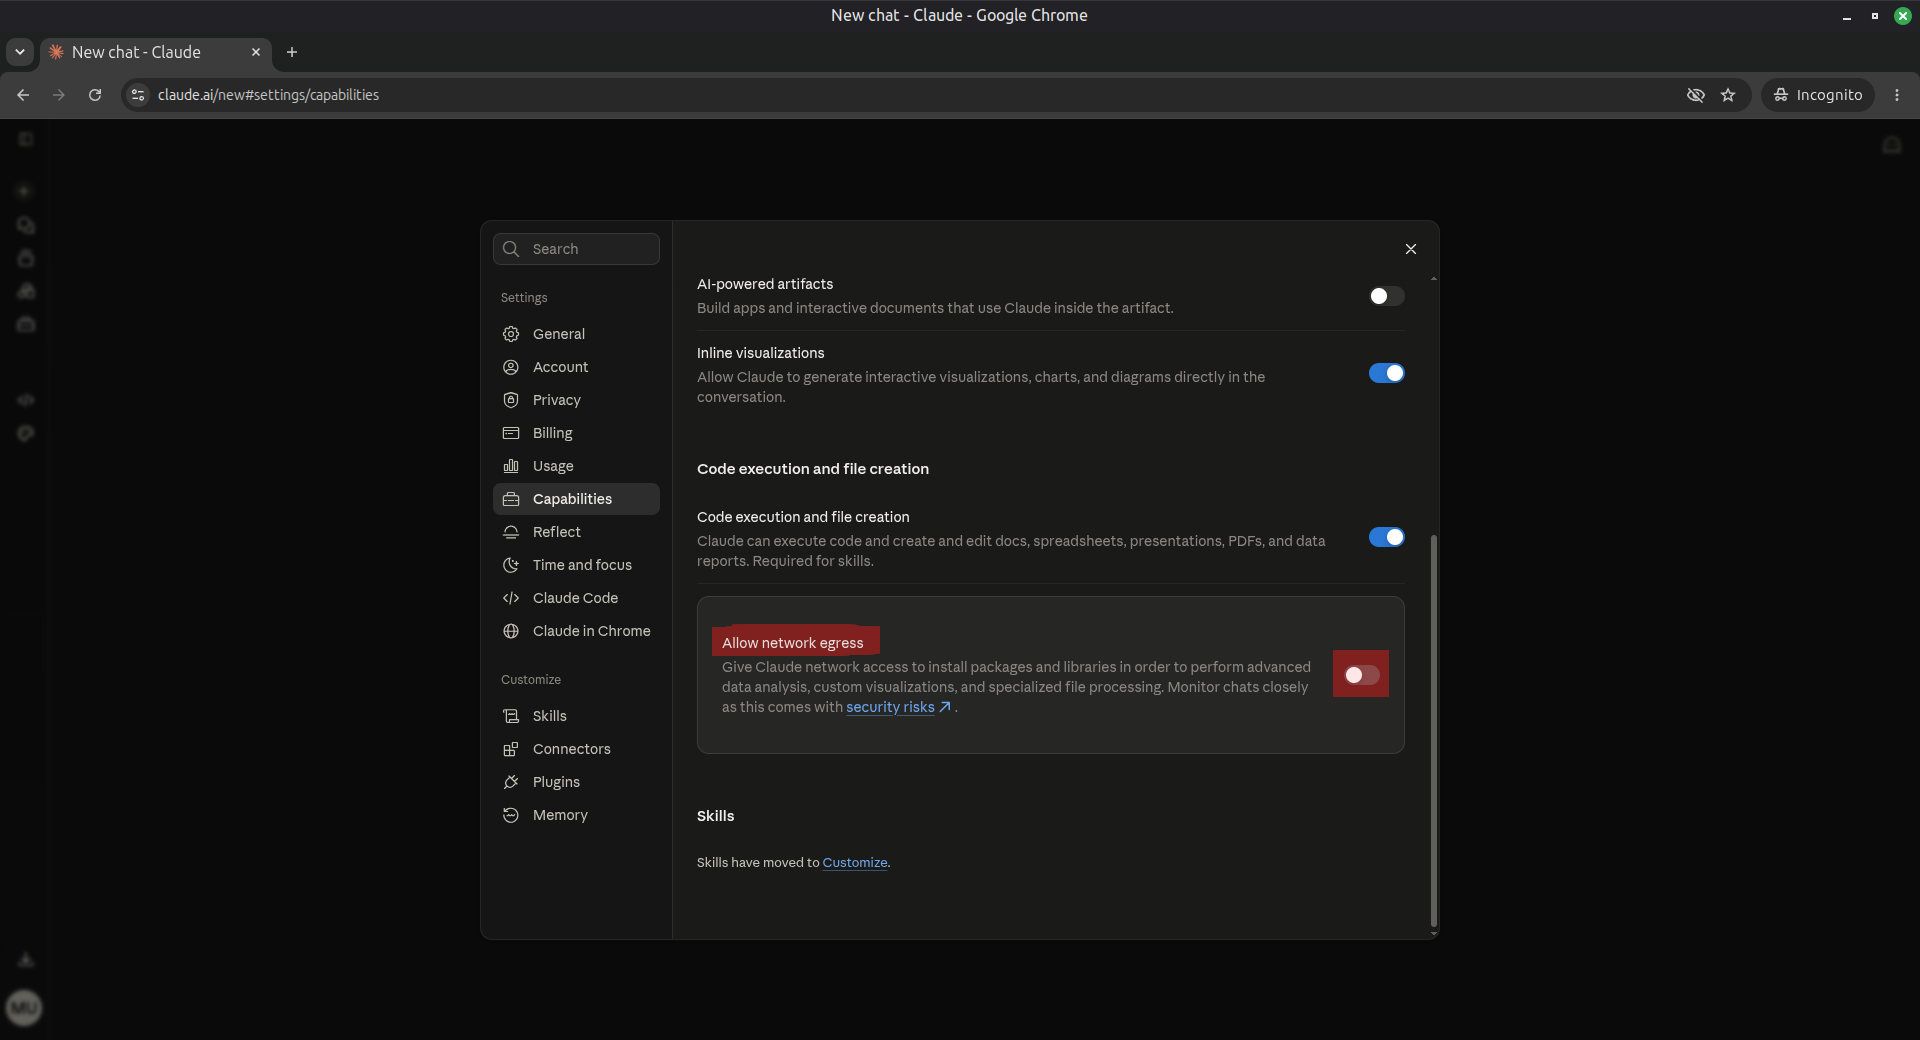
Enable code execution and network egress so Claude can upload files. - 13
Under Domain allowlist, keep Package managers only selected. Enter *.mediery.com under Additional allowed domains and choose Add.
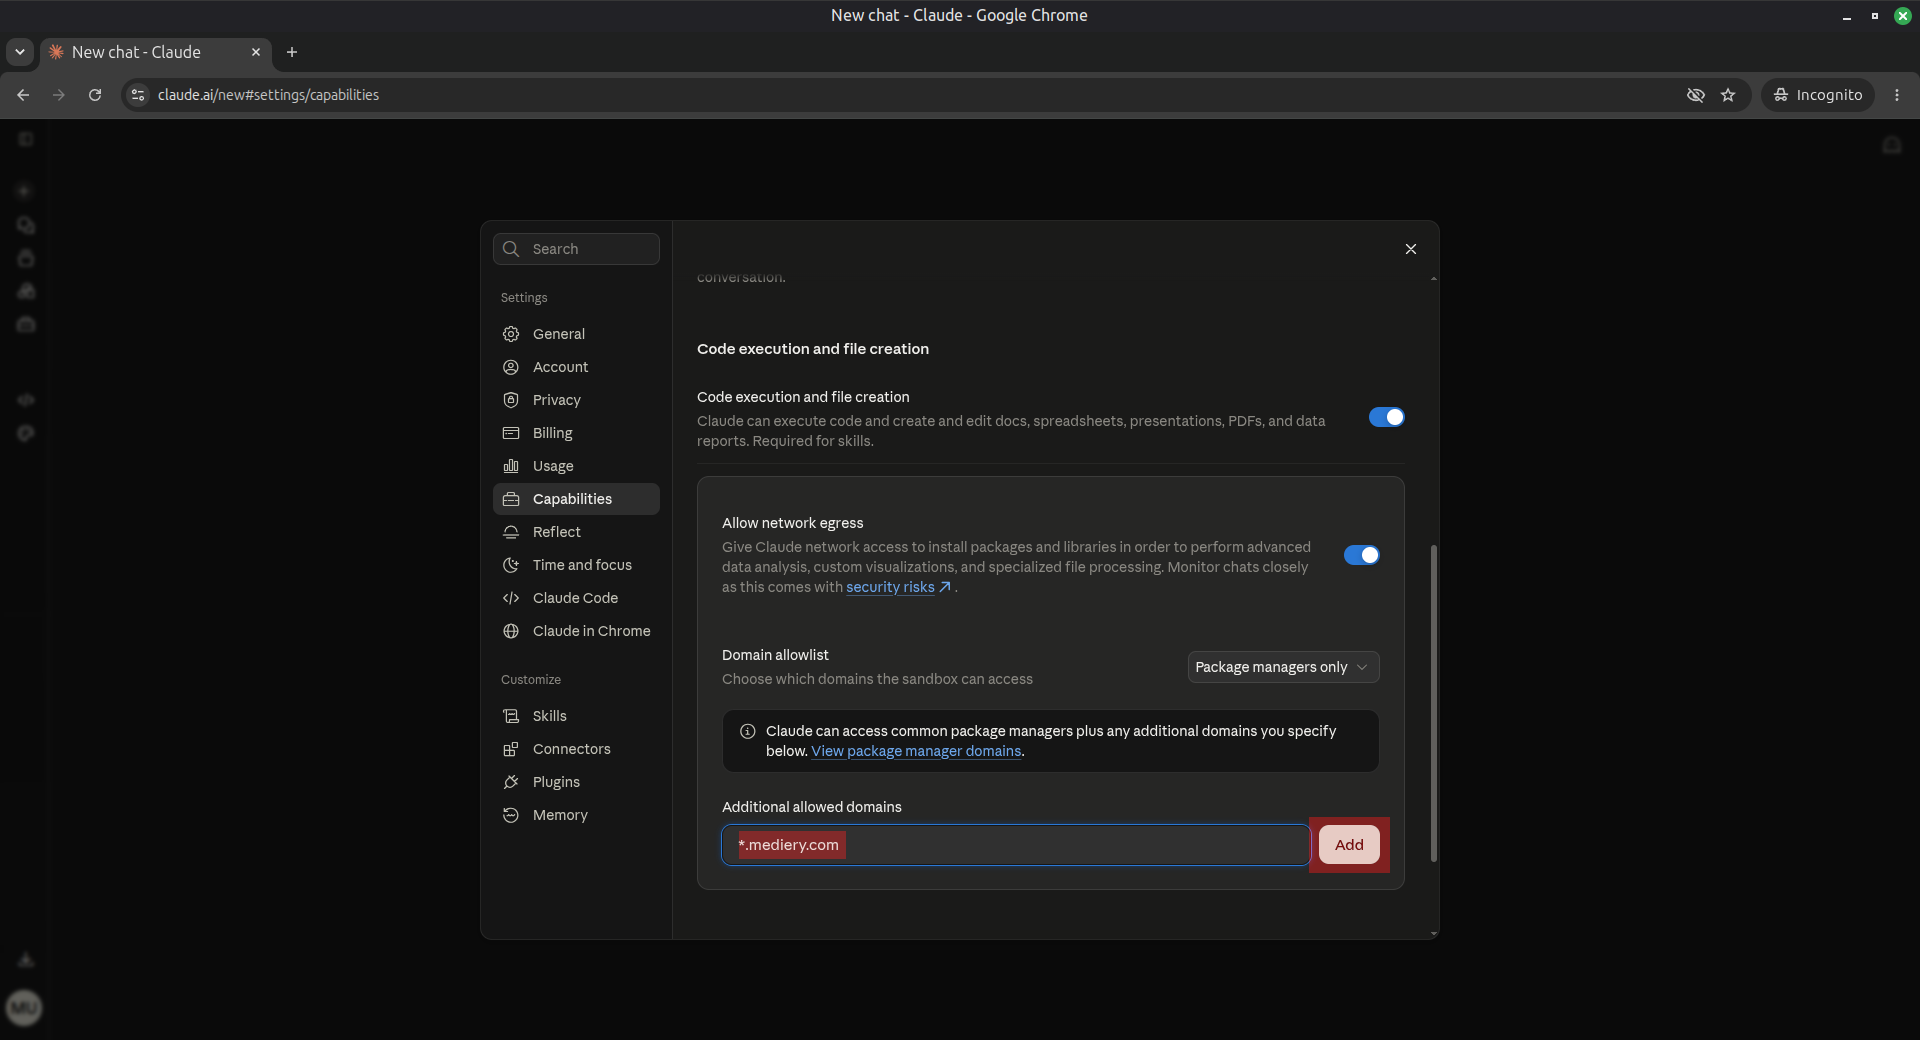
Add *.mediery.com to the allowed domains. - 14
Confirm that *.mediery.com appears in the list of additional allowed domains. Claude can now send attached images, documents, and videos to Mediery tools that support file uploads.
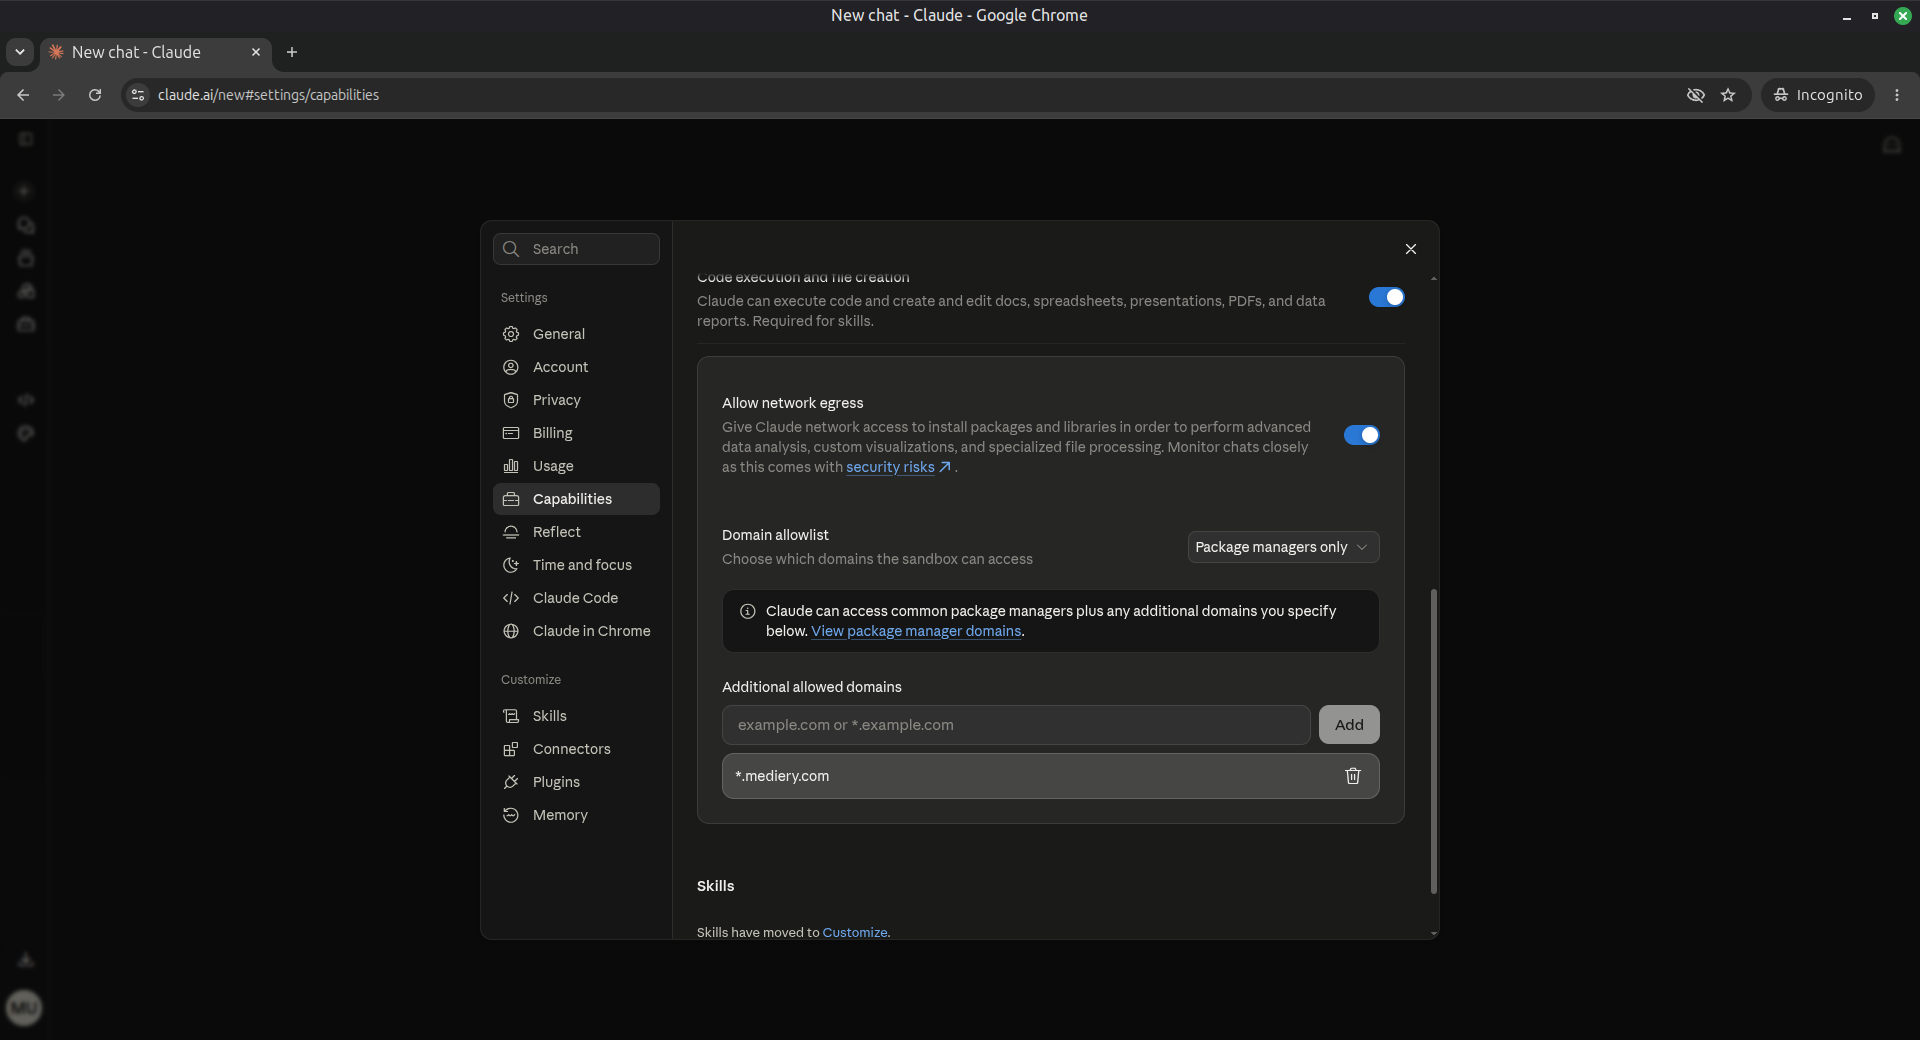
Confirm that the Mediery domain is allowed.
Claude Desktop app
Download and install Claude Desktop from https://claude.com/download. Claude connects to Mediery through OAuth, so you do not need to create or paste an API key.
- 1
Open Claude Settings either by pressing Ctrl+, on Windows or Cmd+, on macOS, or by clicking your name in the lower-left corner and choosing Settings from the popup.
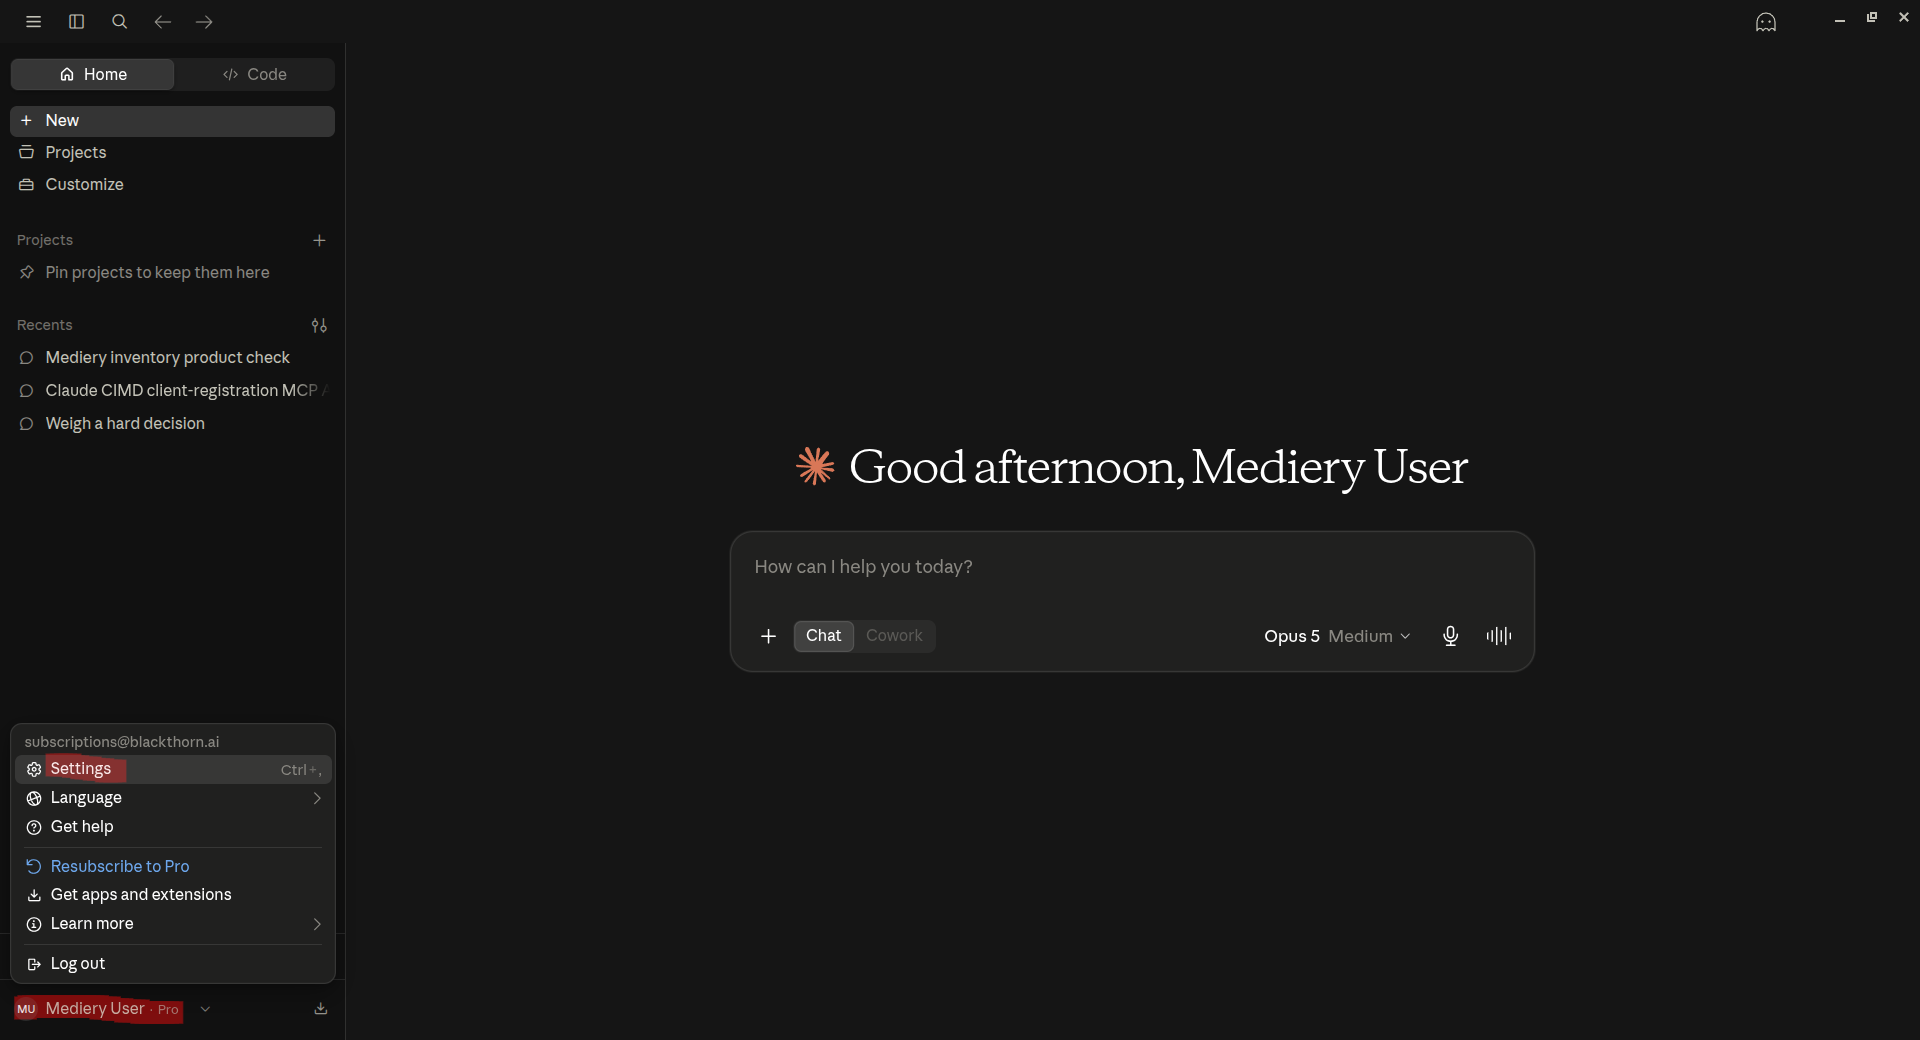
Open Claude Desktop settings. - 2
Under Customize, select Connectors.
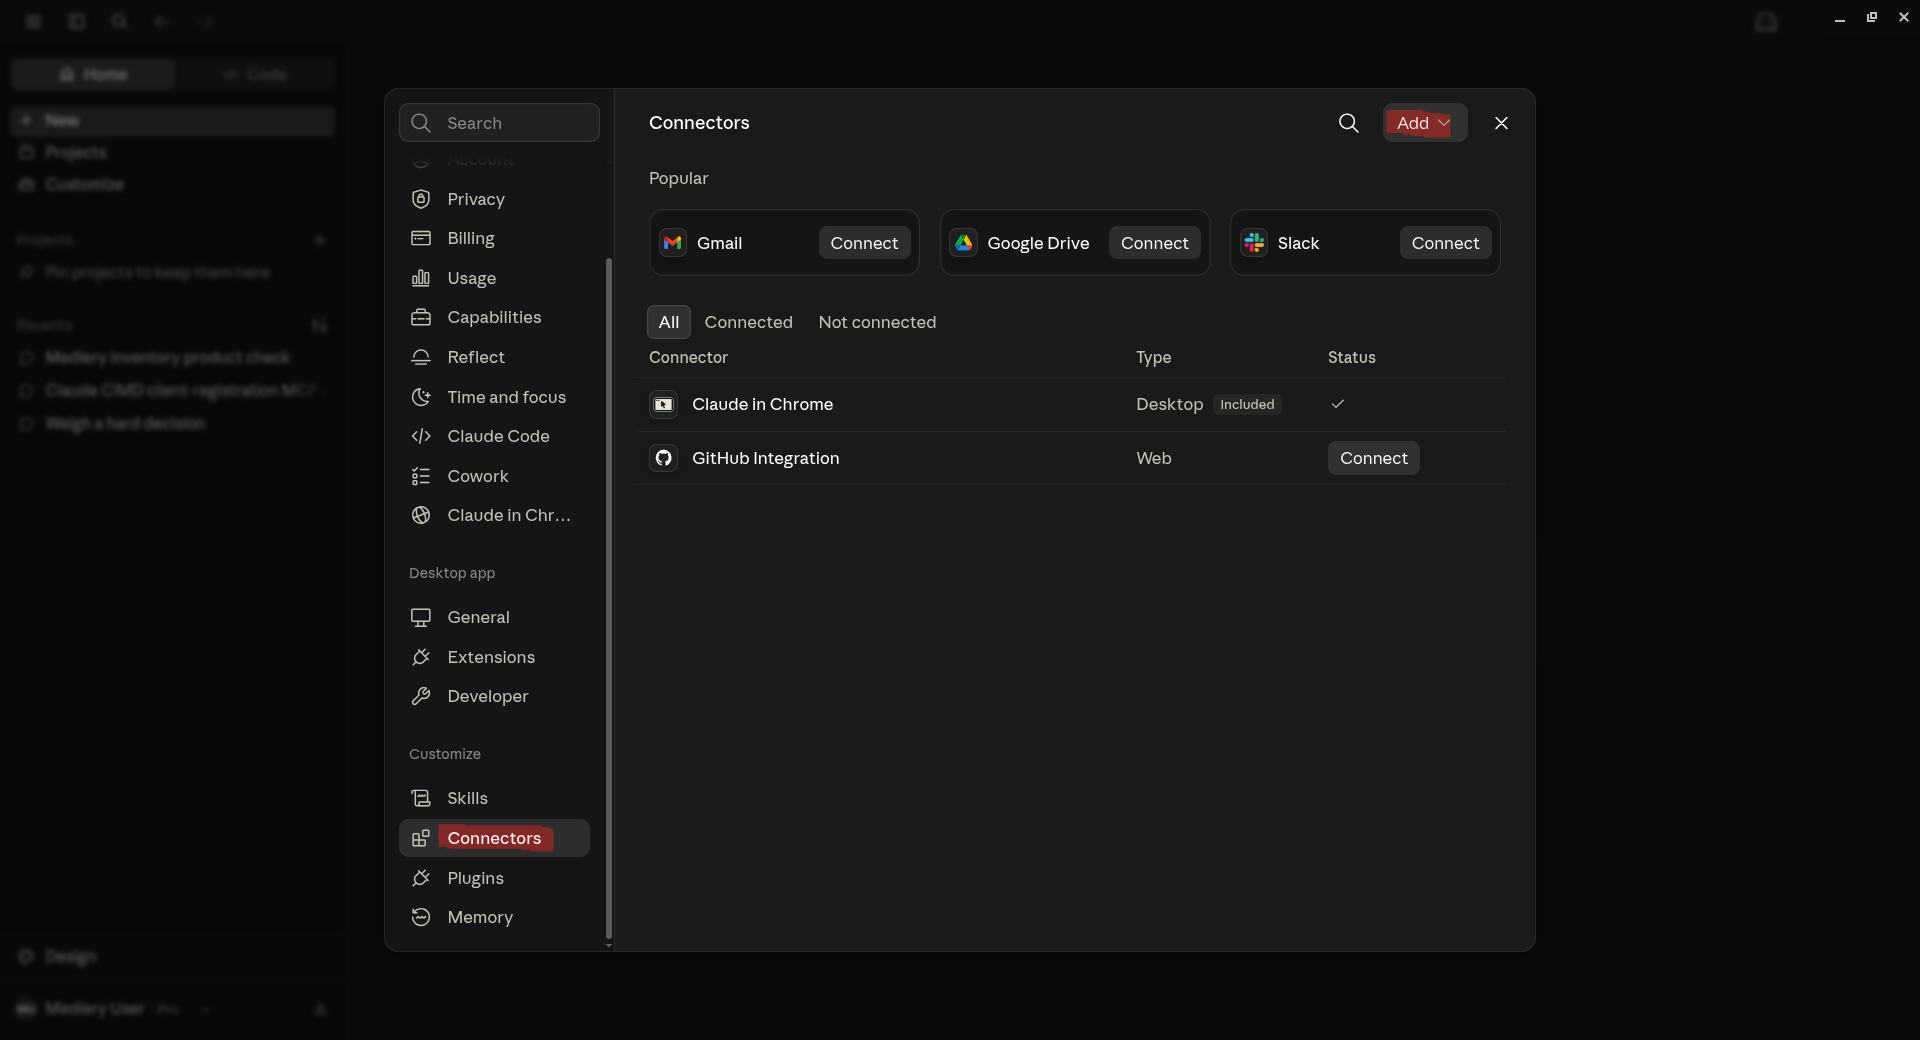
Open the Connectors settings. - 3
Open the Add menu and choose Add custom connector.
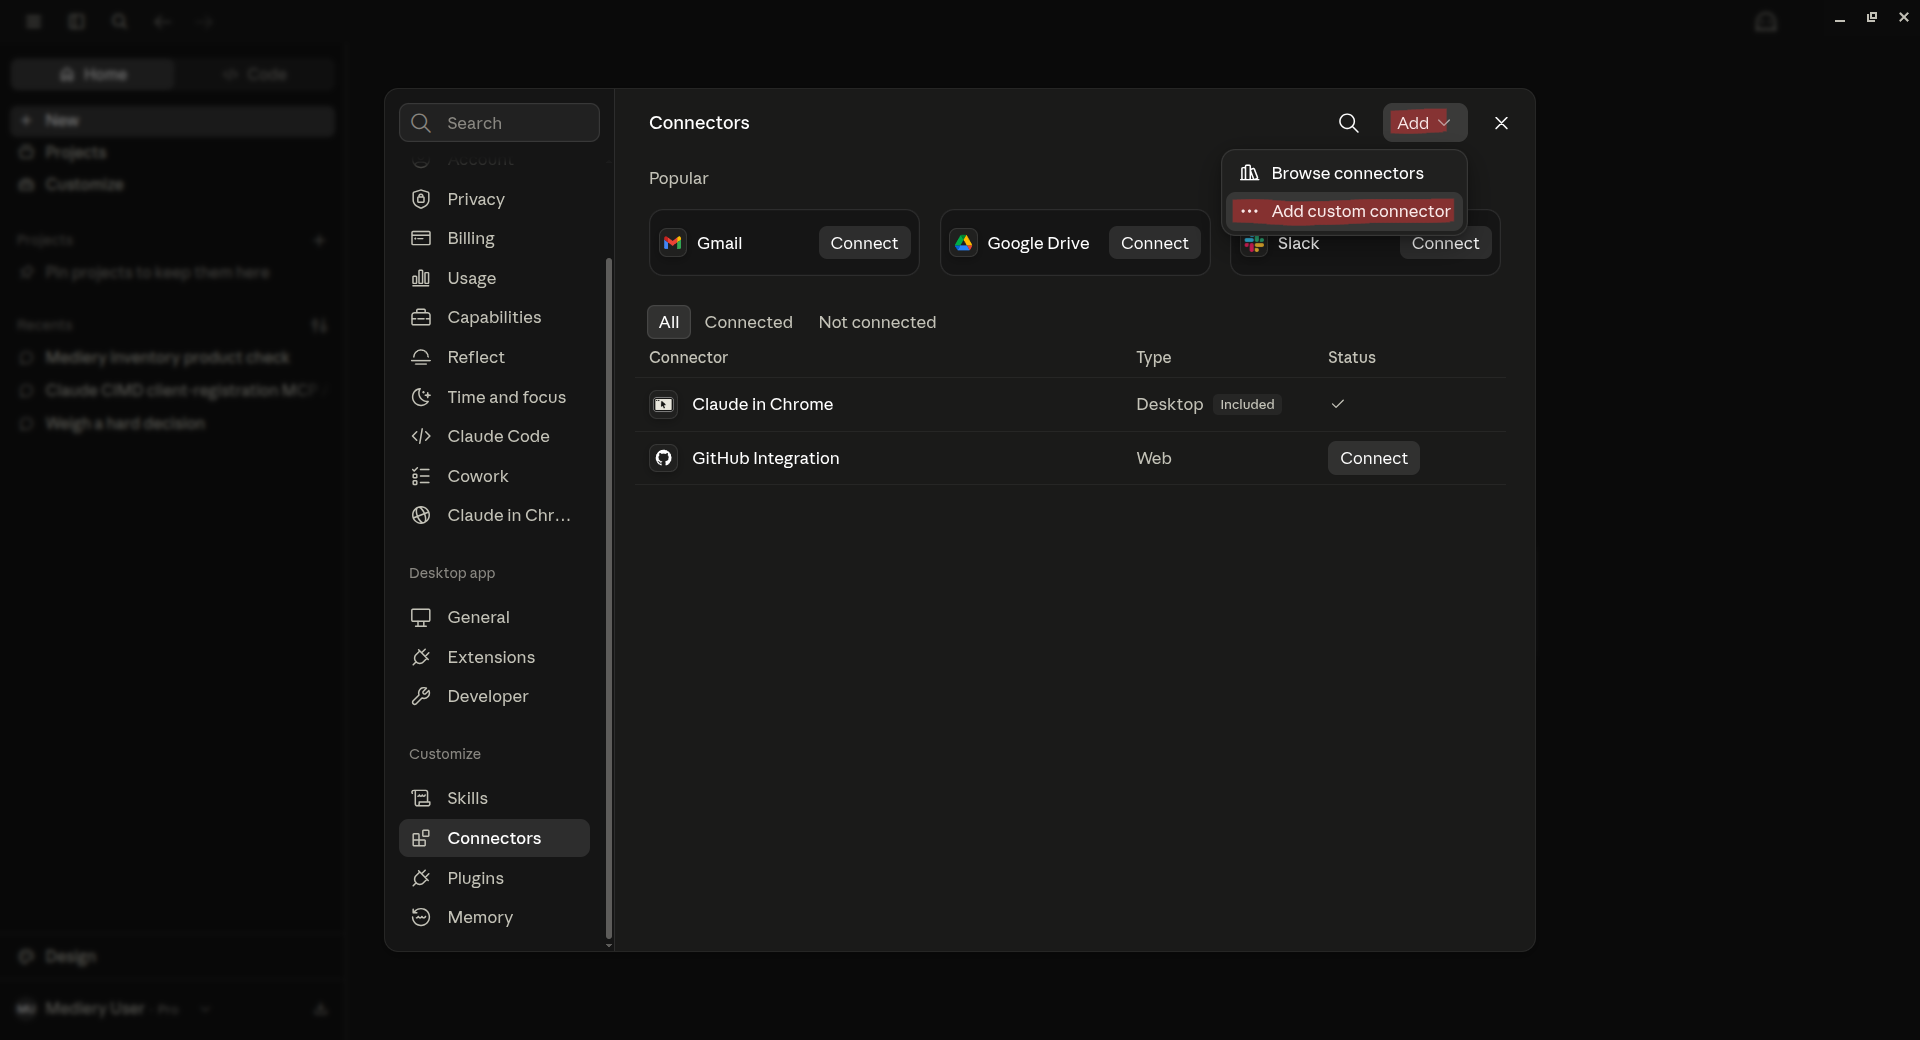
Choose Add custom connector. - 4
Enter Mediery as the name and https://api.mediery.com/mcp as the MCP server URL. Leave OAuth Client ID and OAuth Client Secret blank, then choose Add.
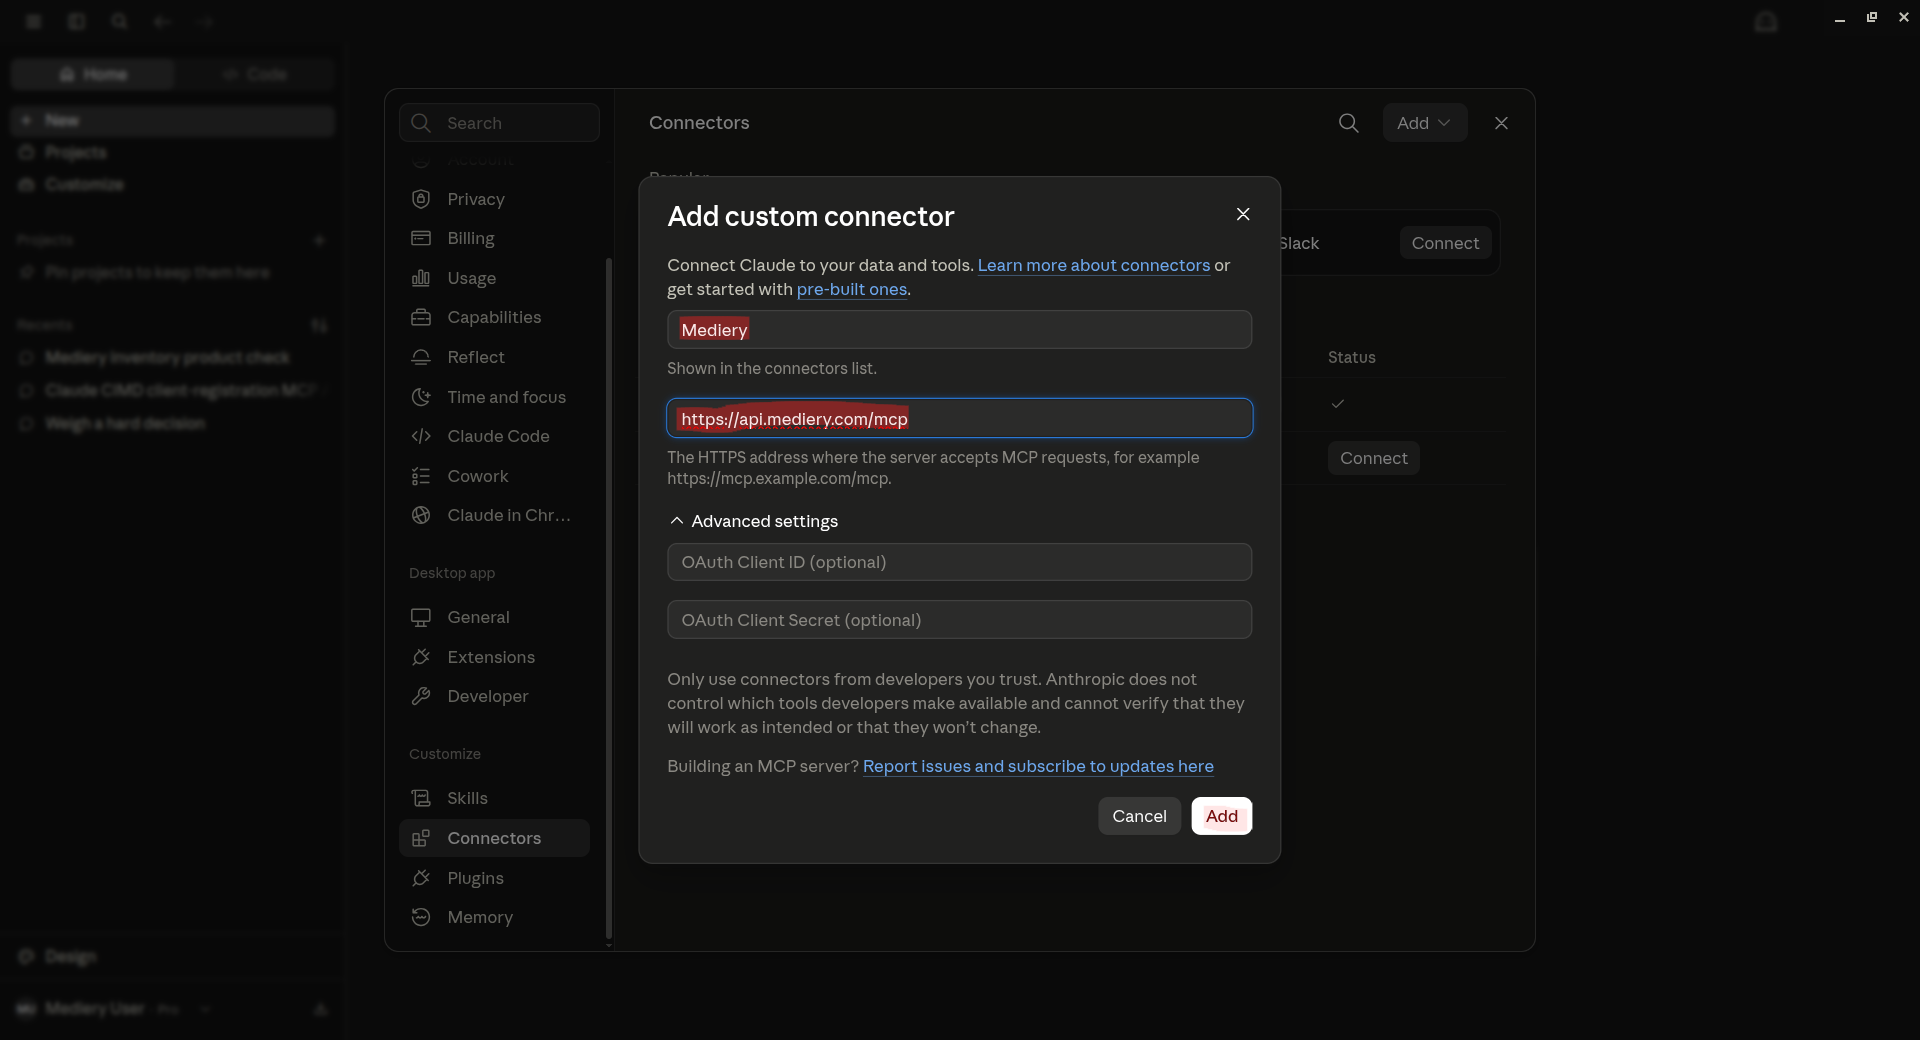
Enter the Mediery name and MCP endpoint; no OAuth client credentials are required. - 5
Open the Mediery connector and choose Connect.
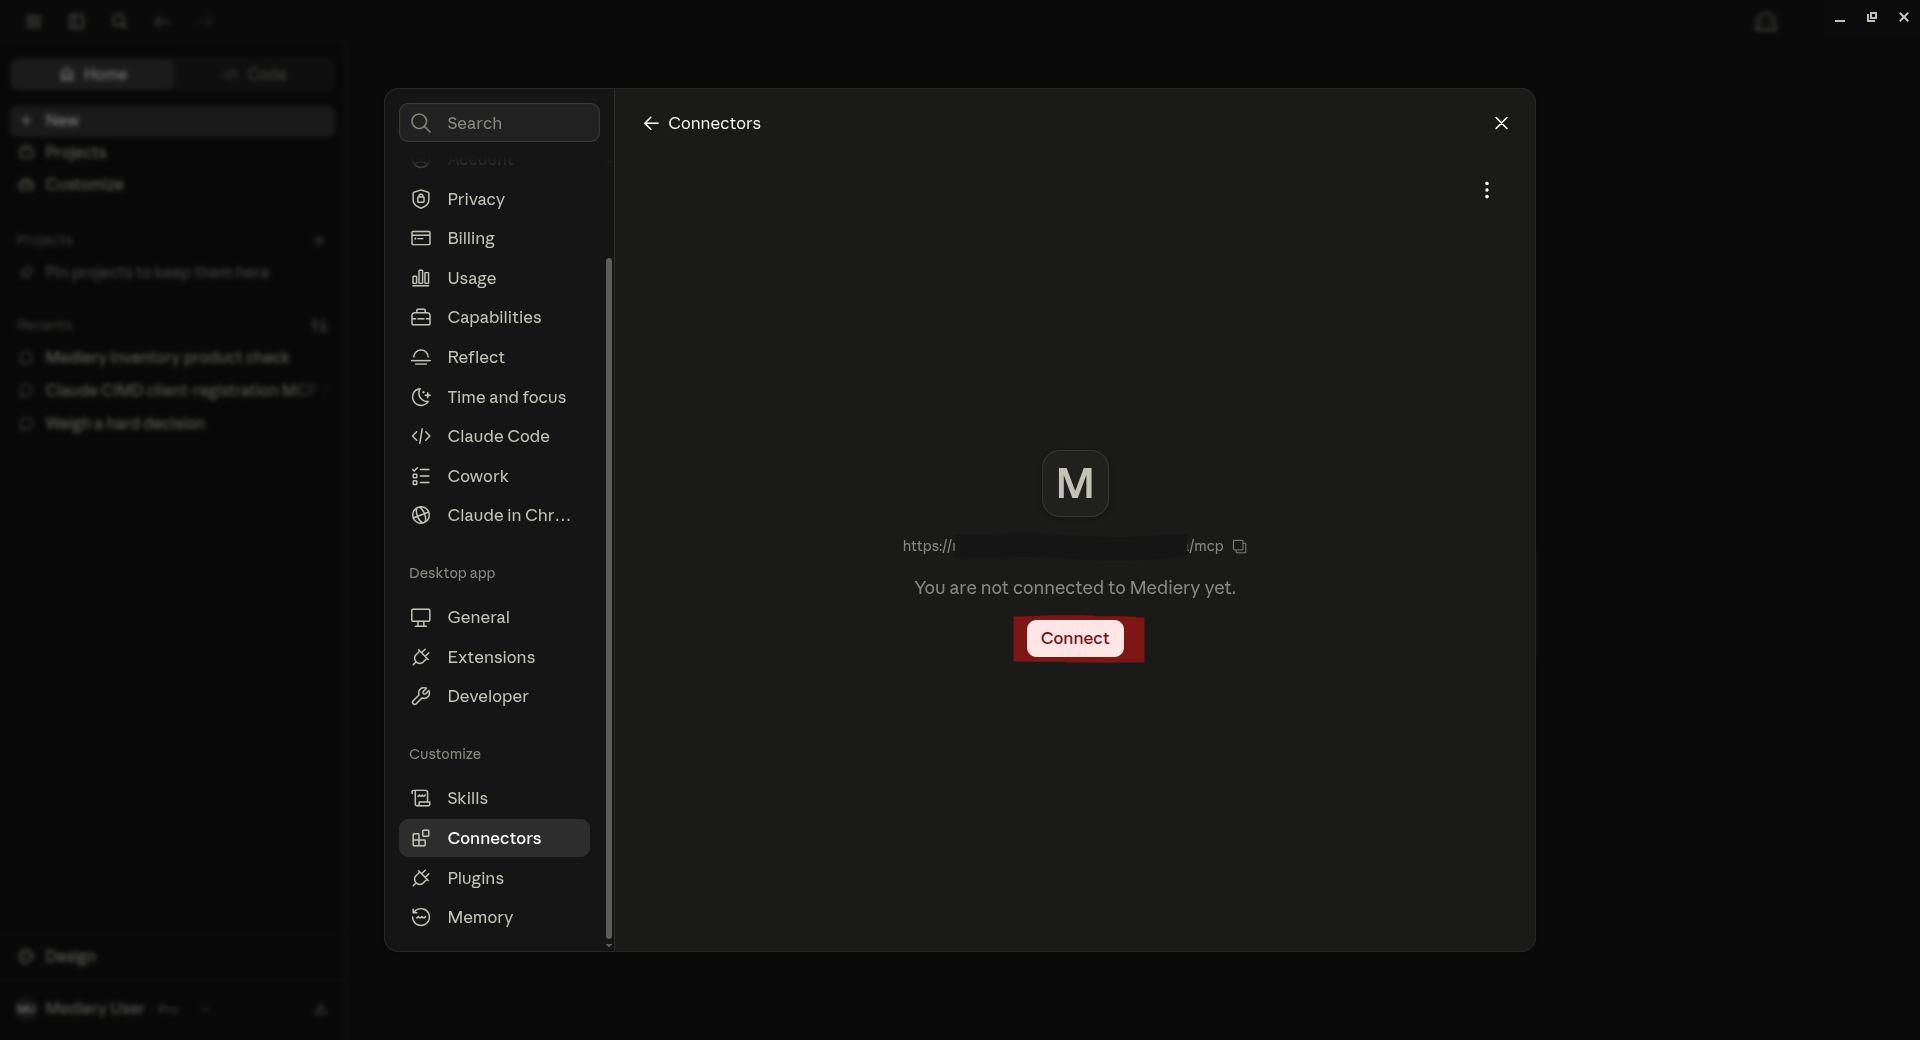
Start the OAuth connection. - 6
If Claude asks you to sign in or authorize first, complete that step. Claude then opens Mediery in your browser. If you are not already signed in, sign in with your Mediery partner account. Do not navigate to another Mediery page. After sign-in, Mediery returns you to the authorization request where you can choose the permission level.
Sign in on the page opened by OAuth before choosing permissions. - 7
After signing in as a partner, review the Mediery access request in your browser.
Review the Mediery access request in your browser. - 8
Once you are signed in as a partner, read access is included. If you also want Claude to make changes, select “Allow this client to create, update, and delete data”. Leave it unselected for read-only access.
Select write access only when Claude needs to change Mediery data. - 9
Choose Allow access.
Authorize the connection. - 10
On the success page, choose Open Claude or Open desktop app to return to Claude Desktop.
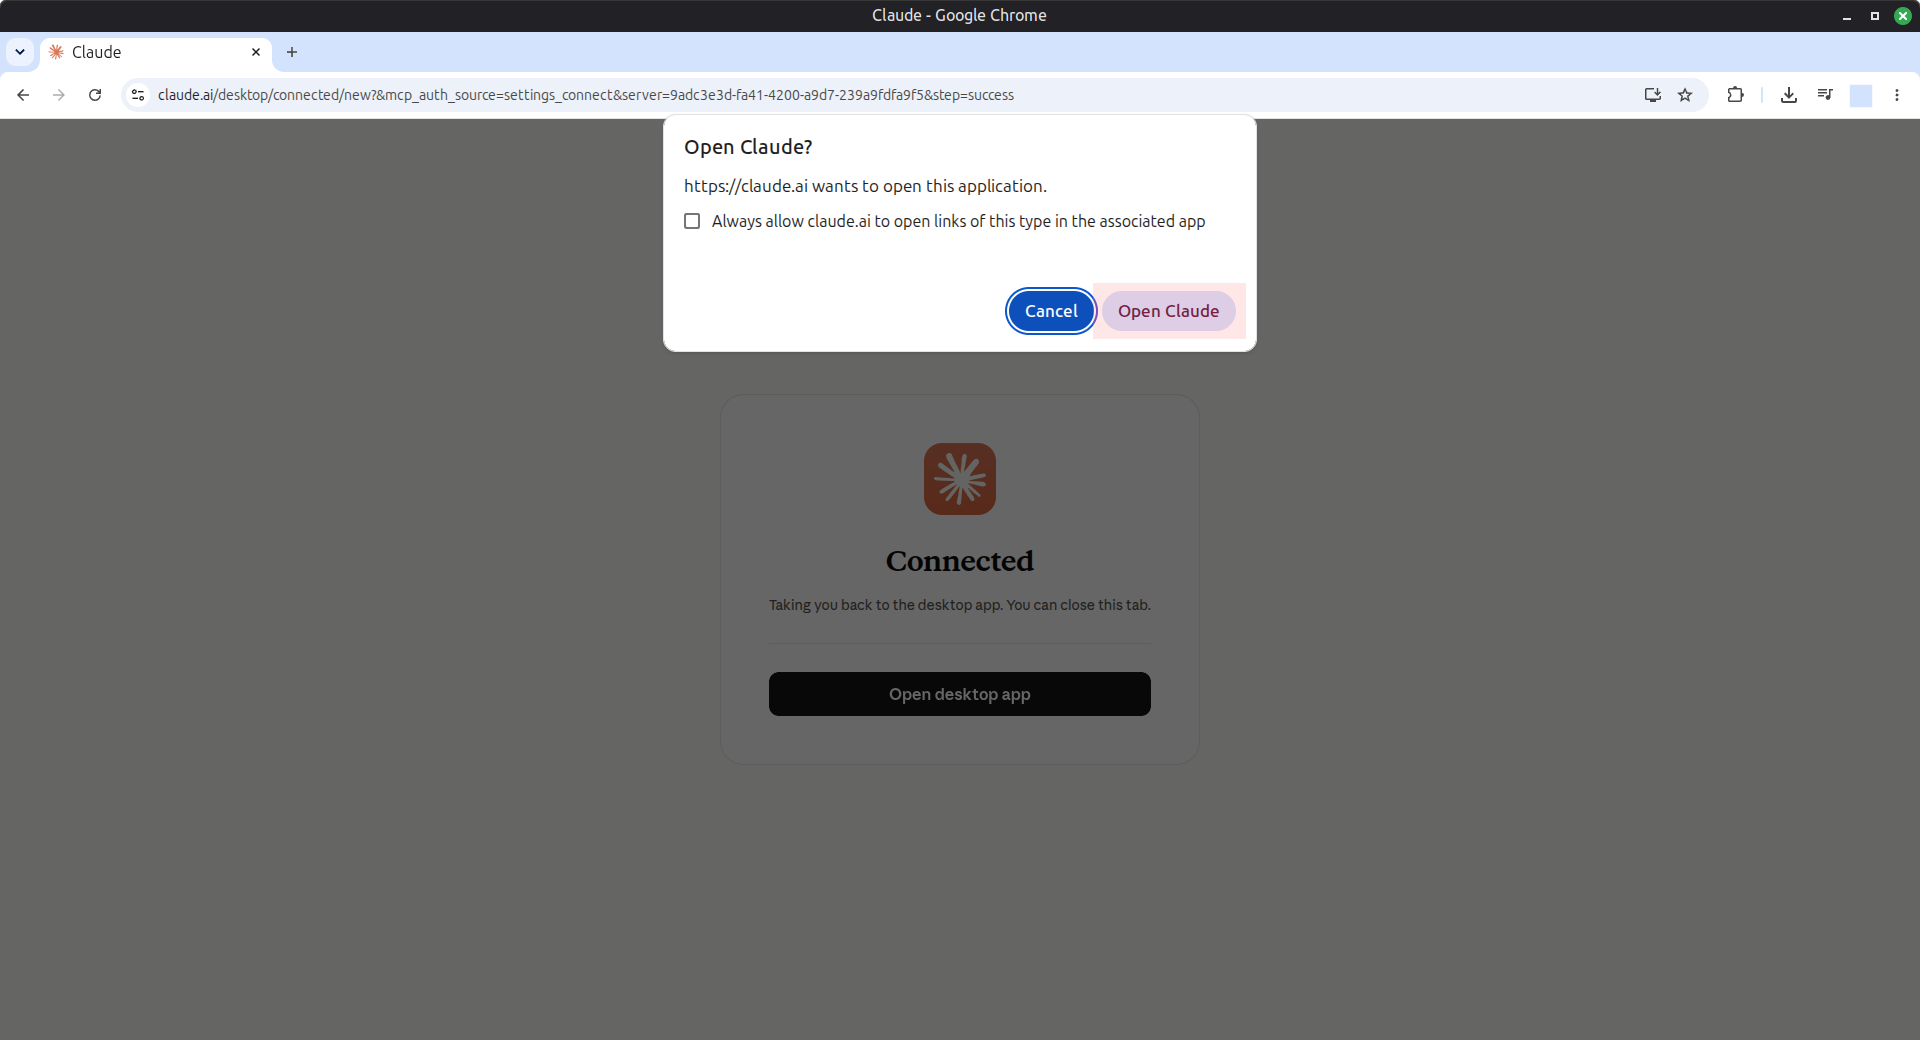
Return to Claude Desktop. - 11
Confirm that Mediery is connected and its tools are listed. You can also choose when Claude must ask for approval before using read-only or write/delete tools.
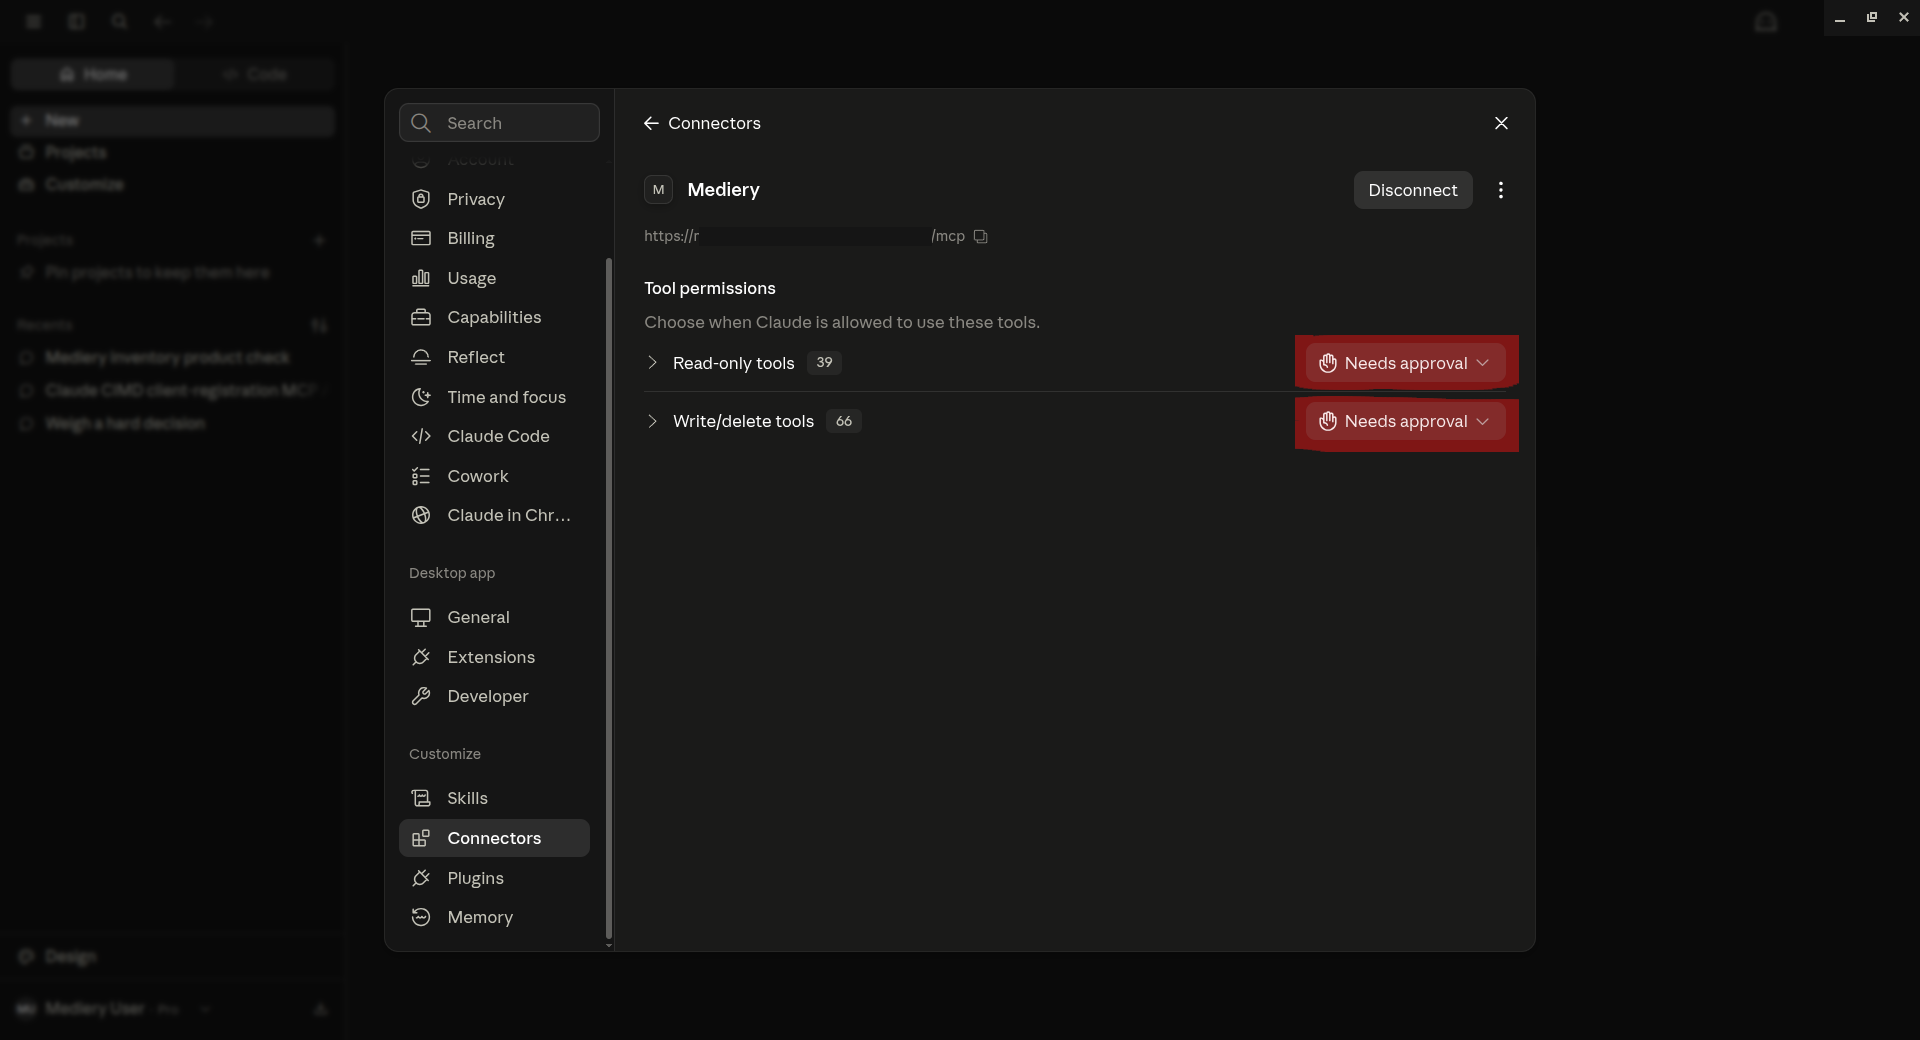
Review the available tools and their approval policies. - 12
To let Mediery tools receive files attached to your chat, open Claude Settings and select Capabilities.
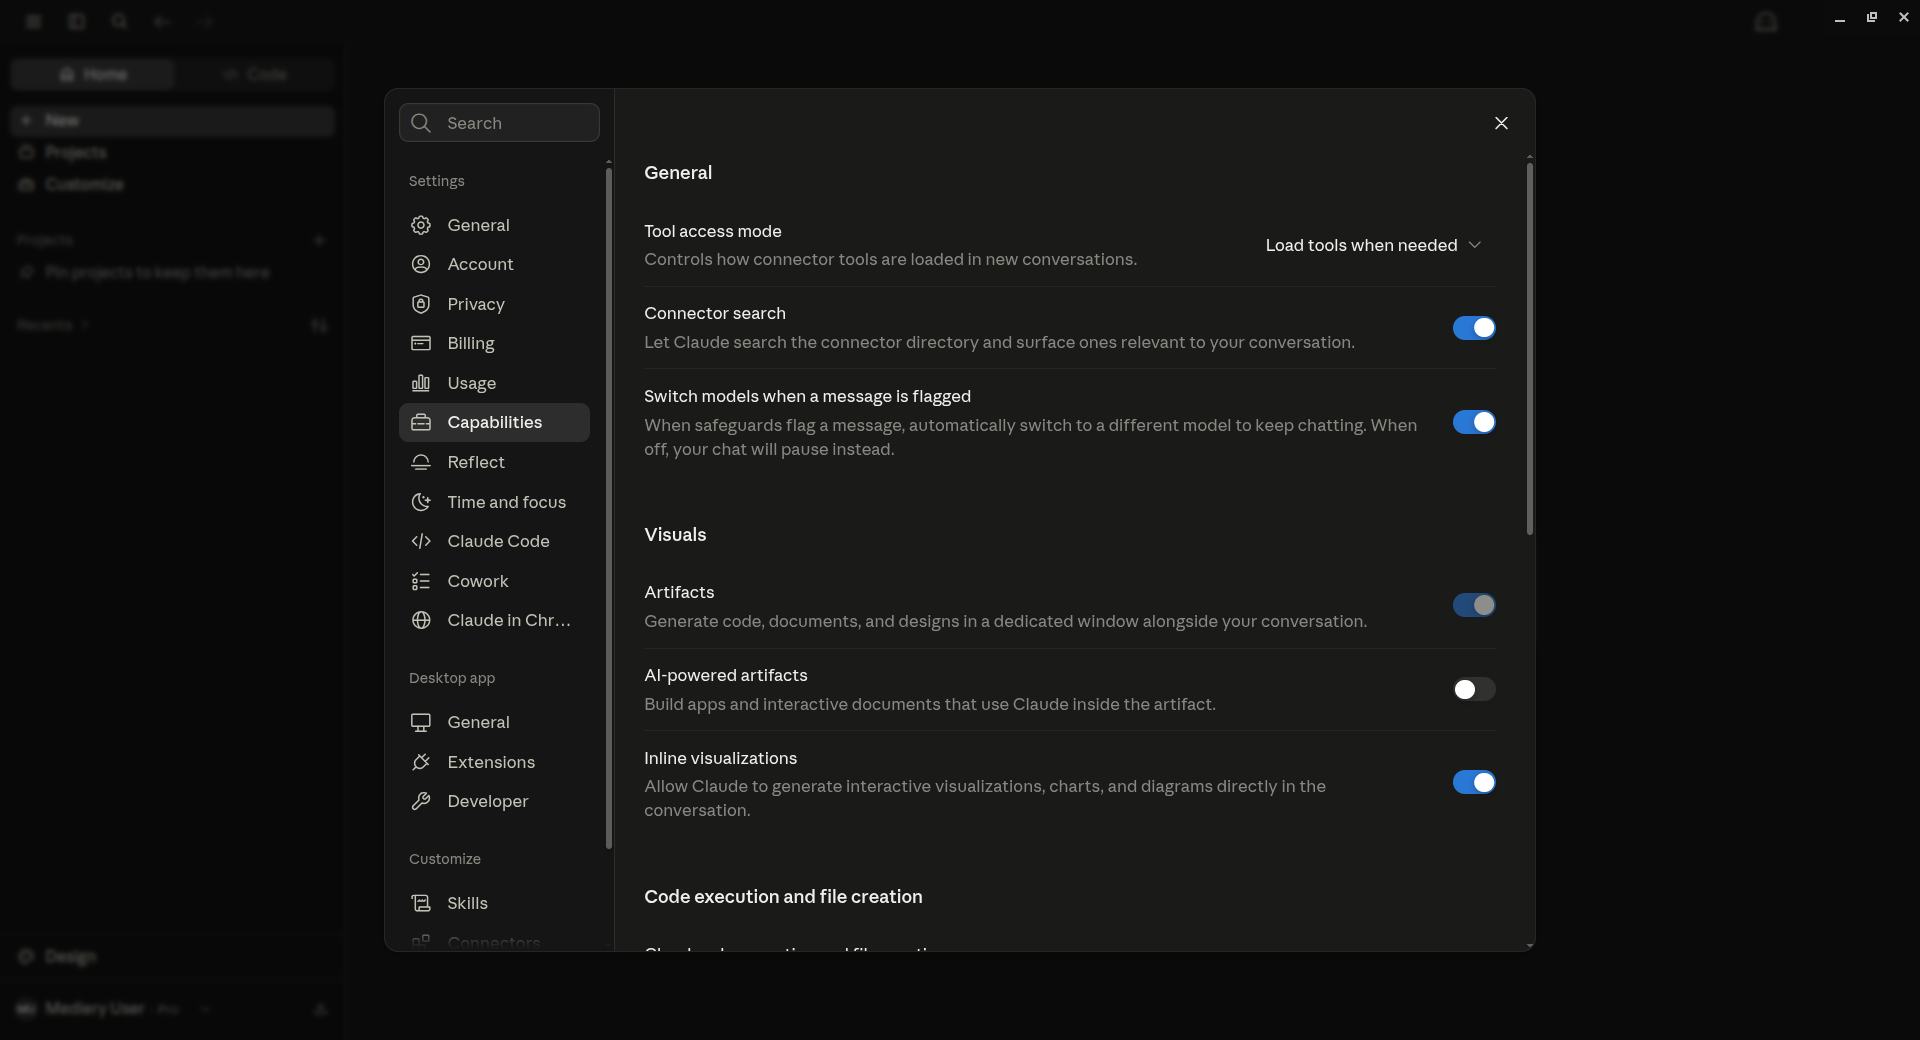
Open the Capabilities settings for file uploads. - 13
Scroll to Code execution and file creation. Make sure Cloud code execution and file creation is enabled, then enable Allow network egress.
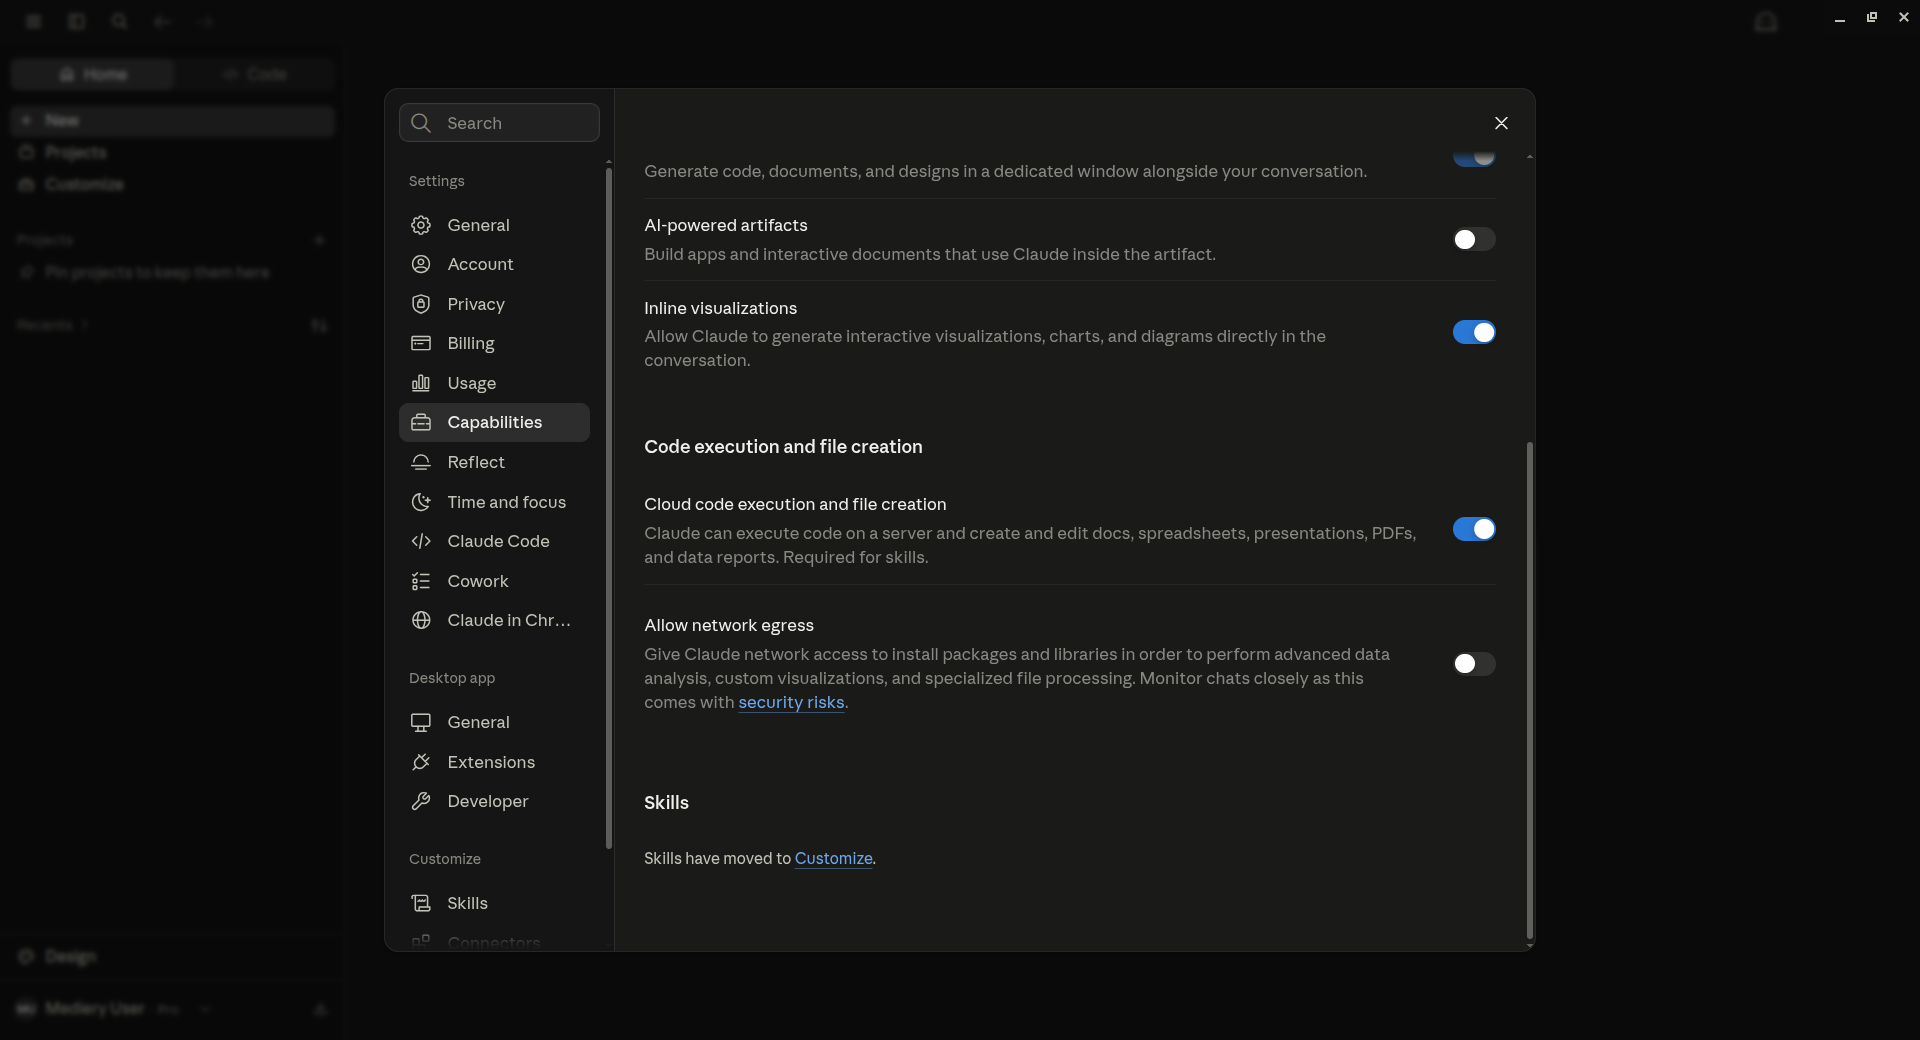
Enable code execution and network egress so Claude can upload files. - 14
Under Domain allowlist, keep Package managers only selected. Enter *.mediery.com under Additional allowed domains and choose Add.
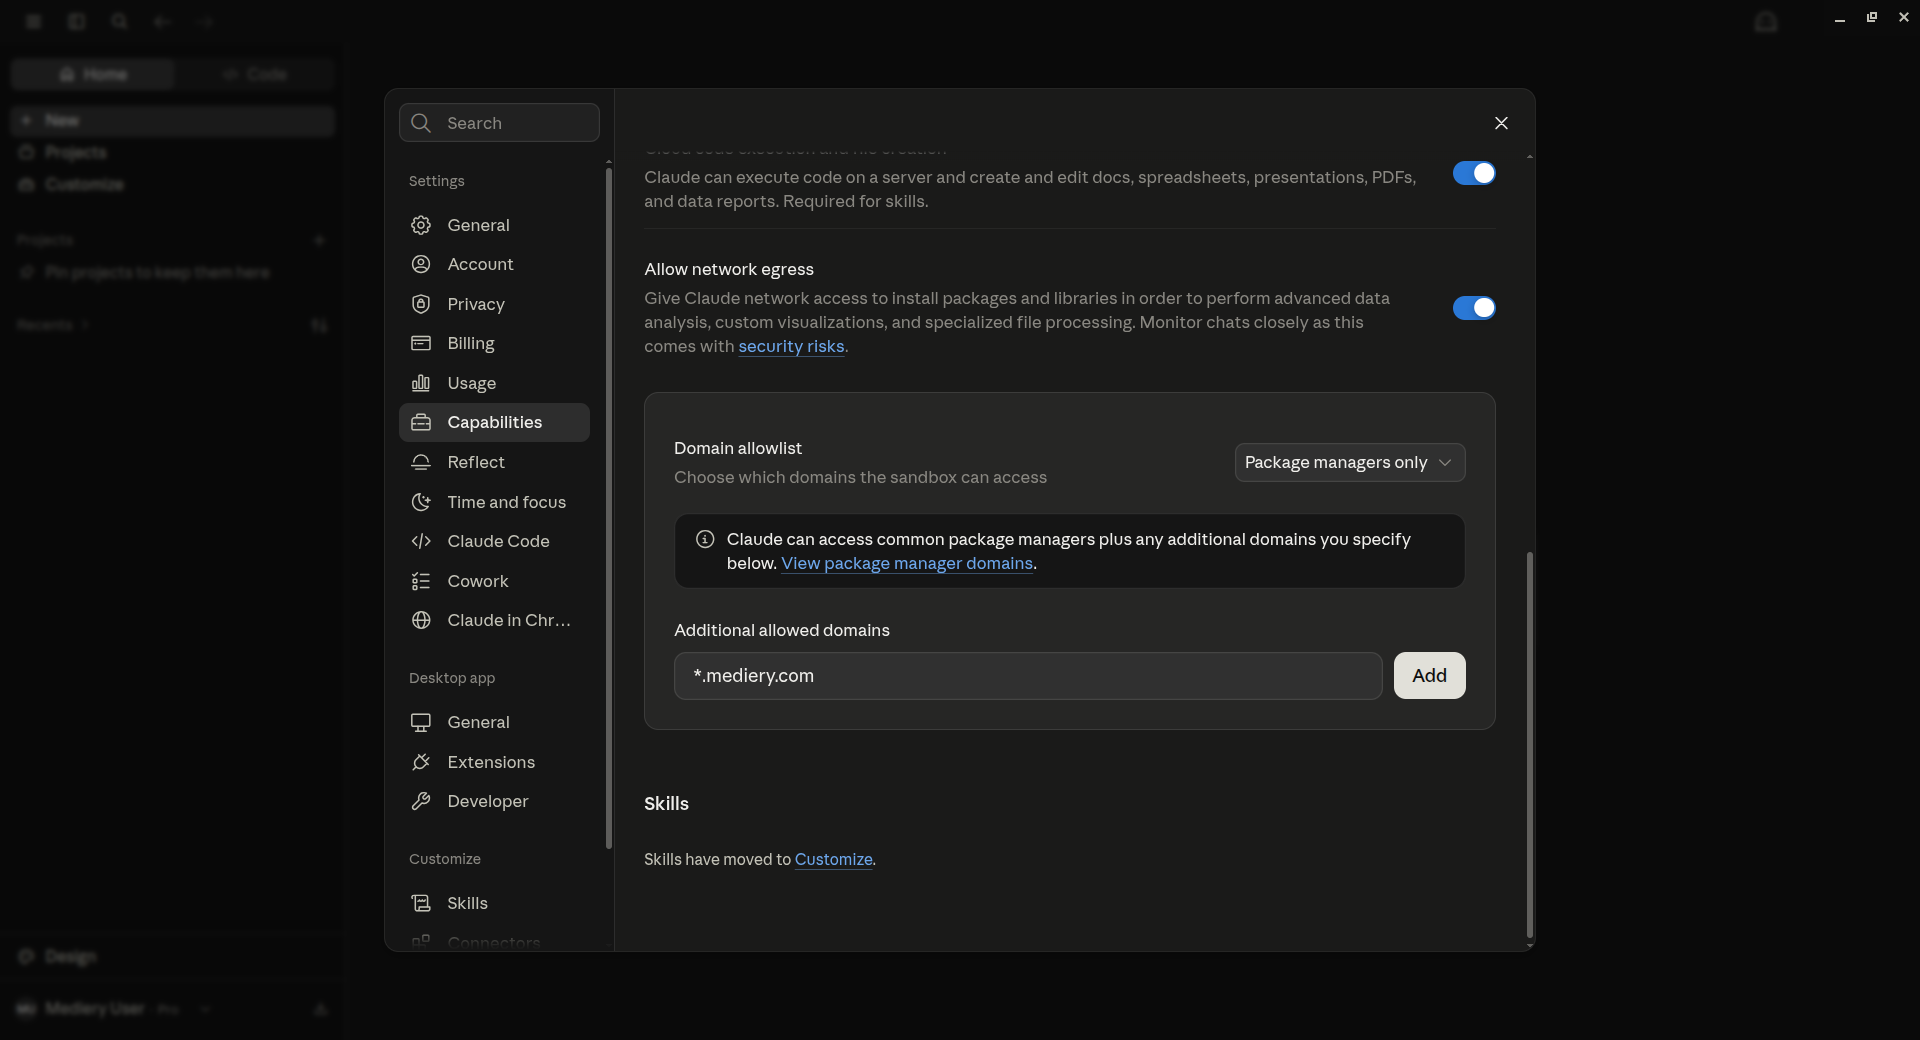
Add *.mediery.com to the allowed domains. - 15
Confirm that *.mediery.com appears in the list of additional allowed domains. Claude can now send attached images, documents, and videos to Mediery tools that support file uploads.
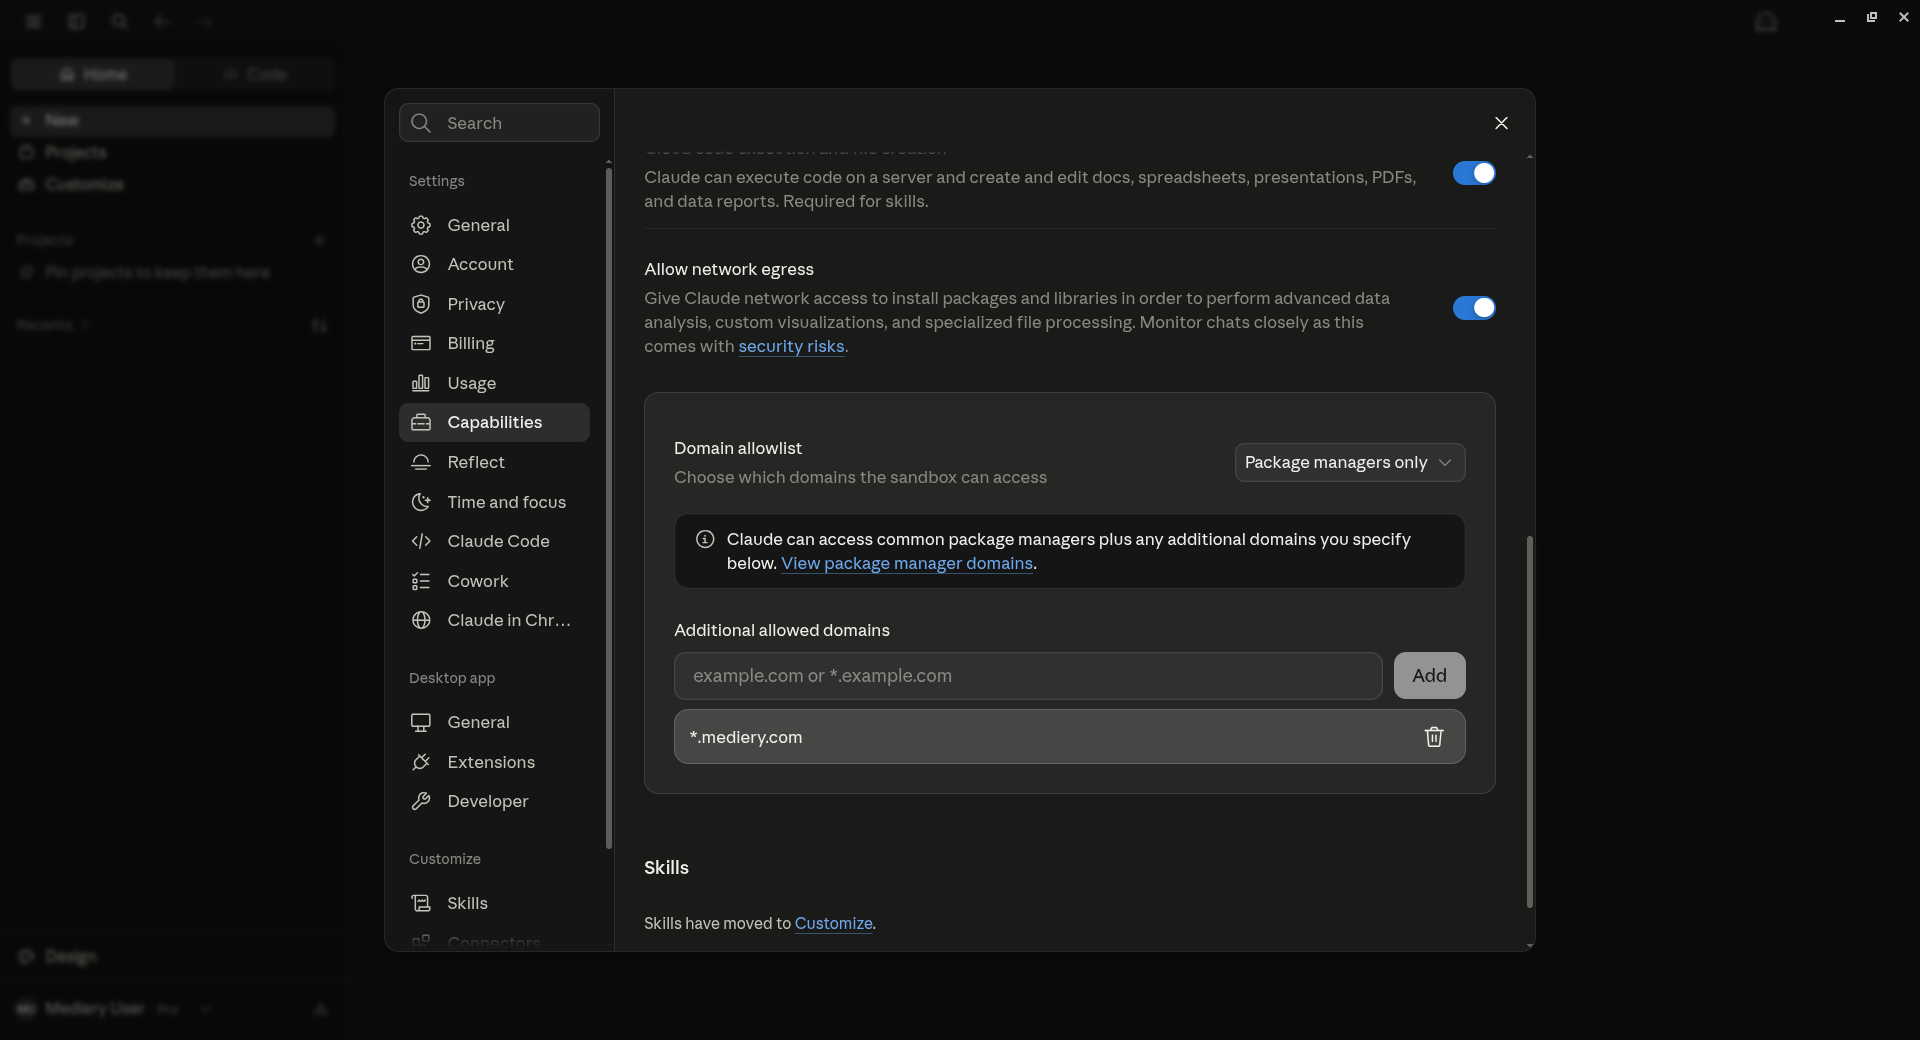
Confirm that the Mediery domain is allowed.
Set up API-key access
ChatGPT Desktop, Codex, Claude Code, Cursor, and OpenCode authenticate with a Mediery API key. Complete these steps once for each client before following its setup guide.
- 1On the MCP Access page, choose Create API key.
- 2Give the key a label that identifies the client, such as “Codex on work laptop”. Use a separate key for each client so you can revoke access independently.
- 3Choose Read only unless the client must create, update, or delete Mediery data. Grant All permissions only when that access is necessary.
- 4Create the key and copy the complete value when it appears. Mediery shows the secret only once.
- 5Keep the key available while you complete the client setup. In the examples below, replace <your_api_key> with the complete key from Mediery.
ChatGPT Desktop app
Download and install the ChatGPT Desktop app from https://chatgpt.com/download/. Then follow these steps to add Mediery as a custom MCP server:
- 1
Open ChatGPT Settings from the Edit menu. You can also press Ctrl+, on Windows or Cmd+, on macOS.
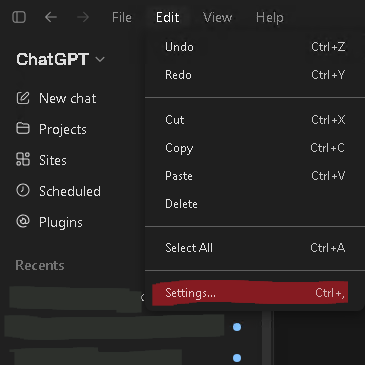
Open ChatGPT Desktop settings. - 2
Select Plugins under Integrations, then open the MCPs tab.
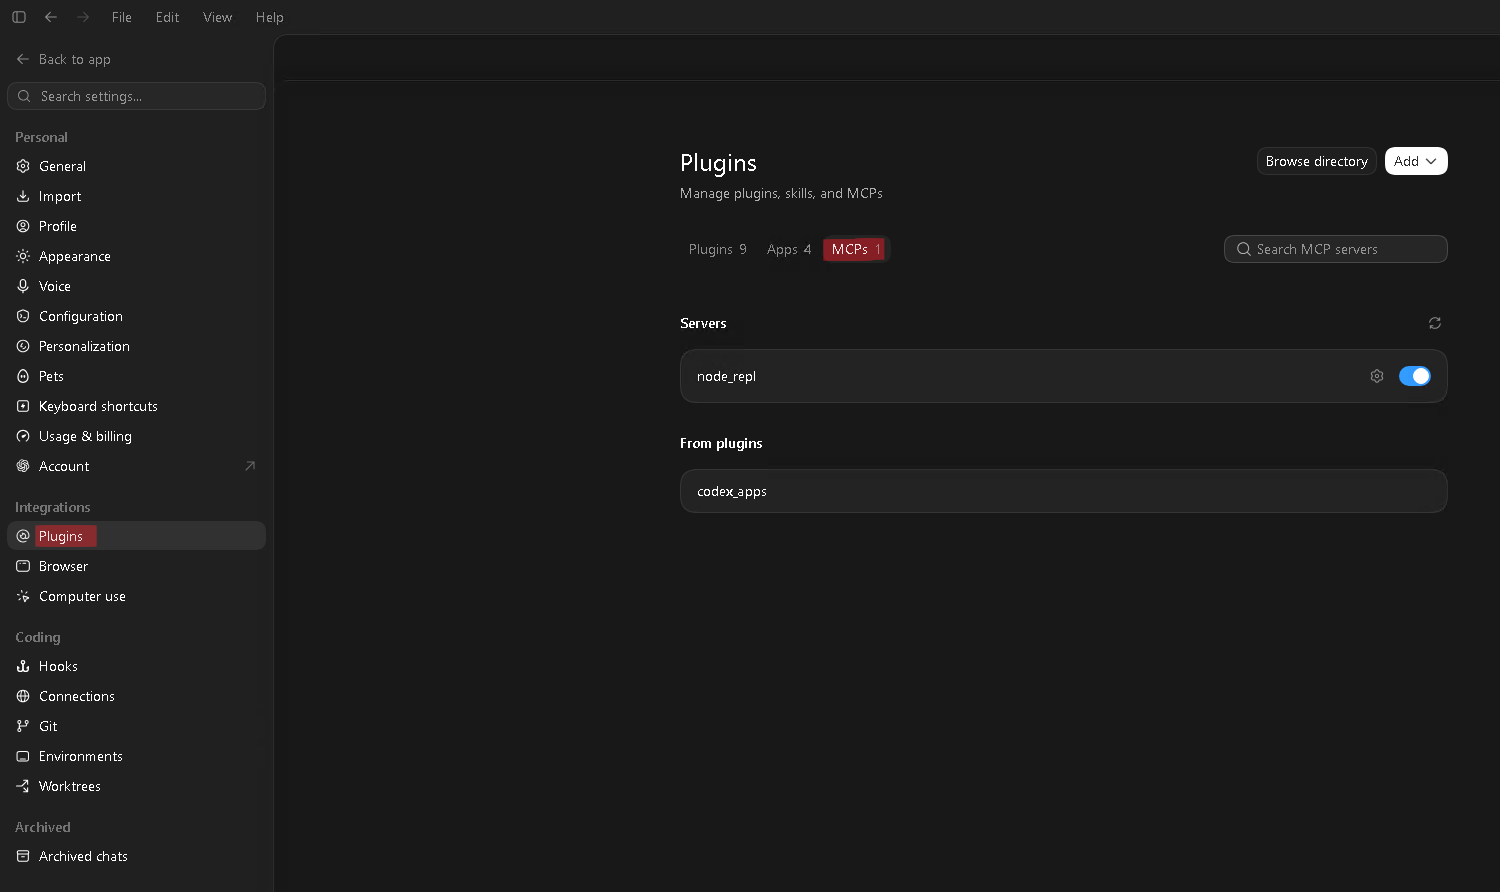
Open Plugins, then MCPs. - 3
Open the Add menu and choose Add MCP server.
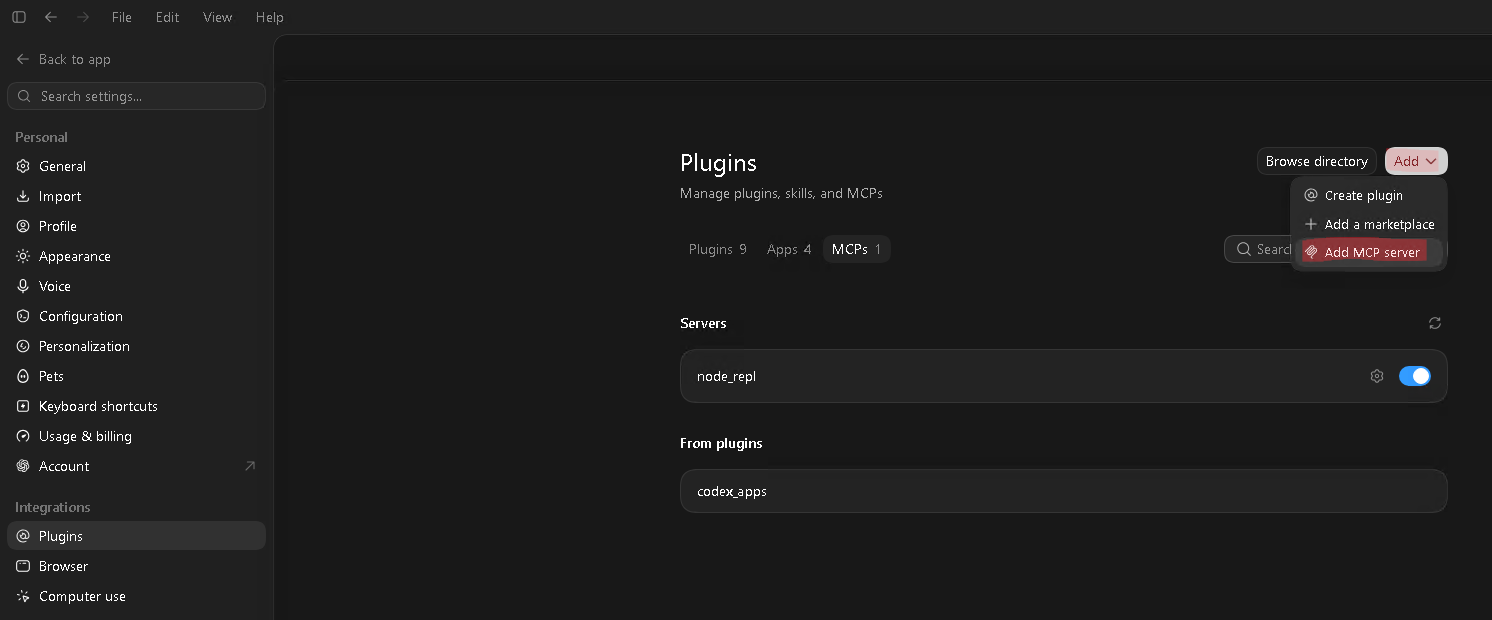
Choose Add MCP server. - 4
Enter Mediery as the name, choose Streamable HTTP, and enter https://api.mediery.com/mcp as the URL. Leave the field named Bearer token env var blank—you do not need it for this setup.
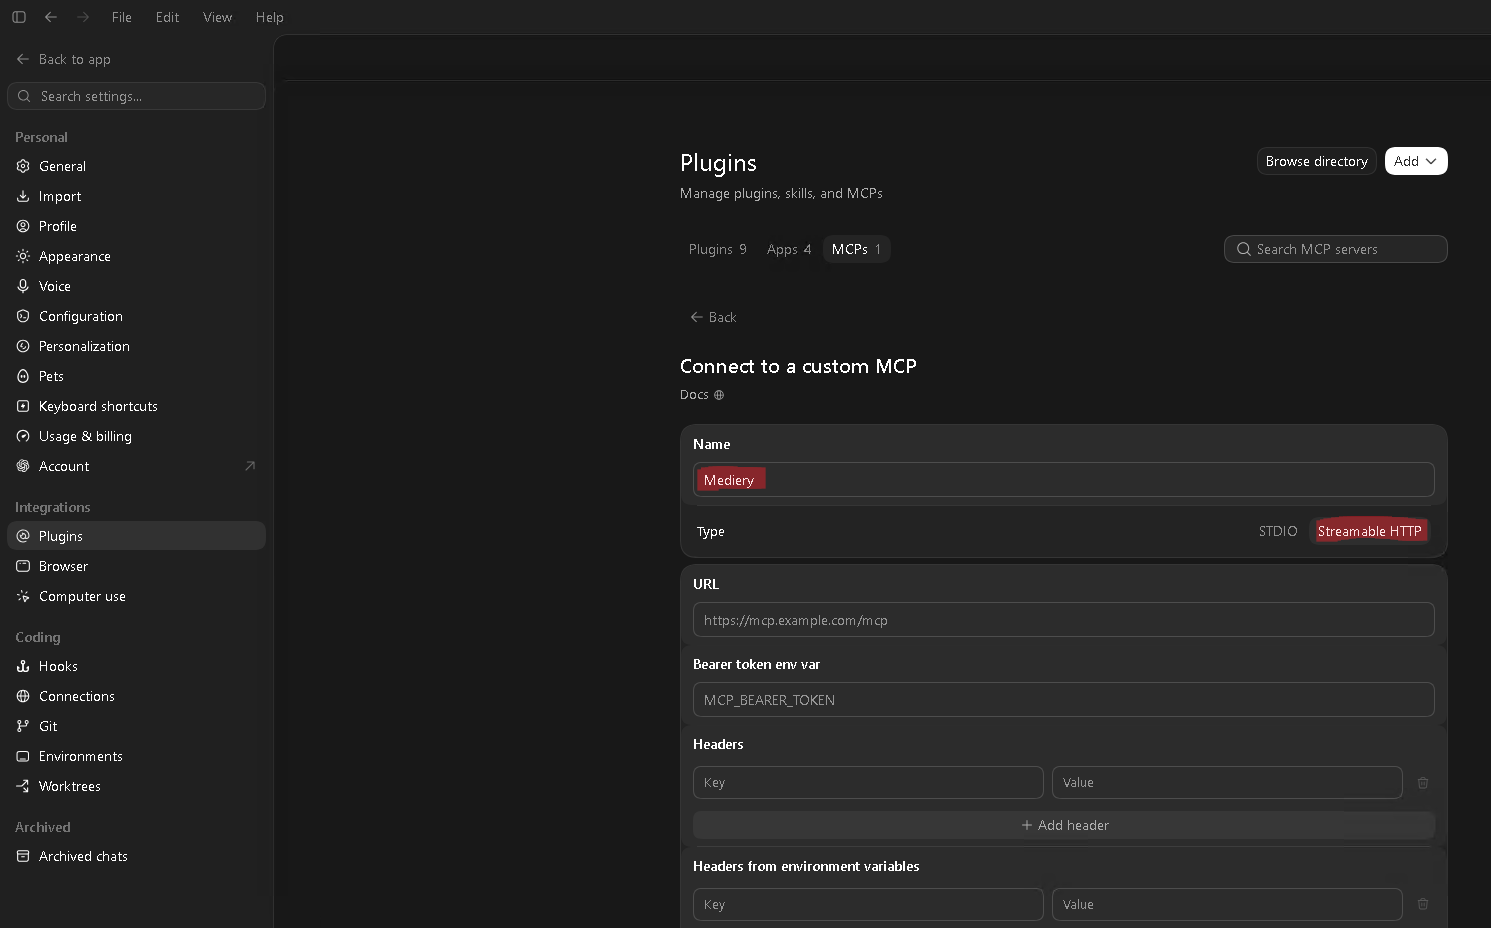
Configure Mediery as a Streamable HTTP server. - 5
Under Headers, enter Authorization as the key and Bearer <your_api_key> as the value, replacing <your_api_key> with the complete key you copied from Mediery. Choose Save.
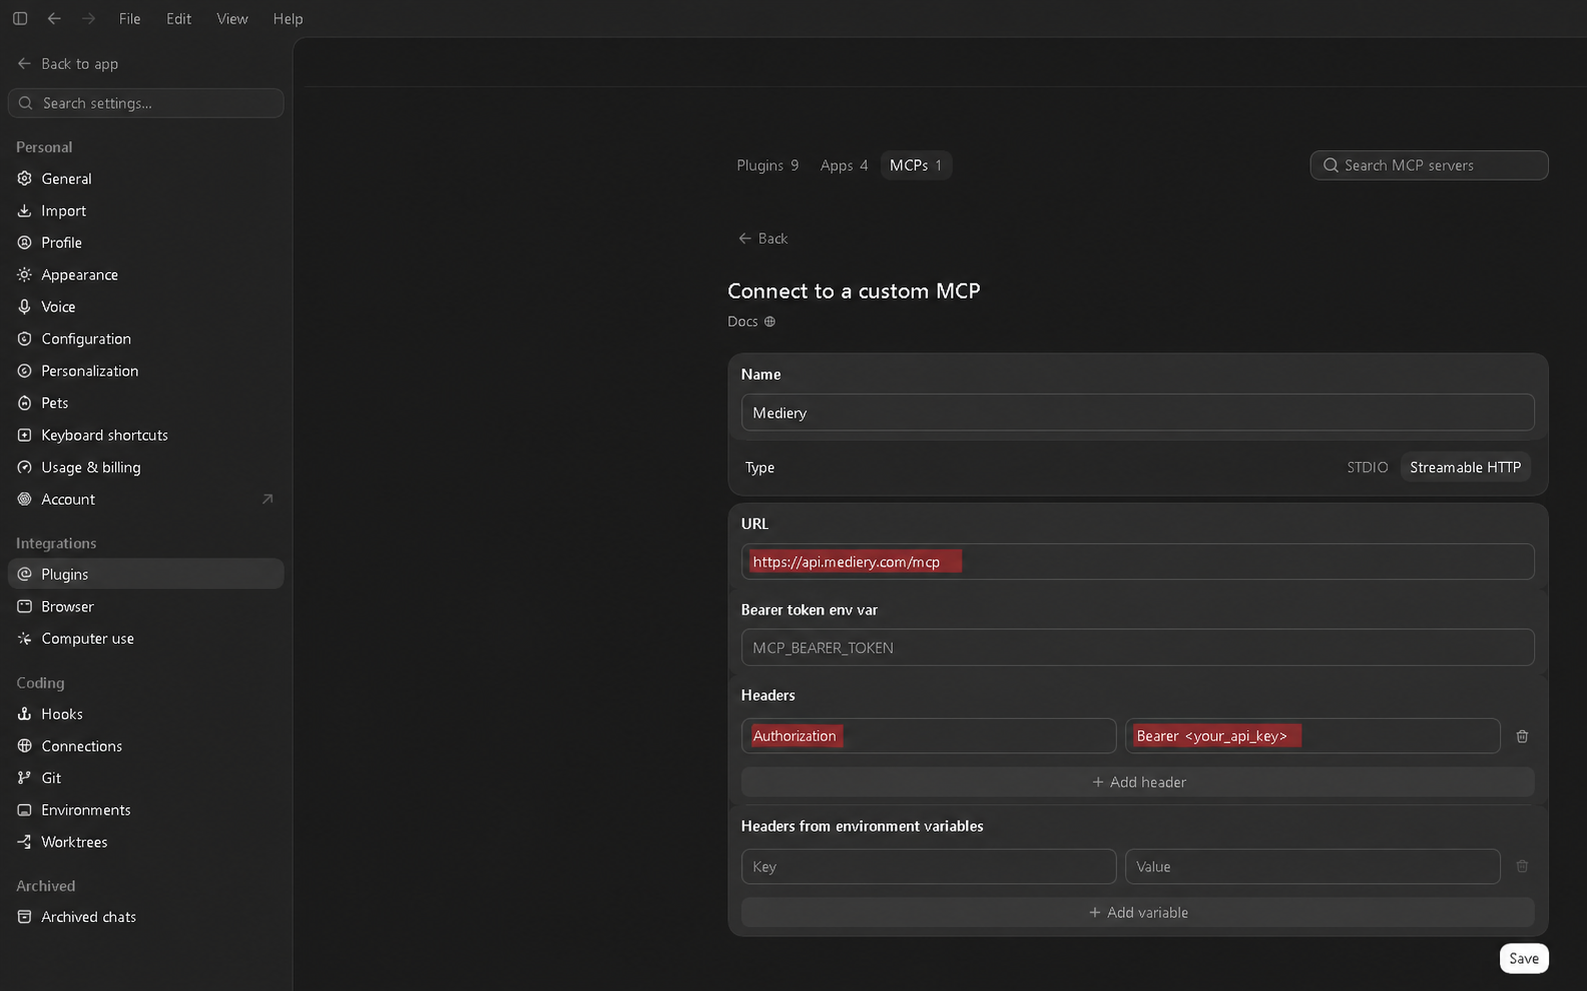
Add the API key as a Bearer Authorization header. The example credential is redacted. - 6
Confirm that mediery is enabled, then choose Restart to apply the MCP configuration.
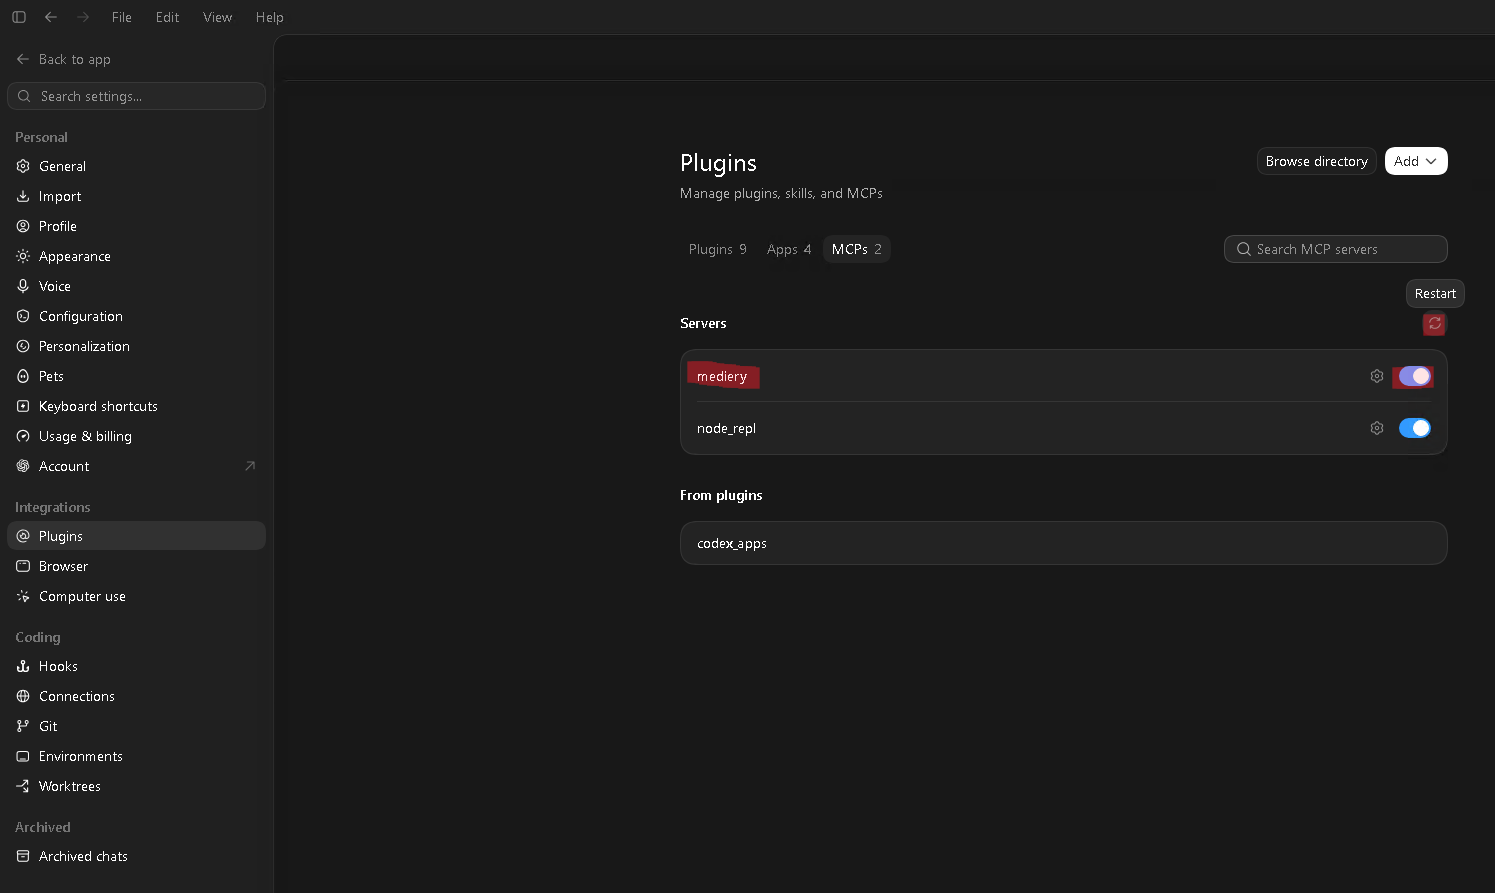
Enable Mediery and restart the MCP servers. - 7
Return to ChatGPT. You can now ask it to use Mediery tools; review each requested action before approving it.
Codex
To make Mediery available in every Codex project, open your global config file. Create the .codex directory and config.toml file if they do not exist:
- macOS: ~/.codex/config.toml
- Windows: %USERPROFILE%\.codex\config.toml
- Linux: ~/.codex/config.toml
To use Mediery in one project only, open that project’s main folder, create a directory named .codex, and create .codex/config.toml inside it. Codex reads project configuration only after you trust the project.
Add the following content to the global or project file you selected. Replace <your_api_key> with the complete key you copied from Mediery. If the file already contains settings, append this block instead of replacing the file.
[mcp_servers.mediery]
url = "https://api.mediery.com/mcp"
http_headers = { Authorization = "Bearer <your_api_key>" }
Restart Codex, then open the MCP server list or use /mcp to confirm that Mediery is connected and its tools are available.
Claude Code
To make Mediery available in every Claude Code project, open your user configuration file:
- macOS: ~/.claude.json
- Windows: %USERPROFILE%\.claude.json
- Linux: ~/.claude.json
To use Mediery in one project only, open that project’s main folder and create a file named .mcp.json there. No additional directory is required. Claude Code asks you to approve project-level MCP servers before using them.
Add the following content to the global or project file you selected. Replace <your_api_key> with the complete key you copied from Mediery. If the file already contains an mcpServers section, add the mediery entry inside it instead of replacing the file.
{
  "mcpServers": {
    "mediery": {
      "type": "http",
      "url": "https://api.mediery.com/mcp",
      "headers": {
        "Authorization": "Bearer <your_api_key>"
      }
    }
  }
}
Restart Claude Code and run /mcp. Mediery should appear as connected. Project-level configurations may require you to approve the server before it can run.
Cursor
To make Mediery available in every Cursor project, open your global MCP configuration file. Create the .cursor directory and mcp.json file if they do not exist:
- macOS: ~/.cursor/mcp.json
- Windows: %USERPROFILE%\.cursor\mcp.json
- Linux: ~/.cursor/mcp.json
To use Mediery in one project only, open that project’s main folder, create a directory named .cursor, and create .cursor/mcp.json inside it.
Add the following content to the global or project file you selected. Replace <your_api_key> with the complete key you copied from Mediery. If the file already contains an mcpServers section, add the mediery entry inside it instead of replacing the file.
{
  "mcpServers": {
    "mediery": {
      "url": "https://api.mediery.com/mcp",
      "headers": {
        "Authorization": "Bearer <your_api_key>"
      }
    }
  }
}
Restart Cursor, open MCP settings, and enable Mediery. Confirm that the server is connected and that its tools appear in the available-tools list.
OpenCode
To make Mediery available in every OpenCode project, open your global configuration file. Create the directories and file if they do not exist:
- macOS: ~/.config/opencode/opencode.json
- Windows: %USERPROFILE%\.config\opencode\opencode.json
- Linux: ~/.config/opencode/opencode.json
To use Mediery in one project only, open that project’s main folder and create a file named opencode.json there. No additional directory is required.
Add the following content to the global or project file you selected. Replace <your_api_key> with the complete key you copied from Mediery. OAuth stays disabled because Mediery uses the Authorization header. If the file already contains settings, add the mediery entry inside its mcp section instead of replacing the file.
{
  "$schema": "https://opencode.ai/config.json",
  "mcp": {
    "mediery": {
      "type": "remote",
      "url": "https://api.mediery.com/mcp",
      "enabled": true,
      "oauth": false,
      "headers": {
        "Authorization": "Bearer <your_api_key>"
      }
    }
  }
}
Restart OpenCode and inspect the MCP server list. Mediery should be enabled and report its available tools.
Test the connection
- 1Confirm that the client reports Mediery as connected and lists its tools.
- 2Start with a harmless read request, such as asking the client to list a few products or recent orders.
- 3Review the requested tool and arguments before approving it. Write operations require an API key with All permissions or an OAuth connection that was granted write access.
- 4Return to MCP Access in Mediery to confirm that Last used and monthly usage update after a successful call.
Troubleshooting
- MCP Server is disabled — open AI Add-ons, find Mediery MCP Server, and choose Enable. A locked card requires a plan upgrade.
- Unauthorized or invalid key — confirm that you replaced <your_api_key> with the complete key, the Authorization value starts with Bearer, and the key has not been revoked.
- An OAuth connection is disconnected or expired — reconnect Mediery from ChatGPT Plugins or the Claude Desktop connector, then authorize it again.
- Server does not appear — verify the JSON or TOML syntax, the MCP server URL, the configuration file location, and that the client was restarted after the change.
- A write tool is unavailable or denied — for an API-key client, create an All-permissions key only if it genuinely needs to make changes. For an OAuth client, reconnect Mediery and grant write access on the authorization page.
- A call cannot be completed — check the MCP monthly allowance and prepaid token wallet on the MCP Access page.
- The key was exposed — revoke it immediately and create a replacement. Update only the affected client.